
Table of contents: Finishing ↓ Soundproofing ↓
- Home
- BMW 7 Series
- E38
- Body
- Interior
- Removal and installation trim and soundproofing of the front door
Removal and installation trim and soundproofing of the front door (BMW 7 Series E38)
Finishing
1. Lower the door glass completely.
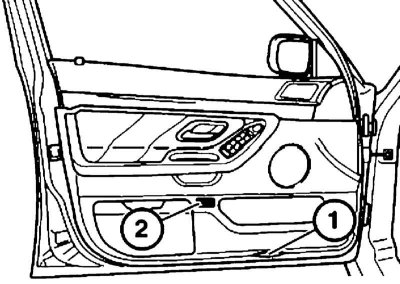
2. Remove the footwell light (1) and disconnect the connector. On models with driver's seat memory, remove the corresponding switch (2) and disconnect the connector.
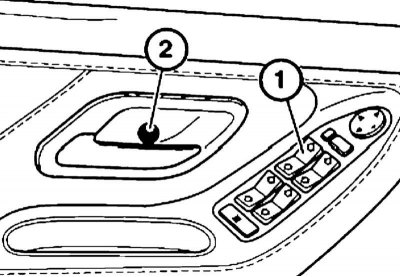
3. Remove the window switch (1). Remove the plug (2) and unscrew the screw.
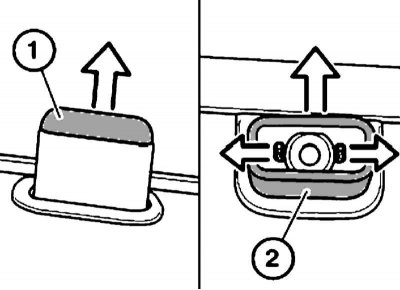
4. Remove the cap (1), pull out the retainer and remove the button (2) by moving it upwards.
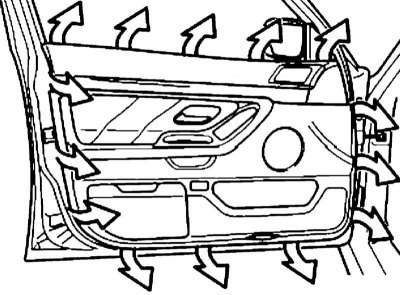
5. Release the door trim from the clips around the entire perimeter.
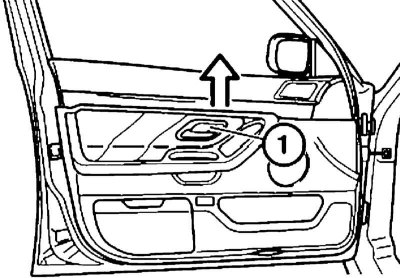
6. Pull the door trim up from the retainer in the door and push the inside door handle (1) through the trim panel.
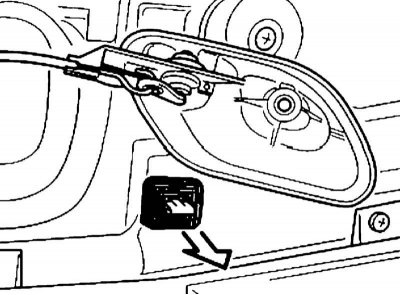
7. Remove the retainer in the door.
8. When replacing the trim panel, transfer the various trims and speaker from the old panel to the new one.
9. Installation is carried out in reverse order. Please note the following points.
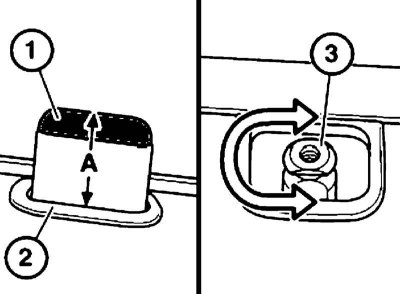
10. Check the distance (A = 14.5±1 mm) between the cap (1) and the guide (2). If necessary, remove the button and adjust the position of the sleeve (3).
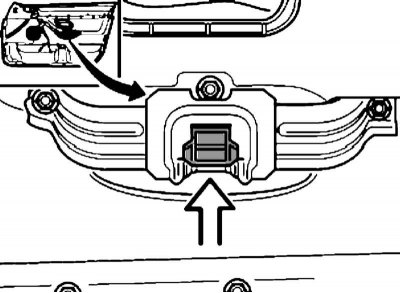
11. Install the door trim into the retainer in the door.
12. Replace damaged clips around the door perimeter.
13. Remove the inner glass seal to avoid damaging it.
Soundproofing
1. Remove the front door trim panel.
2. On models with a side airbag, remove it.
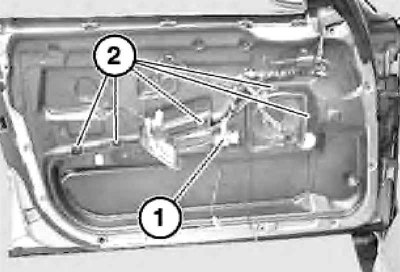
3. Disconnect the connector (1), unscrew the screws (2) and remove the speaker unit. Remove the front door lock actuator handle.
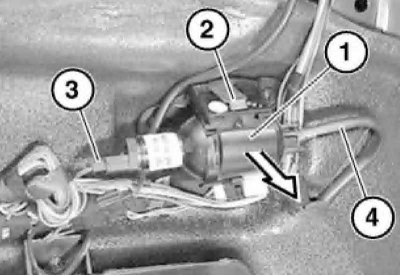
4. Disconnect the center light source (1) from the bracket (2), disconnect the connector (3) and disconnect the fiber optic (4) from the center light source.
The bending radius of the optical fiber should not be less than 20 mm.
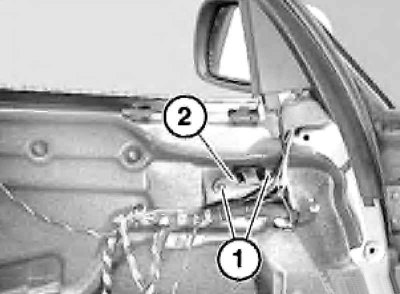
5. Remove the screws (1) and remove the central light source bracket (2).
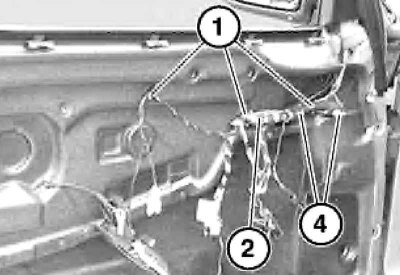
6. Loosen the clamps (1) on the wiring harness (2) and disconnect the connectors (4).
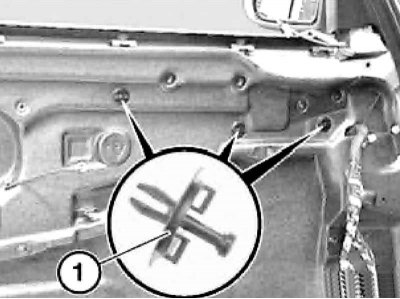
7. Remove the fasteners (1).
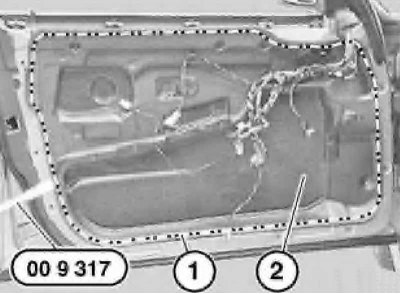
8. Completely or partially separate the sealing bead (1) and remove or bend back the sound insulation (2).
9. Clean the mating surfaces and place a 6 mm diameter butyl cord on the sound insulation and the door, heat it with a technical hair dryer, apply the sound insulation and press it firmly along the entire perimeter with a force of 30 N/cm².
10. Further installation is carried out in reverse order.
This article is available at russian, bulgarian, belarusian, ukrainian, serbian, croatian, romanian, polish, slovak, hungarian
Article verified: Polikarpov Saveliy
Share information:
Previous articles
БМВ E38: Interior
Next articles
Similar articles on other types of BMW cars:
Removal and installation door trim BMW 3 Series E30 (1982-1994)
Removal and installation the front trim BMW 3 Series E36 (1990-2000)
Removal and installation door trim BMW 5 Series E34 (1988-1996)
Removal and installation the rear door trim (Touring) BMW 5 Series E39 (1995-2003)
Removal and installation the airbag system module in the left or… BMW X3 E83 (2003-2010)
Removal and installation the front door trim BMW X5 E53 (1999-2006)
Removal and installation door trim BMW 3 Series E30 (1982-1994)
Removal and installation the front trim BMW 3 Series E36 (1990-2000)
Removal and installation door trim BMW 5 Series E34 (1988-1996)
Removal and installation the rear door trim (Touring) BMW 5 Series E39 (1995-2003)
Removal and installation the airbag system module in the left or… BMW X3 E83 (2003-2010)
Removal and installation the front door trim BMW X5 E53 (1999-2006)
Link in different formats to this page
Visitor comments
No comments yet
- General information
- Introduction to guide
- Manual
- Maintenance
- Power unit
- Engine M60/1, M60/2 (petrol)
- M62 engine (petrol)
- M57 engine (diesel)
- M67 engine (diesel)
- Cooling system
- Fuel system (petrol)
- Fuel system (diesel)
- Exhaust system
- Ignition and control systems
- Charge and launch systems
- Transmission
- Clutch
- Mechanical gearbox
- Automatic gearbox
- Cardan and drive shafts
- Chassis
- Brake system
- Front suspension
- Rear suspension
- Steering
- Body
- Exterior
- Interior
- Electrical equipment
- Equipment and devices
- Lighting
- Heating and air conditioning
- Electrical circuits
- General information
- Care and maintenance
- Power unit
- Minor engine repair
- Engine overhaul
- Lubrication system
- Cooling system
- Ignition system
- Supply system
- Injection system (petrol)
- Injection system (diesel)
- Exhaust system
- Transmission
- Clutch
- Manual gearbox
- Automatic gearbox
- Cardan gear
- Rear axle and shafts
- Chassis
- Front suspension
- Rear suspension
- Steering
- Wheels and tires
- Brake system
- Body
- Body elements
- Electrical equipment
- Equipment and devices
- Electrical circuits