
2. Replace damaged diffusers and mirrors, as well as blackened incandescent lamps.
3. Check and adjust tire pressure if necessary.
4. Create a load on the driver's seat (approx. 75 kg).
5. Fill the car's tank completely or place a load of appropriate weight in the trunk.
6. Check the correct installation of the headlights relative to the hood (gaps).
7. Turn the adjustment wheel to position 0 (manual headlight range adjustment system).
8. After turning on the headlights, wait approx. 30 s (automatic headlight leveling system).
9. After turning on the headlights, wait approx. 80 sec. During this time, the vehicle must be stationary and not subject to vibrations (version with xenon headlights).
10. Position the adjustment device along the longitudinal axis of the vehicle parallel to the plane on which the vehicle is standing. Set the mark (M) on the instrument to the dimension (e). The scale divisions on the instrument show the slope in cm at a distance of 10 m.
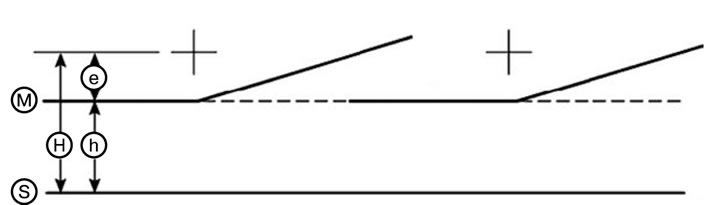
Light-shadow boundary according to the headlight adjustment device:
- E - Set value of headlight adjustment: according to the nameplate on the headlight housing in % (e.g.: 1.0% = 10 cm / 10 m = 10 on the headlight adjustment device).
- Fog light adjustment target value: All vehicles 2.0% = 20 cm / 10 m = 20 on the headlight adjuster.
- H - Height of the center of the light beam above the vehicle installation plane.
- H - e = Height of the mark above the vehicle installation plane.
- + - Center mark = center of high beam headlight.
- M - Risk of the headlight adjustment device.
- S - Installation plane of the vehicle and the headlight adjustment device.
Note: The installation dimension (e) is valid for EUR only. Please observe country-specific requirements.