
Table of contents: Removal ↓ Installation ↓
- Home
- BMW 3 Series
- E46
- Electrical equipment
- Equipment and devices
- Removal and installation the instrument panel
Removal and installation the instrument panel (BMW 3 Series E46)
If the instrument panel needs to be replaced, the fault memory should be read before disassembling. Also read and record the service interval indicator and trip meter (STO).
1. Pull the steering wheel out fully and move it downwards.
2. Disconnect the negative (-) battery cable with the ignition off. The battery is located in the luggage compartment behind the cover on the right side. In BMW 316i, 318i cars, the battery is located in the engine compartment.
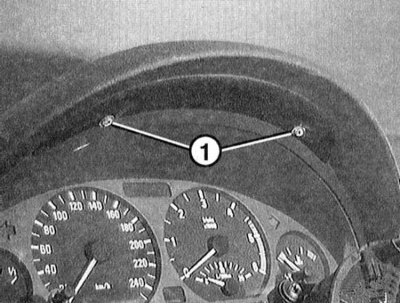
3. Remove screws "1" and move the instrument panel away.
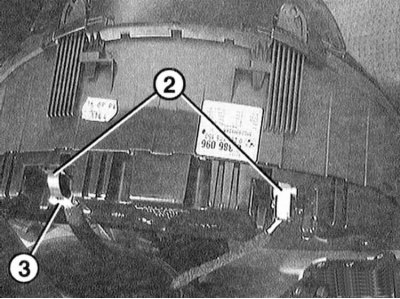
4. Release plug "2" and remove it. To do this, open clamp "3" and move it away from the cable.
5. Connect the connector and secure it with a clamp. Make sure the clamp is secured.
6. Insert the instrument panel into the opening and secure with screws.
7. Connect the negative (-) battery cable with the ignition off. Set the clock.
8. Set the steering column to its normal position.
[The article was copied from an online resource: BMWMan.ru]
Removal
It is not necessary to remove the steering wheel. In the illustrations, the steering wheel is removed for better visibility.
1. Pull the steering wheel out fully and move it downwards.
2. Disconnect the negative (-) battery cable with the ignition off. The battery is located in the luggage compartment behind the cover on the right side. In BMW 316i, 318i cars, the battery is located in the engine compartment.
Disconnecting the battery will erase the fault memory of some control units. If necessary, read the fault memory before disconnecting the battery. Refer to Section Troubleshooting. It is advisable to carry out the work in a service station.
3. Remove screws "1" and move the instrument panel away.
4. Release plug "2" and remove it. To do this, open clamp "3" and move it away from the cable.
Installation
5. Connect the connector and secure it with a clamp. Make sure the clamp is secured.
6. Insert the instrument panel into the opening and secure with screws.
7. Connect the negative (-) battery cable with the ignition off. Set the clock.
8. Set the steering column to its normal position.
[The article was copied from an online resource: BMWMan.ru]
This article is available at russian, bulgarian, belarusian, ukrainian, serbian, croatian, romanian, polish, slovak, hungarian
Article verified: Sevastyanov Nikolay
Share information:
Previous articles
БМВ E46: Equipment and devices
Next articles
Similar articles on other types of BMW cars:
Removal and installation the instrument panel BMW 5 Series E34 (1988-1996)
Removal and installation the instrument panel BMW 5 Series E39 (1995-2003)
Removal and installation instrument panel trim BMW 7 Series E38 (1994-2001)
Cylinder Head Cover — Removal and Installation BMW 7 Series E32 (1986-1994)
Removal and installation the instrument cluster BMW X3 E83 (2003-2010)
Controls and instrument panel BMW X5 E53 (1999-2006)
Link in different formats to this page
Visitor comments
No comments yet
- General information
- Manual
- Maintenance
- Power unit
- Engine repair
- Cooling system
- Power system (gasoline)
- Injection system (gasoline)
- Fuel system (diesel)
- Exhaust system
- Ignition system
- Charge and launch systems
- Transmission
- Car gearbox
- Clutch and drive shafts
- Chassis
- Brake system
- Suspension front and rear
- Steering
- Body
- Body care and repair
- Exterior
- Interior
- Electrical equipment
- Troubleshooting
- Lighting and signaling
- Equipment and devices
- Heater and air conditioner
- Electrical circuits
- General information
- Manual
- Repair on the road
- Weekly checks
- Maintenance
- Troubleshooting
- Power unit
- 4 cylinder engines
- 6 cylinder engines
- Engine overhaul
- Cooling and heating
- Fuel and exhaust system
- Starting and charging system
- Ignition system
- Transmission
- Clutch
- Mechanical gearbox
- Automatic gearbox
- Cardan and drive shafts
- Chassis
- Brake system
- Wheel suspension
- Steering
- Body
- Exterior
- Interior
- Electrical equipment
- Equipment and devices
- Electrical circuits
- General information
- Maintenance
- Power unit
- Engine repair
- Cooling system
- Ignition system
- Supply system
- Fuel injection system
- Exhaust system
- Transmission
- Clutch
- Car gearbox
- Front and rear axle
- Chassis
- Steering
- Brake system
- Body
- Exterior
- Interior
- Electrical equipment
- Heating system
- Equipment and devices
- Power devices
- Electrical circuits
- Power unit
- M10/M20 engine
- M40 engine
- Ignition system
- Lubrication system
- Cooling system
- Supply system
- Fuel injection
- Exhaust system
- Transmission
- Clutch
- Manual gearbox
- Front axle
- Rear axle
- Chassis
- Steering
- Brake system
- Body
- Exterior
- Interior
- Electrical equipment
- Heating system
- Equipment and devices
- Electrical circuits
- General information
- Specifications
- Operation and maintenance
- 4-cylinder engine
- Engine repair
- Cooling and lubrication system
- Supply system
- Ignition system
- 6-cylinder engine
- Engine repair
- Cooling and lubrication system
- Supply system
- Fuel injection system
- Ignition system
- Transmission
- Clutch
- 4-speed manual gearbox
- 5-speed manual gearbox
- Automatic gearbox
- Cardan and rear axle
- Chassis
- Steering
- Front suspension
- Rear suspension
- Brake system
- Electrical equipment
- Equipment and devices
- Electrical circuits