
Table of contents: Diagnostics of electronic systems…↓ Electronic xenon headlight system ↓ Features of the specialized…↓ Engine ↓ Engine electrical equipment ↓ Starter ↓ Power supply system ↓ Lubrication system ↓ Cooling system ↓ Heater ↓ Clutch ↓ Manual transmission (MT) ↓ Automatic transmission (AT) ↓ Bridges ↓ Brake system ↓ Suspension and steering ↓ Windscreen wiper blade defects ↓ Tyre defects ↓
- Home
- BMW 3 Series
- E46
- General information
- Manual
- Troubleshooting
Troubleshooting (BMW 3 Series E46)
This Section offers the simplest scheme for identifying the causes of malfunctions and failures occurring in vehicle units and systems. Failures and their possible causes are divided into groups according to their relationship to specific components or systems of the vehicle, such as the engine, cooling system, etc., and the text also provides references to Chapters and Sections related to these issues.
Remember that successfully completing a troubleshooting is not a black art reserved for experienced professional mechanics, but a combination of knowledge and a patient, systematic approach to investigating the problem. Always move from simple to complex, take each check to its logical conclusion, and try not to miss the obvious – anyone can forget to fill the fuel tank or leave the lights on overnight.
Finally, you should always try to get a clear picture of the progression of the fault and take appropriate steps to prevent a recurrence. If the electrical equipment failure occurred due to a poor contact quality, check the condition of all other contacts and electrical connectors in the system at the same time. If the same fuse continues to blow several times in a row, there is no point in replacing it further - you should try to find out the cause of the failure. Remember that the failure of a minor component may be a sign of a malfunction of a more important unit or the entire system.
The electronic equipment of the car includes:
1. Checking the proper functioning of the injection system components and reducing the toxicity of exhaust gases is carried out using a universal digital meter (multimeter). Using a digital meter is preferable for several reasons. Firstly, it is quite difficult to measure the value of an analog meter (sometimes it's impossible), determine the result of the reading with an accuracy of up to hundredths and thousandths, while when examining circuits that include electronic components, such accuracy takes on special significance.
The second, no less important, reason is the fact that the internal circuit of the digital multimeter has a fairly high impedance (the internal resistance of the device is 10 mOhm). Since the voltmeter is connected to the circuit being tested in parallel, the accuracy of the measurement is higher, the smaller the current that passes through the device itself. This factor is not significant when measuring relatively high voltage values (9÷12 V), but it becomes decisive when diagnosing elements that produce low-voltage signals, such as, for example, an l-probe, where we are talking about measuring fractions of a volt.
2. For diagnostics of electronic systems of the engine, automatic transmission, ABS, SRS, special diagnostic scanners (Pointer) or testers (Retriever) with a specific cartridge, universal cable and connector are used. In addition, for this purpose, you can use an expensive specialized automotive diagnostic computer, specially designed for full diagnostics of most systems of modern cars (for example, ADC2000 from Launch HiTech), or a regular computer with a set of interface devices.
3. In principle, reading the fault codes recorded in the memory of the self-diagnostic system can also be done using the "check engine" indicator on the instrument panel (refer to Chapter Engine electrical equipment).
4. The scanner only reads the fault memory and clears the fault memory. In addition, the scanner only supports the ISO protocol. The tester can additionally activate and display current data and supports the SAE and ISO protocols.
All tester cartridges can be used in the scanner as well. In this case, the functions will be limited to reading and clearing memory only.
For diagnostics, you can use, for example, devices from ToolRama, Inc. (3500 NW Boca Raton Blvd., Boca Raton, Florida, 33431, USA 1 877 866 5726 – 561 750 4511 – 561 338 8447 FAX):
For most vehicles produced since 1996 that support the SAE/ISO 9141 OBD II protocol, an OBD II cartridge can be used that performs the following functions:
In addition to "P0" fault codes, the tool also displays extended "P1" codes for Acura, Audi, BMW, Chrysler, Dodge, FORD, Geo, GM, Honda, Hyundai, Infinity, Kia, Lexus, Lincoln, Mercury, Mazda, Mercedes, Mitsubishi, Nissan, Porsche, Saturn, Seat, Skoda, Subaru, Suzuki, Toyota, Volvo, VW models.
Recently, such reading devices as hand-held scanners such as Actron Scantool or AutoXray XP240 have become absolutely indispensable in diagnosing engine management systems of modern cars.
Information on the use of these devices is contained in the attached documents. You can find more information about these devices on the websites programatools.com, lasn.com.
To carry out diagnostics, we recommend that you seek qualified assistance from service station specialists.
The OBD II diagnostic connector is located under the instrument panel.
Diagnostic connector contacts for the protocols used:
ISO 9141–2 Protocol (for Europe and Asia) identified by the presence of contact 7 and the absence of contacts 2 and/or 10 on the diagnostic connector.
SAE J1850 VPW Protocols (Variable Pulse Width Modulation) – General Motors – or SAE J1850 PWM (Pulse Width Modulation) – American Ford – identified by the absence of contact 7.
All three data exchange protocols operate via the standard OBD-II J1962 cable.
OBD II system trouble codes are listed in the Specifications to Chapter Engine electrical equipment.
The BMW 20-pin diagnostic connector is located under the hood of the engine compartment on the left.
If the engine does not start, the situation should be analyzed. For the engine to start at all, two basic conditions must be met. The fuel-air mixture must enter the cylinders, and a spark must be generated at the spark plug. Therefore, first, you should check whether fuel is being supplied. How to proceed in this case is described in Chapter Fuel, injection and exhaust systems.
To determine whether a spark is produced, remove the spark plugs, insert them into the tips and apply them individually to ground. Do not hold the tip or ignition cable with your hands, but use well-insulated pliers. Ask an assistant to start the engine. If the spark does not slip, determine the malfunction using Chapter Engine electrical equipment.
1. There is corrosion of the battery terminals or the fastening of the wire tips on them is loose. Check the condition of the terminals and tips. Tighten the terminal clamps, remove traces of corrosion if necessary.
2. The battery is discharged or defective. If the cable ends are found to be clean and securely connected to the battery terminals, turn the ignition switch to the ON position, then turn on the headlights and/or windshield wipers. If these electrical equipment do not function, the battery is discharged.
3. The transmission is not accurately set to the "P" position (AT) or to neutral gear (manual transmission), or the clutch is not fully depressed.
4. The wiring in the starting system circuit is broken or the wires are loose at the terminals. Check the condition of the wires, terminals and electrical connectors of the battery, starter solenoid relay and ignition switch.
5. The starter pinion is jammed in the flywheel ring gear. On models equipped with a manual transmission, set it to gear and, pushing the car by hand, turn the engine over. Remove the starter as soon as possible and check the condition of the pinion and flywheel ring gear.
6. The starter traction relay is faulty (Chapter Engine electrical equipment).
7. The starter is faulty (Chapter Engine electrical equipment).
8. The ignition switch is faulty.
1. The launch is not performed correctly
The order of starting a gasoline engine:
Set the parking brake, depress the clutch pedal. On automatic transmission models, press and hold the brake pedal. On automatic transmission, place the selector in the "P" or "N" position. Do not apply gas. Turn the ignition key and hold it until the engine starts. If the engine does not start within 20 seconds or stops immediately, repeat the starting process with the gas pedal half-pressed. As soon as the engine starts, release the ignition key.
In frost below -15°C and at an altitude of more than 1000 m above sea level: Start for at least 10 s with the pedal half-pressed.
Be sure to start moving immediately. If there is severe frost, let the engine run for 30 seconds.
If the engine does not start after 10 seconds, interrupt the start and try again after half a minute.
Only on a hot engine after starting, add a little gas.
2. The fuse is faulty:
For checking fuses, refer to Chapter On-board electrical equipment.
3. Empty fuel tank.
4. There is a malfunction in the fuel injection system.
5. The battery is discharged (the engine turns over too slowly). Check the functioning of electrical equipment.
6. The battery terminal connections are corroded or loose.
7. The fuel pump is faulty (Chapter Fuel, injection and exhaust systems).
8. Damaged or excessively damp ignition system components (Chapter Engine electrical equipment).
9. Worn or faulty spark plugs or incorrectly gapped spark plugs (Chapter Engine electrical equipment).
10. The wiring of the electrical circuit of the starting system is broken or disconnected, or the fastening of the wires at the terminals is loose.
11. The ignition coil circuit wiring is broken or disconnected, or the wires are loose at the coil terminals (Chapter Engine electrical equipment).
12. Compression pressure too low. Replace cylinder head gasket. Repair engine if necessary.
Diesel engine:
13. The launch was performed incorrectly
Starting procedure for a turbodiesel engine:
On a cold engine and at an outside temperature below +8°C, apply the parking brake and depress the clutch pedal. On AT, set the selector to position "P" or "N" - manual transmission. Turn the ignition key to position II and wait until the pre-glow indicator lamp goes out. Immediately after the indicator lamp goes out, start the engine without giving gas. If irregular flashes appear, do not turn off the starter until the engine runs smoothly (no more than 30 sec). If the engine does not start, try starting again after half a minute as described above.
During the engine preheating process, do not turn on power consumers (light, heated rear window).
On a cold engine and at an outside temperature above +8°C, as well as on a warm engine, preheating is not required. The engine can be started immediately. Do not give gas.
14. The fuse is faulty:
15. The engine is not warmed up: check the proper functioning of the pre-heating device.
16. There is no voltage on the electromagnetic shut-off valve. Connect a voltmeter or LED tester to the switch. Turn on the ignition. The LED should light up. Otherwise, you need to find the break in the wiring and fix it.
17. The electromagnetic shut-off valve is faulty. Check the reliability of the electromagnetic switch fastening, check the contacts. Turn the ignition on and off. A click should be heard in the switch.
18. There is damage in the fuel supply line or air in the lines:
19. Fuel injection start adjustment is out of adjustment. Check and make adjustments.
20. The injectors are faulty. Check. Unscrew the union nuts one by one – when you unscrew the nut of the faulty cylinder, the engine speed will not drop.
21. The high-pressure fuel pump (HPFP) is faulty. Install a new or known good HPFP for testing.
22. Compression pressure too low. Replace cylinder head gasket. Repair engine if necessary.
1. The starter gear is jammed. Remove the starter (Chapter Engine electrical equipment) and check its condition.
2. The teeth of the starter gear or flywheel ring gear are worn or damaged.
1. The battery is discharged or not sufficiently charged.
2. There is a malfunction of the components of the power supply system or electrical equipment (Chapters Fuel, injection and exhaust systems and Engine electrical equipment).
3. Paraffin in the fine filter of the diesel engine. Replace the filter element. Fill with winter fuel or dilute with gasoline.
4. The glow plugs of the diesel engine are faulty.
1. The air filter is blocked (Chapter Fuel, injection and exhaust systems).
2. There is a malfunction of the components of the power supply system or electrical equipment (Chapters Fuel, injection and exhaust systems and Engine electrical equipment).
3. Fuel does not reach the injectors of the injection system (Chapter Fuel, injection and exhaust systems).
4. The fuel injection advance angle of the diesel engine is out of order.
5. Low compression in the cylinders, faulty or out of adjustment fuel injection pump of the diesel engine.
1. The teeth of the starter gear or flywheel ring gear are worn or damaged.
2. The starter mounting bolts are missing or their tightening force has weakened.
1. The electrical wiring is faulty or the wires on the coil or generator terminals are loose.
2. There is a malfunction of the components of the power supply system or electrical equipment (Chapters Fuel, injection and exhaust systems and Engine electrical equipment).
3. There are vacuum losses through the gasket surfaces of the intake manifold or fuel injection unit. Make sure that the fastening bolts/nuts are tightened securely, check the fact and quality of fastening on their fittings on the intake manifold of all vacuum hoses. Check the condition of the hoses and their correct connection (specifically to your fittings).
1. There is a loss of vacuum. Make sure that the fastening bolts/nuts are tight, check the fact and quality of fastening on their fittings on the intake manifold of all vacuum hoses. Listen to the running engine with a stethoscope or a section of fuel hose. The presence of a hissing sound will allow you to identify the source of the vacuum "leak". A solution of soapy water can be used for checking no less effectively.
2. There is a malfunction of the components of the power supply system or electrical equipment (Chapters Fuel, injection and exhaust systems and Engine electrical equipment).
3. The crankcase ventilation system valve is blocked (ChapterEngine).
4. The air filter is blocked (Chapter Fuel, injection and exhaust systems).
5. The fuel pump does not supply sufficient fuel to the injection system injectors (Chapter Fuel, injection and exhaust systems).
6. There are leaks through the cylinder head gasket. Measure the compression pressure in the engine cylinders.
7. The working projections of the camshaft cams are worn out (Chapter Engine).
Diesel engine:
8. The quality of the fuel hose connections on the high-pressure fuel pump and fuel filter is damaged. Replace the fuel hoses, secure them with clamps, tighten the screws of the angular connections.
9. The fuel injection pump mount is mechanically damaged or loosened. Check the mount.
10. The connections of the return line and the fuel supply line are reversed. Put the connections back in place. The screw for connecting the return line is marked "OUT".
11. There is damage in the fuel supply line:
12. Fuel injection start adjustment is out of adjustment. Check and make adjustments.
13. The injectors are faulty. Check. Unscrew the union nuts one by one – when you unscrew the nut of the faulty cylinder, the engine speed will not drop.
14. The high-pressure fuel pump (HPFP) is faulty. Install a new or known good HPFP for testing.
1. Spark plugs are worn or dirty, or the spark plug gap is set incorrectly (Chapter Engine electrical equipment).
2. There is a malfunction of the components of the power supply system or electrical equipment (Chapters Fuel, injection and exhaust systems and Engine electrical equipment).
3. The spark plug wires are faulty (Chapter Engine electrical equipment).
4. There are losses of vacuum in the intake manifold or through hose connections.
5. Insufficient or unevenly distributed compression pressure in the cylinders. Perform a compression measurement (Chapter Engine).
1. The fuel filter is blocked or the fuel system is contaminated (Chapter Fuel, injection and exhaust systems).
2. The spark plugs are faulty or dirty, or the spark plug gap is set incorrectly (Chapter Engine electrical equipment).
3. There is a malfunction of the components of the power supply system or electrical equipment (Chapters Fuel, injection and exhaust systems and Engine electrical equipment).
4. There is a defect in the spark plug wires (Chapter Engine electrical equipment).
5. Components of exhaust gas toxicity reduction systems are faulty.
6. Insufficient or uneven distribution of compression pressure between cylinders. Remove the spark plugs and measure the compression pressure (Chapter Engine).
7. The ignition system is faulty (Chapter Engine electrical equipment).
8. There are vacuum losses at the throttle body, intake manifold or through vacuum hoses.
1. Idle speed adjustment is incorrect.
2. The fuel filter is blocked and/or moisture or dirt has entered the fuel system (Chapter Fuel, injection and exhaust systems).
3. There is a failure of the power supply system components or sensors (Chapter Fuel, injection and exhaust systems).
4. Components of exhaust gas toxicity reduction systems are faulty.
5. The spark plugs are faulty or dirty, or the spark plug gap is set incorrectly (Chapter Routine care and maintenance). Also check the condition of the spark plug wires (Chapter Engine electrical equipment).
6. There are losses of vacuum at the throttle body or through the vacuum hoses.
1. There is a malfunction of the components of the power supply system or electrical equipment (Chapters Fuel, injection and exhaust systems and Engine electrical equipment).
2. The air cleaner is clogged. Clean or replace.
3. The spark plugs are faulty or the spark plug gap is set incorrectly (Chapter Routine care and maintenance).
4. The ignition coil is faulty (Chapter Engine electrical equipment).
5. The AT fluid level does not meet the requirements (Chapter Automatic transmission).
6. Clutch slips (Chapter Clutch and drive shafts).
7. The fuel filter is blocked and/or dirt/moisture has entered the fuel system (Chapter Fuel, injection and exhaust systems).
8. The wrong type of fuel has been added. Fill the tank with fuel with the required octane rating.
9. Insufficient or uneven compression pressure across the cylinders. Perform a compression test, the results of which can reveal the presence of valve leaks and/or a leaky cylinder head gasket (Chapter Engine).
Additional for diesel engine
10. The air cleaner is clogged. Clean or replace it
11. Uneven fuel supply from the high-pressure fuel pump to the cylinders. Adjust on a warm engine.
12. The fuel injection pump start time is set incorrectly. Set it.
13. The fuel filter or high-pressure fuel pump (injector) is clogged. Wash the pre-filter, change the fine filter element, clean the spray nozzle or replace the pump (injector).
14. The maximum crankshaft speed adjustment is not correct.
1. There is a malfunction of the components of the power supply system or electrical equipment (Chapters Fuel, injection and exhaust systems and Engine electrical equipment).
2. There is a defect in the secondary circuit of the ignition system (destruction of spark plug insulators or defects in spark plug wires) (Chapter Engine electrical equipment).
3. The fuel injection system needs adjustment or its components are excessively worn (Chapter Fuel, injection and exhaust systems).
4. There are vacuum losses at the throttle body, intake manifold or through vacuum hoses.
5. Valves are stuck (Chapter Engine).
6. The order of connecting the spark plug wires is violated (Chapter Engine electrical equipment).
1. The wrong type of fuel has been added. Fill the tank with fuel with the required octane rating.
2. There is a malfunction of the components of the power supply system or electrical equipment (Chapters Fuel, injection and exhaust systems and Engine electrical equipment).
3. The wrong type of spark plugs are installed. Check the spark plugs and coils for damage (Chapter Engine electrical equipment).
4. There are losses of vacuum.
1. Excessively high idle speed (Chapter Engine).
2. There is a malfunction of the components of the power supply system or electrical equipment (Chapters Engine electrical equipment).
3. Excessive engine operating temperature. Possible causes of this malfunction may be a decrease in the coolant level (Chapter Cooling and heating systems), thermostat failure, radiator blockage, or water pump failure (Chapter Cooling and heating systems).
1. Black smoke:
2. Blue smoke:
3. White or brown smoke:
1. The alternator drive belt is worn or damaged, or its tension adjustment is incorrect (Chapter Engine electrical equipment).
2. The electrolyte level is insufficient or the battery is very discharged (Chapter Engine electrical equipment).
3. There is corrosion of the battery terminals or the fastening of the wire tips on them has become loose (Chapter Engine electrical equipment).
4. The generator does not provide the required charging current (Chapter Engine electrical equipment).
5. The charging circuit wiring is broken or otherwise damaged, or the wires are loose at the terminals (Chapter Engine electrical equipment).
6. A short circuit in the wiring creates a constant leakage of current generated by the battery to ground (refer to Chapter Engine electrical equipment and electrical equipment diagrams).
7. There is an internal defect in the battery.
1. The drive belt is loose. Check the V-belt tensioner.
2. Damage to the overrunning clutch (turbodiesel only). Remove the generator and turn the generator drive shaft to the left. If the working surface of the pulley does not rotate, then the damage is usually in the overrunning clutch.
3. Voltage regulator/generator damaged. Disconnect the (D+) wire from the back of the generator and turn on the ignition. If the test lamp does not light now, the fault is usually in the voltage regulator or generator.
4. Brush wear. Visually inspect the brushes and replace if necessary.
5. Damage to the regulator. Check and replace if necessary.
6. Generator damage. Check and replace if necessary.
7. Damage to the wire between the generator and the voltage regulator. Disconnect the blue wire at contact 12 of the T32a plug connection and at the instrument panel unit. If the indicator lamp does not light now, the D+ wire is connected to ground. Replace the harness.
8. Damage to the instrument panel unit. If, after disconnecting the blue wire from the T32a plug connection with the ignition on, the indicator lamp lights up, the fault is usually in the instrument panel unit.
1. The control lamp on the instrument panel has burned out or otherwise failed (Chapter On-board electrical equipment).
2. The generator is faulty (Chapter Engine electrical equipment).
3. There is a defect in the printed circuit board, wiring inside the instrument panel unit, or lamp socket (Chapter On-board electrical equipment).
1. Positive diodes are short-circuited. Check the diodes, replace the diode board
If the starter does not turn, first check that the required voltage of at least 10 V is present at terminal 50 of the traction relay. If the voltage is lower than this value, check the wires included in the starter current circuit according to the diagram.
You can check whether the starter operates at full battery voltage as follows:
If the starter works perfectly, the cause of the malfunction should be sought in the wires to the starter. If the starter does not work, it should be checked in the removed state.
Verification condition: At the connection points, the wires must be well secured and must not be oxidized.
1. The battery is discharged. Charge the battery.
2. Jumper terminals 30 and 50 of the starter: The starter rotates. Wire 50 to the ignition switch is broken, the starter switch is faulty. Fix the break, replace the defective parts.
3. Broken ground cable or connector, battery is discharged. Check battery cables and connectors, measure battery voltage, charge if necessary.
4. Insufficient current flow due to loose or oxidized connectors. Clean the battery terminals and poles, check the connections between the battery, starter and ground.
5. No voltage at terminal 50 of the traction relay. Wire break, starter switch faulty.
1. Low battery. Charge the battery.
2. Summer oil is filled. Fill with all-season oil.
3. Insufficient current flow due to loose or oxidized connectors. Clean the battery terminals and poles, check the connections between the battery, starter and ground.
4. Carbon brushes do not fit the commutator, are stuck in the guides, are worn, broken, oily or dirty. Check the brushes, clean or replace. Check the guides.
5. Insufficient distance between brushes and commutator. Replace brushes and clean brush guides.
6. The collector is grooved or burnt and oily. Treat the collector or replace the anchor.
7. No voltage at terminal 50 (min. 8 V). Check the starter switch or solenoid relay.
8. The bearing is broken. Check the bearing, replace if necessary.
9. The traction relay is faulty. Replace the traction relay.
1. The pinion drive is faulty. Replace the pinion drive.
2. The gear is dirty. Clean the gear.
3. The flywheel ring gear is faulty. Treat the ring gear, replace the flywheel if necessary.
1. The pinion drive or threads are dirty or damaged. Clean or replace the pinion drive.
2. The traction relay is faulty. Replace the traction relay.
3. The return spring is weak or broken. Replace the return spring.
1. The traction relay is stuck and does not turn off. Immediately turn off the ignition, replace the traction relay.
2. The ignition switch does not turn off. Disconnect the battery immediately and replace the ignition switch.
1. The air filter element is dirty or blocked (Chapter Fuel, injection and exhaust systems).
2. There is a malfunction of the components of the power supply system or electrical equipment (Chapters Fuel, injection and exhaust systems and Engine electrical equipment).
3. Insufficient tire pressure or incorrect size tires installed.
Diesel engine
4. Clogged return line. Blow air through the return line from the high-pressure fuel pump to the fuel tank.
5. Idle speed and maximum speed are too high. Adjust.
6. The engine has mechanical damage. Check the compression, repair the engine if necessary
1. There are leaks in the fuel supply lines or vent lines (Chapter Fuel, injection and exhaust systems).
2. The fuel tank is full. Refuel only until the gun switches off automatically.
3. There are leaks or evaporations from the fuel and exhaust gas toxicity reduction system lines (Chapter Fuel, injection and exhaust systems).
1. When the starter is turned on, the electric fuel pump does not work (no noise from work can be heard). Lightly tap the pump body to release the jammed part. Check if voltage is applied to the pump. Check the fuse for proper operation. Check the electrical contacts for good conductivity.
2. The fuel pump relay is faulty. Check the relay.
3. The injector valves are stuck. Check the injectors, replace if necessary. Check the voltage supply to the injectors. To do this, disconnect the injector connector. Connect the diode test lamp to the wire and turn on the starter. The test lamp should blink.
4. No signal from ignition timing sensors or engine speed sensor. Check electrical wires. Perform fault memory query.
5. The instrument panel does not indicate the AT selector position, the charge indicator blinks or lights up constantly. Error code 11 (the oil level switch sensor is damaged or the 30 x 7.5A fuse is broken) is recorded in the instrument panel memory unit. Replace the fuse or oil level sensor (12 611 433 596).
6. Fuel lines are damaged, clogged or leaky, there are defects in the hoses.
7. The fuel filter is clogged.
8. Presence of ice or wax in the filter or lines of the diesel engine.
9. The fuel tank ventilation is clogged, the filter in the tank is clogged.
10. The diesel engine injectors are damaged. Loosen the union nuts one by one and check whether the corresponding cylinder works.
1. CO content does not meet requirements. Check CO content and idle speed.
2. Temperature sensor is faulty. Check the coolant/intake air temperature sensor.
3. The fuel pressure does not meet the required value. Check the fuel pressure.
The air intake system is leaky. Check the intake system. To do this, leave the engine idling and cover the seals and connections on the intake tract with gasoline. If the RPM increases briefly, eliminate the leaky areas.
1. Electrical connections to the fuel pump are intermittently interrupted. Check the condition of the plug connections and connectors of the electrical wires of the fuel pump, air flow meter and fuel pump relay. Check the fuse and contact locations on the fuel pump relay. Clean the contacts, replace if necessary.
2. Low quality fuel, formation of vapor locks. Fill with quality fuel.
3. Fuel supply volume is too low. Check the pump performance.
4. The fuel filter is faulty. Replace the fuel filter.
5. The fuel pump is faulty. Check the fuel pump.
6. The injectors are faulty. Check the injectors.
7. The throttle position sensor is faulty. Check the throttle position sensor.
8. Weak connection of fuel hoses to the high-pressure fuel pump and fuel filter of the diesel engine.
1. The air intake system is leaky. Check the connections of the intake system. Start the engine and lubricate the contact points and connections in the intake tract with gasoline. If the engine speed increases briefly, eliminate the leak.
2. Incorrect idle speed adjustment. Check the idle speed control valve, throttle position sensor, lambda adjustment.
3. The full load sensor is faulty or incorrectly adjusted. Check the throttle sensor.
1. Incorrect adjustment of CO content. Check CO content and idle speed.
2. Too high pressure in the fuel system. Check the fuel pressure, replace the pressure regulator if necessary.
3. The return line between the pressure regulator and the fuel tank is clogged or bent. Clean or replace the line.
4. The engine temperature sensor is faulty. Check the temperature sensor.
5. The fuel system is leaking. Visually inspect all connections in the engine and electric fuel pump area. Tighten all connections.
6. The air intake system is leaky. Check all connections of the intake system.
1. Injectors are leaky. Check injectors.
2. The fuel shut-off valve on the diesel engine does not work.
1. The oil pressure sensor is faulty. Turn on the ignition, disconnect the wire from the oil pressure sensor and short it to ground. If the lamp lights up, replace the sensor.
2. There is no voltage supplied to the sensor, the contacts are corroded. Check the electrical wires and contacts.
3. The indicator lamp is faulty. Replace the indicator lamp.
4. The control device is faulty. Replace the control device.
The oil is overheated. If the indicator lamp goes out after gas is supplied, nothing needs to be done.
1. Oil pressure is too low. Check the oil level, top up if necessary. Check the oil pressure.
2. The wire to the oil pressure sensor has a short circuit to ground. Disconnect the cable from the sensor and move it to the side (without shorting to ground), turn on the ignition. If the lamp lights up, check the wire.
3. The oil pressure sensor is faulty. Replace the sensor.
1. There is too little oil in the engine. Add oil.
2. The mesh filter is clogged. Remove the oil pan, clean the mesh filter.
3. The oil pump is worn out. Remove the oil pump and check it, replace it if necessary.
4. Bearing damage. Remove the engine.
The pressure reducing valve is stuck open due to contamination. Remove and check the valve.
The pressure reducing valve does not open due to contamination. Remove and check the valve.
1. Not enough coolant in the system (Chapter Cooling and heating systems).
2. The water pump drive belt is worn or damaged, or its tension adjustment is incorrect.
3. The internal channels of the radiator are blocked or the radiator grille is dirty (blocked) (Chapter Cooling and heating systems).
4. The thermostat is faulty (Chapter Cooling and heating systems).
5. Broken or cracked fan blades (Chapter Cooling and heating systems).
6. The fan viscous clutch is faulty (models 320i, 323i, 328i with air conditioning). Check the fan clutch: Increase the engine speed when it is warm. As soon as the fluid temperature reaches 90 – 95°C, the fan speed will increase, which will be noticeable by ear.
7. The coolant temperature gauge is faulty. Check the sensor.
8. The coolant pump is faulty. Remove and check the pump.
9. The radiator cap does not hold pressure. Perform a pressure test of the cap (contact a service station).
1. The thermostat is faulty (Chapter Cooling and heating systems).
2. Temperature meter readings are inaccurate.
1. The hoses are damaged or destroyed as a result of aging of the material or their fastening on the fittings has become loose. Replace the hoses and/or tighten the clamps of their fastening (Chapter Cooling and heating systems).
2. The water pump seals are damaged. In this case, the coolant will leak through the inspection hole in the pump body (Chapter Cooling and heating systems).
3. There are leaks from the internal channels of the radiator or side tank. Professional repair of the radiator is required (description of the removal procedure is given in Chapter Cooling and heating systems).
4. There are leaks through the engine drain plug (Chapter Engine) or squeeze plugs of water galleries (Chapter Cooling and heating systems).
1. There are leaks through the cylinder head gasket. Perform a pressure test of the cooling system.
2. There are cracks in the cylinder walls or in the head casting. To check, disassemble the engine (Chapter Engine).
1. Too much coolant has been added to the system (Chapter Cooling and heating systems).
2. The coolant boils away as a result of engine overheating.
3. There are internal or external coolant leaks.
4. The radiator cap is faulty. Check the cap with pressure.
1. The water pump is not functioning properly. The easiest way to check that the pump is functioning is to pinch the upper radiator hose while the engine is idling. If you feel a jolt of fluid inside the hose when you release it, the pump is functioning properly (Chapter Cooling and heating systems).
2. The cooling system is clogged. Drain the coolant, flush the system and fill it with fresh mixture (Chapter Cooling and heating systems). If such a need arises, remove the radiator (Chapter Cooling and heating systems) and perform a reverse flow flush.
3. The water pump drive belt is worn or damaged, or its tension adjustment is incorrect.
4. Thermostat is stuck (Chapter Cooling and heating systems).
1. The fan motor fuse is faulty. Check the fan fuse and replace if necessary.
2. The fan switch is faulty. Check if voltage is applied to the pre-resistors, remove and check the fan switch.
3. The electric motor is faulty. Check if voltage is applied to the fan motor contacts with the ignition on and the fan switch closed. If voltage is applied, replace the motor.
Pre-resistor is faulty. Replace the connection board.
1. The switch is faulty. Check the switch.
2. The control mixing flap cables are damaged or do not move well. Replace the cables.
1. Coolant level is too low. Check coolant level, top up if necessary.
2. The heater control unit has a heavy stroke, is faulty. Check the heater control unit, replace the cable if necessary.
1. Dirt, leaves got in. Remove the fan and clean it, clean the air duct.
2. Impeller imbalance, bearing failure. Remove the fan motor, check for ease of movement.
The clutch does not disengage (the manual transmission control lever does not move freely into reverse gear and back when the clutch pedal is pressed to the floor)
The clutch disc is bent or damaged (Chapter Clutch and drive shafts).
1. The clutch disc is contaminated with oil or its friction linings are worn out. Remove the clutch (Chapter Clutch and drive shafts) and check the condition of its components.
2. The clutch disc has not been properly run in. It may take 30 to 40 normal car starts to completely run in a new disc.
3. The pressure plate/clutch basket is worn out (Chapter Clutch and drive shafts).
1. The clutch disc is oily. Remove the clutch (Chapter Clutch and drive shafts) and check the condition of its components. Eliminate any leaks found.
2. The splines of the driven disk hub are worn out (clutch disc). Remove the clutch (Chapter Clutch and drive shafts) and check the condition of its components.
3. The pressure plate/clutch basket or flywheel is bent. Remove the clutch (Chapter Clutch and drive shafts) and check the condition of its components and flywheel.
1. Damage to engine and gearbox mounts. Check and replace if necessary.
2. Loose gearbox mounting in suspension. Tighten mounting bolts.
3. Uneven contact of the pressure plate. Replace the clutch basket.
4. The crankshaft is not aligned with the gearbox. Check the alignment.
The clutch release bearing is seized. Remove the clutch (Chapter Clutch and drive shafts) and check the bearing condition. Remove all burrs and burrs, and lubricate the bearing before reinstalling.
1. The release bearing is worn or damaged (Chapter Clutch and drive shafts).
2. The springs are worn or damaged (or aperture blades) pressure plate in the clutch basket (Chapter Clutch and drive shafts).
The piston of the clutch master or slave cylinder is jammed. Damage to the clutch hydraulic system or release bearing. Check the condition, remove the clutch components if necessary.
1. The input shaft bearing is worn out.
2. The bearing of the driven shaft drive gear is damaged.
3. The intermediate shaft bearings are worn out.
4. The intermediate shaft axial play adjustment washers are worn or damaged.
1. Any of the above reasons and/or:
2. There is not enough transmission oil in the manual transmission (his level dropped).
1. The gear teeth of this transmission are worn, damaged or chipped.
2. The synchronizer of this gear is worn out or damaged.
Dirt has gotten between the gearbox housing and the engine, or the gearbox has shifted relative to the engine.
1. The clutch is not fully depressed (disengaged).
2. The shift rod is damaged, loosened or out of adjustment. Carefully check the condition of the components and replace any defective ones if necessary.
1. There is too much transmission oil in the gearbox. Drain the excess if necessary.
2. The differential seals need to be replaced.
The following can be attributed to failures associated with a malfunction of the shift rod adjustment:
Adjust the gear shift rod.
1. There are many possible causes for the problems listed in the title, but only one of them falls within the competence of the amateur mechanic - incorrect transmission fluid level.
2. Before driving the car to the auto service workshop, check the level and condition of the transmission fluid. Adjust the level in accordance with the requirements of the Specifications or change the fluid together with the filter. If the situation is not corrected, seek help from specialists.
1. AT fluid is dark red. Its leaks should not be confused with engine oil, which can be carried to the transmission housing by the oncoming air flow.
2. To identify and locate the source of the leak, first remove all traces of dirt and grease from the transmission housing. Use a suitable degreaser and/or steam clean. Then drive the vehicle for a short time at low speed (so that traces of a leak are not carried away by the oncoming flow far from its source). Stop, jack up the car and visually inspect to determine the source of the leak. Most often, these are:
1. Normal road noise. Cannot be adjusted.
2. Tire noise. Check the condition of the treads and the inflation pressure of the tires.
3. Wheel bearings are worn or damaged, or their tightening force has weakened.
Check the condition of the wheel bearings by jacking up the appropriate corner of the car one by one and rotating the wheel manually. Listen to the sounds coming from the bearing. Remove the bearings and check their condition.
The drive shaft seals are damaged (Chapter Clutch and drive shafts).
The brake circuit is out of order. Check if brake fluid is leaking.
1. Air in the brake system. Remove air from the system.
2. Not enough fluid in the reservoir. Add new brake fluid, remove air from the system.
3. Formation of steam bubbles. Occurs mainly under heavy load on the brakes. Replace the brake fluid, remove air from the system.
1. Leaky pipeline. Tighten the pipeline connections or replace the tubes.
2. Damage to the seals in the master or working brake cylinders. Replace the seal. Replace the internal elements in the master brake cylinder, replace the master cylinder if necessary
3. The rubber gasket is damaged. Repair the caliper.
1. The brake linings are oily. Replace the brake pads.
2. Incorrect or hardened brake pads installed. Replace the pads. Install genuine BMW brake pads.
3. The brake booster is faulty. Check the brake booster.
4. The brake pads are worn out. Replace the brake pads.
1. The tire pressure is not correct. Check and correct the tire pressure.
2. Uneven tire wear. Replace worn tires.
3. The brake pads are oily. Replace the pads.
4. Different brake pads are installed on one axle. Replace the pads. Install original BMW pads.
5. Poor condition of brake pads. Replace the pads.
6. The caliper wells are dirty. Clean the guides and seating surfaces of the pads in the caliper.
7. Corrosion of brake caliper cylinders. Replace the caliper.
8. Uneven wear of the brake pad. Replace the brake pads (on both wheels).
1. The compensation hole in the master cylinder is clogged. Clean the master cylinder and replace the internal components.
2. The clearance between the drive rod and the master cylinder piston is too small. Check the clearance.
1. The compensation hole in the master cylinder is clogged. Clean the master cylinder and replace the internal components.
2. The clearance between the drive rod and the master cylinder piston is too small. Check the clearance.
3. The throttling hole in the special valve on the bottom is clogged. Clean the main brake cylinder, replace the internal elements and brake fluid.
1. The wrong type of brake pads are installed. Replace the pads, install genuine BMW pads.
2. The brake disc is corroded in places. Carefully polish the brake disc.
3. The brake disc has lateral runout. Treat or replace the disc.
Corrosion in brake caliper cylinders. Repair the caliper, possibly replace it.
1. The wrong type of brake pads are installed. Replace the pads, install genuine BMW pads.
2. The caliper is dirty. Clean the caliper well.
3. Heavy piston stroke. Fix.
4. The brake system is not tight. Check the tightness of the brake system.
1. The brake disc does not rotate parallel to the caliper. Check the caliper mating surfaces.
2. Corrosion in the calipers. Remove contamination.
3. The piston is not working properly. Check the piston position.
1. Often the reason is atmospheric influence (air humidity). If the creaking appears after a long period of standing in high humidity and then disappears, there is no need to do anything.
2. The wrong type of brake pads are installed. Replace the pads, install genuine BMW pads, coat the base plates with anti-squeak paste.
3. The brake disc does not rotate parallel to the caliper. Check the mating surfaces of the brake caliper.
4. The caliper shaft is dirty. Clean the caliper shaft
5. The brake shoe mounting springs are bent. Replace the mounting springs.
6. The pressure springs are stretched. Replace the pressure springs.
1. ABS in action. Normal, no assistance required.
2. Too much lateral runout or thickness tolerance of the brake disc. Check runout and thickness. Rework or replace the disc.
3. The brake disc does not rotate parallel to the caliper. Check the caliper mating surface.
1. The supply voltage is too low (below 10 V). Check the voltage. Check whether the generator indicator lamp goes out after the engine starts. If everything is OK, check the generator drive V-belt.
2. ABS damage. Check the reliability of the contact and the presence of corrosion of the ground connection at the return pump (in the hydraulic block).
1. Tires are unevenly inflated.
2. There is a defect in the tires.
3. Excessively worn suspension or steering components (Chapter Suspension and steering).
4. It is necessary to adjust the front wheel alignment angles.
5. The front brakes are seized (Chapter Brake system).
1. Wheel balance is disturbed or rims are out of roundness. Have them balanced at a tire shop.
2. Wheel bearings are worn out, their tightening force has weakened, or their adjustment is disturbed (Chapter Suspension and steering).
3. Shock absorbers or other suspension components are worn or damaged (Chapter Suspension and steering).
1. The shock absorbers are faulty. Replace the entire set (Chapter Suspension and steering).
2. Springs and/or other suspension components are broken or weak. Check the condition of the components (Chapter Suspension and steering).
1. The fluid level in the power steering system reservoir has dropped excessively (Chapter Suspension and steering).
2. The tires are not inflated correctly.
3. The steering linkage joints are not sufficiently lubricated (Chapter Suspension and steering).
4. The front wheel alignment angles are out of adjustment.
5. The power steering does not develop the required power.
1. The tightening force of the front wheel bearings has weakened (Chapter Suspension and steering).
2. Excessively worn suspension or steering components (Chapter Suspension and steering).
1. The power steering pump drive belt is worn or damaged, or its tension adjustment is incorrect (Chapter Suspension and steering).
2. The hydraulic fluid level has dropped excessively (Chapter Suspension and steering).
3. The hydraulic system hoses or lines are clogged. Check and replace if necessary.
4. Air has entered the hydraulic system. Bleed the system (Chapter Suspension and steering).
1. The tires are not inflated correctly.
2. Wheel balance is disturbed. Contact a tire shop
3. Wheel disks are damaged. Check and replace if necessary.
4. Excessively worn suspension or steering components (Chapter Suspension and steering).
1. The tires are not inflated correctly.
2. Turns are made too sharply. Reduce speed.
3. The front wheel alignment angles are out of adjustment (excessive convergence). Contact a workshop for professional adjustment.
4. Bent or twisted suspension arm (Chapter Suspension and steering).
1. The tires are not inflated correctly.
2. The front wheel alignment angles are out of adjustment (divergence). Have the adjustment done at a car service workshop.
3. Steering components are damaged or loose (Chapter Suspension and steering).
1. Wheel balance is disturbed.
2. The disks are damaged or bent. Check and replace if necessary.
3. There is a defect in the tires.
1. The rubber bands are dirty. Clean the rubber bands with a stiff nylon brush and a detergent solution or alcohol.
2. The edges of the brushes are frayed, the rubber bands are worn or torn. Replace the rubber bands.
3. Old rubber bands, cracked surfaces. Replace the rubber bands.
The windshield is contaminated with varnish polish or oil. Clean the windshield with a clean cloth and remover of grease, oil, silicones.
1. The rubber band is deformed to one side "does not tip over anymore". Install a new rubber band.
2. The wiper arm is twisted, the blade does not fit precisely on the glass. Carefully turn the arm until the vertical position is reached.
1. The elastic has come loose from the frame. Carefully insert the elastic into the frame.
2. The brush does not fit evenly to the glass because the spring bars or plates are bent. Replace the brush. This malfunction primarily occurs when the spare brush is installed carelessly.
3. The force of the lever pressing is too low. Lightly lubricate the wiper arm pivots and springs or install a new arm.
Tire pressure too low.
Tire pressure is too high.
Static and dynamic imbalance of the wheel. Possibly too much lateral runout of the disc, too much play in the bearing joints.
Static wheel imbalance. Possible consequence of strong vertical runout.
Traces of blocking under full braking.
Overloading the vehicle. Check the inside of the tire for base tears.
Incorrect wheel alignment. Tire is worn. Also check the condition of the shock absorber on the rear wheels.
Incorrect toe adjustment. Tire is worn. Frequent driving on wavy surfaces. Fast driving on turns.
Driving over sharp rocks, tire impacts, etc. at high speed.
1. Check the camber adjustment.
2. ABS damage. Check the reliability of the connection to the housing at the return pump (in the hydraulic block).
Remember that successfully completing a troubleshooting is not a black art reserved for experienced professional mechanics, but a combination of knowledge and a patient, systematic approach to investigating the problem. Always move from simple to complex, take each check to its logical conclusion, and try not to miss the obvious – anyone can forget to fill the fuel tank or leave the lights on overnight.
Finally, you should always try to get a clear picture of the progression of the fault and take appropriate steps to prevent a recurrence. If the electrical equipment failure occurred due to a poor contact quality, check the condition of all other contacts and electrical connectors in the system at the same time. If the same fuse continues to blow several times in a row, there is no point in replacing it further - you should try to find out the cause of the failure. Remember that the failure of a minor component may be a sign of a malfunction of a more important unit or the entire system.
Diagnostics of electronic systems E46 - general information about diagnostic devices
The electronic equipment of the car includes:
- Electronic control system for gasoline engines Siemens MS 42.0
- Bosch 3.0 Diesel Electronic Control System
- ABS anti-lock brake system
- dynamic Stability Control built into ABS - DSC3 on early E46 models Traction Control - (Teves ABS/ASC Mark20ET)
- Additional safety system SRS, MRS2, MRS3
- AT with electronic control EGS/AGS, A5S 360R Siemens AGS 20
Electronic xenon headlight system
1. Checking the proper functioning of the injection system components and reducing the toxicity of exhaust gases is carried out using a universal digital meter (multimeter). Using a digital meter is preferable for several reasons. Firstly, it is quite difficult to measure the value of an analog meter (sometimes it's impossible), determine the result of the reading with an accuracy of up to hundredths and thousandths, while when examining circuits that include electronic components, such accuracy takes on special significance.
The second, no less important, reason is the fact that the internal circuit of the digital multimeter has a fairly high impedance (the internal resistance of the device is 10 mOhm). Since the voltmeter is connected to the circuit being tested in parallel, the accuracy of the measurement is higher, the smaller the current that passes through the device itself. This factor is not significant when measuring relatively high voltage values (9÷12 V), but it becomes decisive when diagnosing elements that produce low-voltage signals, such as, for example, an l-probe, where we are talking about measuring fractions of a volt.
2. For diagnostics of electronic systems of the engine, automatic transmission, ABS, SRS, special diagnostic scanners (Pointer) or testers (Retriever) with a specific cartridge, universal cable and connector are used. In addition, for this purpose, you can use an expensive specialized automotive diagnostic computer, specially designed for full diagnostics of most systems of modern cars (for example, ADC2000 from Launch HiTech), or a regular computer with a set of interface devices.
3. In principle, reading the fault codes recorded in the memory of the self-diagnostic system can also be done using the "check engine" indicator on the instrument panel (refer to Chapter Engine electrical equipment).
4. The scanner only reads the fault memory and clears the fault memory. In addition, the scanner only supports the ISO protocol. The tester can additionally activate and display current data and supports the SAE and ISO protocols.
All tester cartridges can be used in the scanner as well. In this case, the functions will be limited to reading and clearing memory only.
For diagnostics, you can use, for example, devices from ToolRama, Inc. (3500 NW Boca Raton Blvd., Boca Raton, Florida, 33431, USA 1 877 866 5726 – 561 750 4511 – 561 338 8447 FAX):
- tester R000 with cartridge T051D, scanner P000 with cartridge T041,
- universal cable N000,
- connector N001.
For most vehicles produced since 1996 that support the SAE/ISO 9141 OBD II protocol, an OBD II cartridge can be used that performs the following functions:
- Read and clear OBD II trouble codes. Display oxygen sensor test results.
- Continuous monitoring of ignition systems, injection systems and components.
- Displays a list of current data and recorded intermittent failures:
- Absolute pressure in the intake manifold;
- Oxygen sensor voltage;
- Engine coolant temperature;
- Estimated engine load;
- Car speed;
- Fuel quality;
- Air flow (by mass);
- Ignition timing;
- Throttle position;
- Intake air temperature.
In addition to "P0" fault codes, the tool also displays extended "P1" codes for Acura, Audi, BMW, Chrysler, Dodge, FORD, Geo, GM, Honda, Hyundai, Infinity, Kia, Lexus, Lincoln, Mercury, Mazda, Mercedes, Mitsubishi, Nissan, Porsche, Saturn, Seat, Skoda, Subaru, Suzuki, Toyota, Volvo, VW models.
Recently, such reading devices as hand-held scanners such as Actron Scantool or AutoXray XP240 have become absolutely indispensable in diagnosing engine management systems of modern cars.
Features of the specialized automotive diagnostic device ADC2000:
- Built-in 4-channel oscilloscope with standard preset for 19 sensors.
- Ignition system analyzer for checking primary and secondary circuits (with voltage up to 100 kV) on systems with a distributor or separate ignition coils - with control of combustion time, peak voltage value, ignition timing, current, and speed.
- Two-channel multimeter with digital and graphic representation of data on voltage (150V), frequency (1100 kHz), current (150A).
- Built-in scanner for the main systems on cars: VAG, MB, BMW, Volvo, Toyota/Lexus, Mitsubishi, Nissan, Honda, Mazda, GM, Ford, Chrysler, Daewoo, Hyundai, Kia, Samsung, as well as on cars that support the OBD-II protocol.
- No cartridges are required - you can update the device's software yourself by downloading the necessary updates from the Internet.
- Software for communication with a personal computer.
Information on the use of these devices is contained in the attached documents. You can find more information about these devices on the websites programatools.com, lasn.com.
To carry out diagnostics, we recommend that you seek qualified assistance from service station specialists.
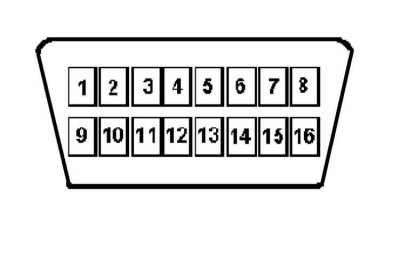
The OBD II diagnostic connector is located under the instrument panel.
Diagnostic connector contacts for the protocols used:
- ISO 9141–2 Contacts 4, 5, 7, 15, 16
- J1850 PWM Pins 2, 4, 5, 10, 16
- J1850 VPW Contacts 2, 4, 5, 16 (without 10)
ISO 9141–2 Protocol (for Europe and Asia) identified by the presence of contact 7 and the absence of contacts 2 and/or 10 on the diagnostic connector.
SAE J1850 VPW Protocols (Variable Pulse Width Modulation) – General Motors – or SAE J1850 PWM (Pulse Width Modulation) – American Ford – identified by the absence of contact 7.
All three data exchange protocols operate via the standard OBD-II J1962 cable.
| output No | Purpose |
| 1. | Set by the manufacturer |
| 2. | Bus + Line, SAE J1850 |
| 3. | Set by the manufacturer |
| 4. | Connection to the body |
| 5. | Housing - signal output |
| 6. | Set by the manufacturer (CAN high level, J–2284) |
| 7. | K Line, ISO 9141 |
| 8. | Set by the manufacturer |
| 9. | Set by the manufacturer |
| 10. | Bus Line – SAE J1850 |
| 11. | Set by the manufacturer |
| 12. | Set by the manufacturer |
| 13. | Set by the manufacturer |
| 14. | Set by manufacturer (CAN Low Level, J–2284) |
| 15. | L-Line, ISO 9141 |
| 16. | Plus battery via fuse. Under voltage in any position of ignition switch |
OBD II system trouble codes are listed in the Specifications to Chapter Engine electrical equipment.
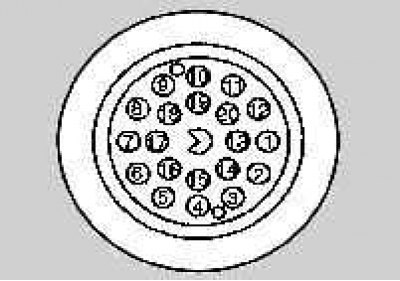
The BMW 20-pin diagnostic connector is located under the hood of the engine compartment on the left.
Pin assignment
| Characteristic | Meaning |
| data | data |
| data | data |
| data | data |
Engine
If the engine does not start, the situation should be analyzed. For the engine to start at all, two basic conditions must be met. The fuel-air mixture must enter the cylinders, and a spark must be generated at the spark plug. Therefore, first, you should check whether fuel is being supplied. How to proceed in this case is described in Chapter Fuel, injection and exhaust systems.
To determine whether a spark is produced, remove the spark plugs, insert them into the tips and apply them individually to ground. Do not hold the tip or ignition cable with your hands, but use well-insulated pliers. Ask an assistant to start the engine. If the spark does not slip, determine the malfunction using Chapter Engine electrical equipment.
The engine does not turn over when trying to start it
1. There is corrosion of the battery terminals or the fastening of the wire tips on them is loose. Check the condition of the terminals and tips. Tighten the terminal clamps, remove traces of corrosion if necessary.
2. The battery is discharged or defective. If the cable ends are found to be clean and securely connected to the battery terminals, turn the ignition switch to the ON position, then turn on the headlights and/or windshield wipers. If these electrical equipment do not function, the battery is discharged.
3. The transmission is not accurately set to the "P" position (AT) or to neutral gear (manual transmission), or the clutch is not fully depressed.
4. The wiring in the starting system circuit is broken or the wires are loose at the terminals. Check the condition of the wires, terminals and electrical connectors of the battery, starter solenoid relay and ignition switch.
5. The starter pinion is jammed in the flywheel ring gear. On models equipped with a manual transmission, set it to gear and, pushing the car by hand, turn the engine over. Remove the starter as soon as possible and check the condition of the pinion and flywheel ring gear.
6. The starter traction relay is faulty (Chapter Engine electrical equipment).
7. The starter is faulty (Chapter Engine electrical equipment).
8. The ignition switch is faulty.
The engine turns over but does not start
1. The launch is not performed correctly
The order of starting a gasoline engine:
Set the parking brake, depress the clutch pedal. On automatic transmission models, press and hold the brake pedal. On automatic transmission, place the selector in the "P" or "N" position. Do not apply gas. Turn the ignition key and hold it until the engine starts. If the engine does not start within 20 seconds or stops immediately, repeat the starting process with the gas pedal half-pressed. As soon as the engine starts, release the ignition key.
In frost below -15°C and at an altitude of more than 1000 m above sea level: Start for at least 10 s with the pedal half-pressed.
Be sure to start moving immediately. If there is severe frost, let the engine run for 30 seconds.
If the engine does not start after 10 seconds, interrupt the start and try again after half a minute.
Several unsuccessful starting attempts in a row can damage the catalytic converter, since unburned fuel explosively burns when heated in the catalytic converter.
Only on a hot engine after starting, add a little gas.
2. The fuse is faulty:
- Electric fuel pump
- Electronic injection system
For checking fuses, refer to Chapter On-board electrical equipment.
3. Empty fuel tank.
4. There is a malfunction in the fuel injection system.
5. The battery is discharged (the engine turns over too slowly). Check the functioning of electrical equipment.
6. The battery terminal connections are corroded or loose.
7. The fuel pump is faulty (Chapter Fuel, injection and exhaust systems).
8. Damaged or excessively damp ignition system components (Chapter Engine electrical equipment).
9. Worn or faulty spark plugs or incorrectly gapped spark plugs (Chapter Engine electrical equipment).
10. The wiring of the electrical circuit of the starting system is broken or disconnected, or the fastening of the wires at the terminals is loose.
11. The ignition coil circuit wiring is broken or disconnected, or the wires are loose at the coil terminals (Chapter Engine electrical equipment).
12. Compression pressure too low. Replace cylinder head gasket. Repair engine if necessary.
Diesel engine:
13. The launch was performed incorrectly
Starting procedure for a turbodiesel engine:
On a cold engine and at an outside temperature below +8°C, apply the parking brake and depress the clutch pedal. On AT, set the selector to position "P" or "N" - manual transmission. Turn the ignition key to position II and wait until the pre-glow indicator lamp goes out. Immediately after the indicator lamp goes out, start the engine without giving gas. If irregular flashes appear, do not turn off the starter until the engine runs smoothly (no more than 30 sec). If the engine does not start, try starting again after half a minute as described above.
During the engine preheating process, do not turn on power consumers (light, heated rear window).
On a cold engine and at an outside temperature above +8°C, as well as on a warm engine, preheating is not required. The engine can be started immediately. Do not give gas.
14. The fuse is faulty:
- Electric fuel pump.
- Preheating systems.
15. The engine is not warmed up: check the proper functioning of the pre-heating device.
16. There is no voltage on the electromagnetic shut-off valve. Connect a voltmeter or LED tester to the switch. Turn on the ignition. The LED should light up. Otherwise, you need to find the break in the wiring and fix it.
17. The electromagnetic shut-off valve is faulty. Check the reliability of the electromagnetic switch fastening, check the contacts. Turn the ignition on and off. A click should be heard in the switch.
18. There is damage in the fuel supply line or air in the lines:
- a) The lines or hoses are mechanically damaged or clogged. Clean the fuel lines and bleed air from the lines and filter.
- b) The fuel filter is clogged. Replace the filter element.
- c) In winter, check the filter and lines for ice or wax. Park the car in a heated garage, add gasoline to the system.
- d) The tank ventilation or fuel intake mesh filter is clogged. Clean.
19. Fuel injection start adjustment is out of adjustment. Check and make adjustments.
20. The injectors are faulty. Check. Unscrew the union nuts one by one – when you unscrew the nut of the faulty cylinder, the engine speed will not drop.
21. The high-pressure fuel pump (HPFP) is faulty. Install a new or known good HPFP for testing.
22. Compression pressure too low. Replace cylinder head gasket. Repair engine if necessary.
The starter operates without turning the engine
1. The starter gear is jammed. Remove the starter (Chapter Engine electrical equipment) and check its condition.
2. The teeth of the starter gear or flywheel ring gear are worn or damaged.
Difficulty starting a cold engine
1. The battery is discharged or not sufficiently charged.
2. There is a malfunction of the components of the power supply system or electrical equipment (Chapters Fuel, injection and exhaust systems and Engine electrical equipment).
3. Paraffin in the fine filter of the diesel engine. Replace the filter element. Fill with winter fuel or dilute with gasoline.
4. The glow plugs of the diesel engine are faulty.
Difficulty starting a hot engine
1. The air filter is blocked (Chapter Fuel, injection and exhaust systems).
2. There is a malfunction of the components of the power supply system or electrical equipment (Chapters Fuel, injection and exhaust systems and Engine electrical equipment).
3. Fuel does not reach the injectors of the injection system (Chapter Fuel, injection and exhaust systems).
4. The fuel injection advance angle of the diesel engine is out of order.
5. Low compression in the cylinders, faulty or out of adjustment fuel injection pump of the diesel engine.
The starter engages too noisily or with difficulty
1. The teeth of the starter gear or flywheel ring gear are worn or damaged.
2. The starter mounting bolts are missing or their tightening force has weakened.
The engine starts but immediately stalls
1. The electrical wiring is faulty or the wires on the coil or generator terminals are loose.
2. There is a malfunction of the components of the power supply system or electrical equipment (Chapters Fuel, injection and exhaust systems and Engine electrical equipment).
3. There are vacuum losses through the gasket surfaces of the intake manifold or fuel injection unit. Make sure that the fastening bolts/nuts are tightened securely, check the fact and quality of fastening on their fittings on the intake manifold of all vacuum hoses. Check the condition of the hoses and their correct connection (specifically to your fittings).
The stability of the engine at idle speed is impaired
1. There is a loss of vacuum. Make sure that the fastening bolts/nuts are tight, check the fact and quality of fastening on their fittings on the intake manifold of all vacuum hoses. Listen to the running engine with a stethoscope or a section of fuel hose. The presence of a hissing sound will allow you to identify the source of the vacuum "leak". A solution of soapy water can be used for checking no less effectively.
2. There is a malfunction of the components of the power supply system or electrical equipment (Chapters Fuel, injection and exhaust systems and Engine electrical equipment).
3. The crankcase ventilation system valve is blocked (ChapterEngine).
4. The air filter is blocked (Chapter Fuel, injection and exhaust systems).
5. The fuel pump does not supply sufficient fuel to the injection system injectors (Chapter Fuel, injection and exhaust systems).
6. There are leaks through the cylinder head gasket. Measure the compression pressure in the engine cylinders.
7. The working projections of the camshaft cams are worn out (Chapter Engine).
Diesel engine:
8. The quality of the fuel hose connections on the high-pressure fuel pump and fuel filter is damaged. Replace the fuel hoses, secure them with clamps, tighten the screws of the angular connections.
9. The fuel injection pump mount is mechanically damaged or loosened. Check the mount.
10. The connections of the return line and the fuel supply line are reversed. Put the connections back in place. The screw for connecting the return line is marked "OUT".
11. There is damage in the fuel supply line:
- a) The pipes or hoses are mechanically damaged or clogged. Clean the fuel pipes.
- b) The fuel filter is clogged. Replace the filter element.
- c) In winter, check the filter and lines for ice or wax. Park the car in a heated garage, add gasoline to the system.
- d) The tank ventilation or fuel intake mesh filter is clogged. Clean.
12. Fuel injection start adjustment is out of adjustment. Check and make adjustments.
13. The injectors are faulty. Check. Unscrew the union nuts one by one – when you unscrew the nut of the faulty cylinder, the engine speed will not drop.
14. The high-pressure fuel pump (HPFP) is faulty. Install a new or known good HPFP for testing.
There are misfires when the engine is idling
1. Spark plugs are worn or dirty, or the spark plug gap is set incorrectly (Chapter Engine electrical equipment).
2. There is a malfunction of the components of the power supply system or electrical equipment (Chapters Fuel, injection and exhaust systems and Engine electrical equipment).
3. The spark plug wires are faulty (Chapter Engine electrical equipment).
4. There are losses of vacuum in the intake manifold or through hose connections.
5. Insufficient or unevenly distributed compression pressure in the cylinders. Perform a compression measurement (Chapter Engine).
There are misfires when the car is moving in gear
1. The fuel filter is blocked or the fuel system is contaminated (Chapter Fuel, injection and exhaust systems).
2. The spark plugs are faulty or dirty, or the spark plug gap is set incorrectly (Chapter Engine electrical equipment).
3. There is a malfunction of the components of the power supply system or electrical equipment (Chapters Fuel, injection and exhaust systems and Engine electrical equipment).
4. There is a defect in the spark plug wires (Chapter Engine electrical equipment).
5. Components of exhaust gas toxicity reduction systems are faulty.
6. Insufficient or uneven distribution of compression pressure between cylinders. Remove the spark plugs and measure the compression pressure (Chapter Engine).
7. The ignition system is faulty (Chapter Engine electrical equipment).
8. There are vacuum losses at the throttle body, intake manifold or through vacuum hoses.
The engine stalls
1. Idle speed adjustment is incorrect.
2. The fuel filter is blocked and/or moisture or dirt has entered the fuel system (Chapter Fuel, injection and exhaust systems).
3. There is a failure of the power supply system components or sensors (Chapter Fuel, injection and exhaust systems).
4. Components of exhaust gas toxicity reduction systems are faulty.
5. The spark plugs are faulty or dirty, or the spark plug gap is set incorrectly (Chapter Routine care and maintenance). Also check the condition of the spark plug wires (Chapter Engine electrical equipment).
6. There are losses of vacuum at the throttle body or through the vacuum hoses.
The engine does not develop full power
1. There is a malfunction of the components of the power supply system or electrical equipment (Chapters Fuel, injection and exhaust systems and Engine electrical equipment).
2. The air cleaner is clogged. Clean or replace.
3. The spark plugs are faulty or the spark plug gap is set incorrectly (Chapter Routine care and maintenance).
4. The ignition coil is faulty (Chapter Engine electrical equipment).
5. The AT fluid level does not meet the requirements (Chapter Automatic transmission).
6. Clutch slips (Chapter Clutch and drive shafts).
7. The fuel filter is blocked and/or dirt/moisture has entered the fuel system (Chapter Fuel, injection and exhaust systems).
8. The wrong type of fuel has been added. Fill the tank with fuel with the required octane rating.
9. Insufficient or uneven compression pressure across the cylinders. Perform a compression test, the results of which can reveal the presence of valve leaks and/or a leaky cylinder head gasket (Chapter Engine).
Additional for diesel engine
10. The air cleaner is clogged. Clean or replace it
11. Uneven fuel supply from the high-pressure fuel pump to the cylinders. Adjust on a warm engine.
12. The fuel injection pump start time is set incorrectly. Set it.
13. The fuel filter or high-pressure fuel pump (injector) is clogged. Wash the pre-filter, change the fine filter element, clean the spray nozzle or replace the pump (injector).
14. The maximum crankshaft speed adjustment is not correct.
There are pops in the intake system or shots in the exhaust system
1. There is a malfunction of the components of the power supply system or electrical equipment (Chapters Fuel, injection and exhaust systems and Engine electrical equipment).
2. There is a defect in the secondary circuit of the ignition system (destruction of spark plug insulators or defects in spark plug wires) (Chapter Engine electrical equipment).
3. The fuel injection system needs adjustment or its components are excessively worn (Chapter Fuel, injection and exhaust systems).
4. There are vacuum losses at the throttle body, intake manifold or through vacuum hoses.
5. Valves are stuck (Chapter Engine).
6. The order of connecting the spark plug wires is violated (Chapter Engine electrical equipment).
When accelerating or driving uphill, detonation sounds occur
1. The wrong type of fuel has been added. Fill the tank with fuel with the required octane rating.
2. There is a malfunction of the components of the power supply system or electrical equipment (Chapters Fuel, injection and exhaust systems and Engine electrical equipment).
3. The wrong type of spark plugs are installed. Check the spark plugs and coils for damage (Chapter Engine electrical equipment).
4. There are losses of vacuum.
Pre-ignition takes place (the engine continues to run after the ignition is turned off)
1. Excessively high idle speed (Chapter Engine).
2. There is a malfunction of the components of the power supply system or electrical equipment (Chapters Engine electrical equipment).
3. Excessive engine operating temperature. Possible causes of this malfunction may be a decrease in the coolant level (Chapter Cooling and heating systems), thermostat failure, radiator blockage, or water pump failure (Chapter Cooling and heating systems).
Diesel engine smokes
1. Black smoke:
- a) The air cleaner is dirty. Flush and fill with fresh oil or replace the element.
- b) Incorrect fuel used. Flush tank and change fuel.
- c) The moment of start of injection of the high-pressure fuel pump is set incorrectly.
2. Blue smoke:
- a) Oil burning in the combustion chamber due to worn piston rings, high oil level in the air cleaner, worn seals in the turbocharger covers, leaks in the gasket between the crankcase and the turbocharger. Repair the engine, set the normal oil level, replace the seals, tighten the turbocharger mounting bolts or replace the gasket.
- b) No fuel is supplied to one of the injectors. Check by heating the outlet pipes of the manifold.
- c) Poor fuel atomization by the injector due to a faulty valve or a broken atomizer. Grind the valve or replace the injector.
3. White or brown smoke:
- a) Low temperature in the cooling system. Check the thermostat.
- b) Poor operation of the injectors due to wear or breakage of the atomizer. Replace the atomizer.
Engine electrical equipment
The battery does not hold a charge
1. The alternator drive belt is worn or damaged, or its tension adjustment is incorrect (Chapter Engine electrical equipment).
2. The electrolyte level is insufficient or the battery is very discharged (Chapter Engine electrical equipment).
3. There is corrosion of the battery terminals or the fastening of the wire tips on them has become loose (Chapter Engine electrical equipment).
4. The generator does not provide the required charging current (Chapter Engine electrical equipment).
5. The charging circuit wiring is broken or otherwise damaged, or the wires are loose at the terminals (Chapter Engine electrical equipment).
6. A short circuit in the wiring creates a constant leakage of current generated by the battery to ground (refer to Chapter Engine electrical equipment and electrical equipment diagrams).
7. There is an internal defect in the battery.
The ignition indicator lamp does not go out when the revs increase
1. The drive belt is loose. Check the V-belt tensioner.
2. Damage to the overrunning clutch (turbodiesel only). Remove the generator and turn the generator drive shaft to the left. If the working surface of the pulley does not rotate, then the damage is usually in the overrunning clutch.
3. Voltage regulator/generator damaged. Disconnect the (D+) wire from the back of the generator and turn on the ignition. If the test lamp does not light now, the fault is usually in the voltage regulator or generator.
4. Brush wear. Visually inspect the brushes and replace if necessary.
5. Damage to the regulator. Check and replace if necessary.
6. Generator damage. Check and replace if necessary.
7. Damage to the wire between the generator and the voltage regulator. Disconnect the blue wire at contact 12 of the T32a plug connection and at the instrument panel unit. If the indicator lamp does not light now, the D+ wire is connected to ground. Replace the harness.
8. Damage to the instrument panel unit. If, after disconnecting the blue wire from the T32a plug connection with the ignition on, the indicator lamp lights up, the fault is usually in the instrument panel unit.
The ignition indicator lamp does not light when the ignition key is turned to the "ON" position (when the ignition is turned on)
1. The control lamp on the instrument panel has burned out or otherwise failed (Chapter On-board electrical equipment).
2. The generator is faulty (Chapter Engine electrical equipment).
3. There is a defect in the printed circuit board, wiring inside the instrument panel unit, or lamp socket (Chapter On-board electrical equipment).
The charge indicator lamp lights up after the ignition is turned off
1. Positive diodes are short-circuited. Check the diodes, replace the diode board
Starter
If the starter does not turn, first check that the required voltage of at least 10 V is present at terminal 50 of the traction relay. If the voltage is lower than this value, check the wires included in the starter current circuit according to the diagram.
You can check whether the starter operates at full battery voltage as follows:
- Without shifting into gear, turn on the ignition.
- Short-circuit terminals 30 and 50 of the starter with a wire of at least 4 mm² cross-section, refer also to Section Removal, installation and checking the starter traction relay.
If the starter works perfectly, the cause of the malfunction should be sought in the wires to the starter. If the starter does not work, it should be checked in the removed state.
Verification condition: At the connection points, the wires must be well secured and must not be oxidized.
The starter does not turn when the ignition switch is turned on
1. The battery is discharged. Charge the battery.
2. Jumper terminals 30 and 50 of the starter: The starter rotates. Wire 50 to the ignition switch is broken, the starter switch is faulty. Fix the break, replace the defective parts.
3. Broken ground cable or connector, battery is discharged. Check battery cables and connectors, measure battery voltage, charge if necessary.
4. Insufficient current flow due to loose or oxidized connectors. Clean the battery terminals and poles, check the connections between the battery, starter and ground.
5. No voltage at terminal 50 of the traction relay. Wire break, starter switch faulty.
The starter rotates slowly and does not turn the crankshaft
1. Low battery. Charge the battery.
2. Summer oil is filled. Fill with all-season oil.
3. Insufficient current flow due to loose or oxidized connectors. Clean the battery terminals and poles, check the connections between the battery, starter and ground.
4. Carbon brushes do not fit the commutator, are stuck in the guides, are worn, broken, oily or dirty. Check the brushes, clean or replace. Check the guides.
5. Insufficient distance between brushes and commutator. Replace brushes and clean brush guides.
6. The collector is grooved or burnt and oily. Treat the collector or replace the anchor.
7. No voltage at terminal 50 (min. 8 V). Check the starter switch or solenoid relay.
8. The bearing is broken. Check the bearing, replace if necessary.
9. The traction relay is faulty. Replace the traction relay.
The starter catches and turns the engine jerkily
1. The pinion drive is faulty. Replace the pinion drive.
2. The gear is dirty. Clean the gear.
3. The flywheel ring gear is faulty. Treat the ring gear, replace the flywheel if necessary.
The starter pinion does not move away from the ring gear
1. The pinion drive or threads are dirty or damaged. Clean or replace the pinion drive.
2. The traction relay is faulty. Replace the traction relay.
3. The return spring is weak or broken. Replace the return spring.
The starter continues to operate after the ignition key is released
1. The traction relay is stuck and does not turn off. Immediately turn off the ignition, replace the traction relay.
2. The ignition switch does not turn off. Disconnect the battery immediately and replace the ignition switch.
Power supply system
Excessive fuel consumption
1. The air filter element is dirty or blocked (Chapter Fuel, injection and exhaust systems).
2. There is a malfunction of the components of the power supply system or electrical equipment (Chapters Fuel, injection and exhaust systems and Engine electrical equipment).
3. Insufficient tire pressure or incorrect size tires installed.
Diesel engine
4. Clogged return line. Blow air through the return line from the high-pressure fuel pump to the fuel tank.
5. Idle speed and maximum speed are too high. Adjust.
6. The engine has mechanical damage. Check the compression, repair the engine if necessary
There are fuel leaks and/or a smell of gasoline
1. There are leaks in the fuel supply lines or vent lines (Chapter Fuel, injection and exhaust systems).
2. The fuel tank is full. Refuel only until the gun switches off automatically.
3. There are leaks or evaporations from the fuel and exhaust gas toxicity reduction system lines (Chapter Fuel, injection and exhaust systems).
The engine does not start
1. When the starter is turned on, the electric fuel pump does not work (no noise from work can be heard). Lightly tap the pump body to release the jammed part. Check if voltage is applied to the pump. Check the fuse for proper operation. Check the electrical contacts for good conductivity.
2. The fuel pump relay is faulty. Check the relay.
3. The injector valves are stuck. Check the injectors, replace if necessary. Check the voltage supply to the injectors. To do this, disconnect the injector connector. Connect the diode test lamp to the wire and turn on the starter. The test lamp should blink.
4. No signal from ignition timing sensors or engine speed sensor. Check electrical wires. Perform fault memory query.
5. The instrument panel does not indicate the AT selector position, the charge indicator blinks or lights up constantly. Error code 11 (the oil level switch sensor is damaged or the 30 x 7.5A fuse is broken) is recorded in the instrument panel memory unit. Replace the fuse or oil level sensor (12 611 433 596).
6. Fuel lines are damaged, clogged or leaky, there are defects in the hoses.
7. The fuel filter is clogged.
8. Presence of ice or wax in the filter or lines of the diesel engine.
9. The fuel tank ventilation is clogged, the filter in the tank is clogged.
10. The diesel engine injectors are damaged. Loosen the union nuts one by one and check whether the corresponding cylinder works.
Cold engine starts poorly, runs unsteadily
1. CO content does not meet requirements. Check CO content and idle speed.
2. Temperature sensor is faulty. Check the coolant/intake air temperature sensor.
3. The fuel pressure does not meet the required value. Check the fuel pressure.
A warm engine starts poorly and runs unsteadily
The air intake system is leaky. Check the intake system. To do this, leave the engine idling and cover the seals and connections on the intake tract with gasoline. If the RPM increases briefly, eliminate the leaky areas.
The engine runs intermittently
1. Electrical connections to the fuel pump are intermittently interrupted. Check the condition of the plug connections and connectors of the electrical wires of the fuel pump, air flow meter and fuel pump relay. Check the fuse and contact locations on the fuel pump relay. Clean the contacts, replace if necessary.
2. Low quality fuel, formation of vapor locks. Fill with quality fuel.
3. Fuel supply volume is too low. Check the pump performance.
4. The fuel filter is faulty. Replace the fuel filter.
5. The fuel pump is faulty. Check the fuel pump.
6. The injectors are faulty. Check the injectors.
7. The throttle position sensor is faulty. Check the throttle position sensor.
8. Weak connection of fuel hoses to the high-pressure fuel pump and fuel filter of the diesel engine.
The engine operates intermittently in transient and idle modes
1. The air intake system is leaky. Check the connections of the intake system. Start the engine and lubricate the contact points and connections in the intake tract with gasoline. If the engine speed increases briefly, eliminate the leak.
2. Incorrect idle speed adjustment. Check the idle speed control valve, throttle position sensor, lambda adjustment.
3. The full load sensor is faulty or incorrectly adjusted. Check the throttle sensor.
Hot engine won't start
1. Incorrect adjustment of CO content. Check CO content and idle speed.
2. Too high pressure in the fuel system. Check the fuel pressure, replace the pressure regulator if necessary.
3. The return line between the pressure regulator and the fuel tank is clogged or bent. Clean or replace the line.
4. The engine temperature sensor is faulty. Check the temperature sensor.
5. The fuel system is leaking. Visually inspect all connections in the engine and electric fuel pump area. Tighten all connections.
6. The air intake system is leaky. Check all connections of the intake system.
The engine runs after being turned off
1. Injectors are leaky. Check injectors.
2. The fuel shut-off valve on the diesel engine does not work.
Lubrication system
The control lamp does not light after the ignition is turned on
1. The oil pressure sensor is faulty. Turn on the ignition, disconnect the wire from the oil pressure sensor and short it to ground. If the lamp lights up, replace the sensor.
2. There is no voltage supplied to the sensor, the contacts are corroded. Check the electrical wires and contacts.
3. The indicator lamp is faulty. Replace the indicator lamp.
4. The control device is faulty. Replace the control device.
The indicator light does not go out after starting the engine
The oil is overheated. If the indicator lamp goes out after gas is supplied, nothing needs to be done.
The indicator light does not go out after gas is supplied or lights up while driving
1. Oil pressure is too low. Check the oil level, top up if necessary. Check the oil pressure.
2. The wire to the oil pressure sensor has a short circuit to ground. Disconnect the cable from the sensor and move it to the side (without shorting to ground), turn on the ignition. If the lamp lights up, check the wire.
3. The oil pressure sensor is faulty. Replace the sensor.
Oil pressure too low at all speeds
1. There is too little oil in the engine. Add oil.
2. The mesh filter is clogged. Remove the oil pan, clean the mesh filter.
3. The oil pump is worn out. Remove the oil pump and check it, replace it if necessary.
4. Bearing damage. Remove the engine.
Too low oil pressure at low speeds
The pressure reducing valve is stuck open due to contamination. Remove and check the valve.
Oil pressure too high at speeds above 2000 rpm
The pressure reducing valve does not open due to contamination. Remove and check the valve.
Cooling system
Overheat
1. Not enough coolant in the system (Chapter Cooling and heating systems).
2. The water pump drive belt is worn or damaged, or its tension adjustment is incorrect.
3. The internal channels of the radiator are blocked or the radiator grille is dirty (blocked) (Chapter Cooling and heating systems).
4. The thermostat is faulty (Chapter Cooling and heating systems).
5. Broken or cracked fan blades (Chapter Cooling and heating systems).
6. The fan viscous clutch is faulty (models 320i, 323i, 328i with air conditioning). Check the fan clutch: Increase the engine speed when it is warm. As soon as the fluid temperature reaches 90 – 95°C, the fan speed will increase, which will be noticeable by ear.
7. The coolant temperature gauge is faulty. Check the sensor.
8. The coolant pump is faulty. Remove and check the pump.
9. The radiator cap does not hold pressure. Perform a pressure test of the cap (contact a service station).
Hypothermia
1. The thermostat is faulty (Chapter Cooling and heating systems).
2. Temperature meter readings are inaccurate.
External coolant leaks
1. The hoses are damaged or destroyed as a result of aging of the material or their fastening on the fittings has become loose. Replace the hoses and/or tighten the clamps of their fastening (Chapter Cooling and heating systems).
2. The water pump seals are damaged. In this case, the coolant will leak through the inspection hole in the pump body (Chapter Cooling and heating systems).
3. There are leaks from the internal channels of the radiator or side tank. Professional repair of the radiator is required (description of the removal procedure is given in Chapter Cooling and heating systems).
4. There are leaks through the engine drain plug (Chapter Engine) or squeeze plugs of water galleries (Chapter Cooling and heating systems).
Internal coolant leaks
Internal coolant leaks are usually detected by checking the engine oil condition. Inspect the dipstick blade and the inside surfaces of the cylinder head(s) for signs of water and oil foaming.
1. There are leaks through the cylinder head gasket. Perform a pressure test of the cooling system.
2. There are cracks in the cylinder walls or in the head casting. To check, disassemble the engine (Chapter Engine).
Coolant losses occur
1. Too much coolant has been added to the system (Chapter Cooling and heating systems).
2. The coolant boils away as a result of engine overheating.
3. There are internal or external coolant leaks.
4. The radiator cap is faulty. Check the cap with pressure.
Coolant circulation is disrupted
1. The water pump is not functioning properly. The easiest way to check that the pump is functioning is to pinch the upper radiator hose while the engine is idling. If you feel a jolt of fluid inside the hose when you release it, the pump is functioning properly (Chapter Cooling and heating systems).
2. The cooling system is clogged. Drain the coolant, flush the system and fill it with fresh mixture (Chapter Cooling and heating systems). If such a need arises, remove the radiator (Chapter Cooling and heating systems) and perform a reverse flow flush.
3. The water pump drive belt is worn or damaged, or its tension adjustment is incorrect.
4. Thermostat is stuck (Chapter Cooling and heating systems).
Heater
The heater fan does not work
1. The fan motor fuse is faulty. Check the fan fuse and replace if necessary.
2. The fan switch is faulty. Check if voltage is applied to the pre-resistors, remove and check the fan switch.
3. The electric motor is faulty. Check if voltage is applied to the fan motor contacts with the ignition on and the fan switch closed. If voltage is applied, replace the motor.
The heater fan does not work at one of the stages
Pre-resistor is faulty. Replace the connection board.
The heater does not turn off with the regulator
1. The switch is faulty. Check the switch.
2. The control mixing flap cables are damaged or do not move well. Replace the cables.
Heating power too low
1. Coolant level is too low. Check coolant level, top up if necessary.
2. The heater control unit has a heavy stroke, is faulty. Check the heater control unit, replace the cable if necessary.
Noise in the area of the heater fan
1. Dirt, leaves got in. Remove the fan and clean it, clean the air duct.
2. Impeller imbalance, bearing failure. Remove the fan motor, check for ease of movement.
Clutch
The clutch does not disengage (the manual transmission control lever does not move freely into reverse gear and back when the clutch pedal is pressed to the floor)
The clutch disc is bent or damaged (Chapter Clutch and drive shafts).
The clutch is slipping (engine speed increases without increasing vehicle speed)
1. The clutch disc is contaminated with oil or its friction linings are worn out. Remove the clutch (Chapter Clutch and drive shafts) and check the condition of its components.
2. The clutch disc has not been properly run in. It may take 30 to 40 normal car starts to completely run in a new disc.
3. The pressure plate/clutch basket is worn out (Chapter Clutch and drive shafts).
There is a strong vibration when the clutch is engaged
1. The clutch disc is oily. Remove the clutch (Chapter Clutch and drive shafts) and check the condition of its components. Eliminate any leaks found.
2. The splines of the driven disk hub are worn out (clutch disc). Remove the clutch (Chapter Clutch and drive shafts) and check the condition of its components.
3. The pressure plate/clutch basket or flywheel is bent. Remove the clutch (Chapter Clutch and drive shafts) and check the condition of its components and flywheel.
Jerks when engaging the clutch
1. Damage to engine and gearbox mounts. Check and replace if necessary.
2. Loose gearbox mounting in suspension. Tighten mounting bolts.
3. Uneven contact of the pressure plate. Replace the clutch basket.
4. The crankshaft is not aligned with the gearbox. Check the alignment.
A squealing or rattling noise occurs when the clutch is fully engaged (pedal released)
The clutch release bearing is seized. Remove the clutch (Chapter Clutch and drive shafts) and check the bearing condition. Remove all burrs and burrs, and lubricate the bearing before reinstalling.
A squealing or rattling noise occurs when the clutch is fully disengaged (the pedal is pressed)
1. The release bearing is worn or damaged (Chapter Clutch and drive shafts).
2. The springs are worn or damaged (or aperture blades) pressure plate in the clutch basket (Chapter Clutch and drive shafts).
The clutch pedal remains depressed to the floor after it is released
The piston of the clutch master or slave cylinder is jammed. Damage to the clutch hydraulic system or release bearing. Check the condition, remove the clutch components if necessary.
Manual transmission (MT)
When the gearbox is in neutral, extraneous noises occur while the engine is running
1. The input shaft bearing is worn out.
2. The bearing of the driven shaft drive gear is damaged.
3. The intermediate shaft bearings are worn out.
4. The intermediate shaft axial play adjustment washers are worn or damaged.
Extraneous noises occur in any position of the manual transmission
1. Any of the above reasons and/or:
2. There is not enough transmission oil in the manual transmission (his level dropped).
Extraneous noises occur in a particular gear
1. The gear teeth of this transmission are worn, damaged or chipped.
2. The synchronizer of this gear is worn out or damaged.
The gearbox "jumps" out of the highest gear
Dirt has gotten between the gearbox housing and the engine, or the gearbox has shifted relative to the engine.
Difficulties occur when shifting gears
1. The clutch is not fully depressed (disengaged).
2. The shift rod is damaged, loosened or out of adjustment. Carefully check the condition of the components and replace any defective ones if necessary.
There are transmission oil leaks
1. There is too much transmission oil in the gearbox. Drain the excess if necessary.
2. The differential seals need to be replaced.
Automatic transmission (AT)
Due to the complexity of the AT design, full diagnostics of its faults and repair of components are beyond the skills of the average amateur mechanic. If any problems with the functioning of the AT other than those listed below occur, the car should be taken to a car service workshop or representative office of BMW for inspection and repair.
Common problems associated with the operation of the switching mechanism
The following can be attributed to failures associated with a malfunction of the shift rod adjustment:
- a) The engine can be started in transmission positions other than "P" (Park) and "N" (Neutral).
- b) The transmission position indicator readings differ from the actual gear selected.
- c) The vehicle is moving with the transmission in position "P".
Adjust the gear shift rod.
The transmission slips, shifts with difficulty, makes strange noises, or does not allow the vehicle to move when shifted into one of the forward or reverse gears
1. There are many possible causes for the problems listed in the title, but only one of them falls within the competence of the amateur mechanic - incorrect transmission fluid level.
2. Before driving the car to the auto service workshop, check the level and condition of the transmission fluid. Adjust the level in accordance with the requirements of the Specifications or change the fluid together with the filter. If the situation is not corrected, seek help from specialists.
There are transmission fluid leaks
1. AT fluid is dark red. Its leaks should not be confused with engine oil, which can be carried to the transmission housing by the oncoming air flow.
2. To identify and locate the source of the leak, first remove all traces of dirt and grease from the transmission housing. Use a suitable degreaser and/or steam clean. Then drive the vehicle for a short time at low speed (so that traces of a leak are not carried away by the oncoming flow far from its source). Stop, jack up the car and visually inspect to determine the source of the leak. Most often, these are:
- a) Transmission oil pan: Tighten the mounting bolts and/or replace the oil pan gasket.
- b) Fluid filler tube: Replace the rubber seal where the tube enters the transmission case.
- c) Transmission fluid lines: Tighten fittings or replace lines.
- d) Vent Tube: Transmission is overfilled and/or water has entered the transmission.
Bridges
Extraneous noises
1. Normal road noise. Cannot be adjusted.
2. Tire noise. Check the condition of the treads and the inflation pressure of the tires.
3. Wheel bearings are worn or damaged, or their tightening force has weakened.
Vibrations
Check the condition of the wheel bearings by jacking up the appropriate corner of the car one by one and rotating the wheel manually. Listen to the sounds coming from the bearing. Remove the bearings and check their condition.
Oil leaks
The drive shaft seals are damaged (Chapter Clutch and drive shafts).
Brake system
Before you come to a final conclusion about the presence of problems with the braking system, make sure that the tires are in satisfactory condition and inflated to the required pressure, the front wheel alignment is not out of alignment and the vehicle is not loaded unevenly.
Increased brake pedal travel
The brake circuit is out of order. Check if brake fluid is leaking.
The brake pedal springs and sinks
1. Air in the brake system. Remove air from the system.
2. Not enough fluid in the reservoir. Add new brake fluid, remove air from the system.
3. Formation of steam bubbles. Occurs mainly under heavy load on the brakes. Replace the brake fluid, remove air from the system.
Reduced braking effect, pedal falls through
1. Leaky pipeline. Tighten the pipeline connections or replace the tubes.
2. Damage to the seals in the master or working brake cylinders. Replace the seal. Replace the internal elements in the master brake cylinder, replace the master cylinder if necessary
3. The rubber gasket is damaged. Repair the caliper.
Poor braking despite high pedal force
1. The brake linings are oily. Replace the brake pads.
2. Incorrect or hardened brake pads installed. Replace the pads. Install genuine BMW brake pads.
3. The brake booster is faulty. Check the brake booster.
4. The brake pads are worn out. Replace the brake pads.
When braking, the car pulls to the side
1. The tire pressure is not correct. Check and correct the tire pressure.
2. Uneven tire wear. Replace worn tires.
3. The brake pads are oily. Replace the pads.
4. Different brake pads are installed on one axle. Replace the pads. Install original BMW pads.
5. Poor condition of brake pads. Replace the pads.
6. The caliper wells are dirty. Clean the guides and seating surfaces of the pads in the caliper.
7. Corrosion of brake caliper cylinders. Replace the caliper.
8. Uneven wear of the brake pad. Replace the brake pads (on both wheels).
The brake tightens by itself
1. The compensation hole in the master cylinder is clogged. Clean the master cylinder and replace the internal components.
2. The clearance between the drive rod and the master cylinder piston is too small. Check the clearance.
Brakes get hot while driving
1. The compensation hole in the master cylinder is clogged. Clean the master cylinder and replace the internal components.
2. The clearance between the drive rod and the master cylinder piston is too small. Check the clearance.
3. The throttling hole in the special valve on the bottom is clogged. Clean the main brake cylinder, replace the internal elements and brake fluid.
The brakes are shaking
1. The wrong type of brake pads are installed. Replace the pads, install genuine BMW pads.
2. The brake disc is corroded in places. Carefully polish the brake disc.
3. The brake disc has lateral runout. Treat or replace the disc.
The brake pads do not move away from the brake disc, the wheel is difficult to turn by hand
Corrosion in brake caliper cylinders. Repair the caliper, possibly replace it.
Uneven wear of brake pads
1. The wrong type of brake pads are installed. Replace the pads, install genuine BMW pads.
2. The caliper is dirty. Clean the caliper well.
3. Heavy piston stroke. Fix.
4. The brake system is not tight. Check the tightness of the brake system.
Wedge-shaped wear of brake pads
1. The brake disc does not rotate parallel to the caliper. Check the caliper mating surfaces.
2. Corrosion in the calipers. Remove contamination.
3. The piston is not working properly. Check the piston position.
Squeaking brakes
1. Often the reason is atmospheric influence (air humidity). If the creaking appears after a long period of standing in high humidity and then disappears, there is no need to do anything.
2. The wrong type of brake pads are installed. Replace the pads, install genuine BMW pads, coat the base plates with anti-squeak paste.
3. The brake disc does not rotate parallel to the caliper. Check the mating surfaces of the brake caliper.
4. The caliper shaft is dirty. Clean the caliper shaft
5. The brake shoe mounting springs are bent. Replace the mounting springs.
6. The pressure springs are stretched. Replace the pressure springs.
Brake pedal pulsation
1. ABS in action. Normal, no assistance required.
2. Too much lateral runout or thickness tolerance of the brake disc. Check runout and thickness. Rework or replace the disc.
3. The brake disc does not rotate parallel to the caliper. Check the caliper mating surface.
ABS warning light comes on while driving
1. The supply voltage is too low (below 10 V). Check the voltage. Check whether the generator indicator lamp goes out after the engine starts. If everything is OK, check the generator drive V-belt.
2. ABS damage. Check the reliability of the contact and the presence of corrosion of the ground connection at the return pump (in the hydraulic block).
Suspension and steering
The car pulls to one side when moving
1. Tires are unevenly inflated.
2. There is a defect in the tires.
3. Excessively worn suspension or steering components (Chapter Suspension and steering).
4. It is necessary to adjust the front wheel alignment angles.
5. The front brakes are seized (Chapter Brake system).
There is jerking, twitching or vibration
1. Wheel balance is disturbed or rims are out of roundness. Have them balanced at a tire shop.
2. Wheel bearings are worn out, their tightening force has weakened, or their adjustment is disturbed (Chapter Suspension and steering).
3. Shock absorbers or other suspension components are worn or damaged (Chapter Suspension and steering).
There is excessive rocking of the car or "digging" of the nose when turning or braking
1. The shock absorbers are faulty. Replace the entire set (Chapter Suspension and steering).
2. Springs and/or other suspension components are broken or weak. Check the condition of the components (Chapter Suspension and steering).
The steering wheel is too hard to turn
1. The fluid level in the power steering system reservoir has dropped excessively (Chapter Suspension and steering).
2. The tires are not inflated correctly.
3. The steering linkage joints are not sufficiently lubricated (Chapter Suspension and steering).
4. The front wheel alignment angles are out of adjustment.
5. The power steering does not develop the required power.
There is excessive play in the steering
1. The tightening force of the front wheel bearings has weakened (Chapter Suspension and steering).
2. Excessively worn suspension or steering components (Chapter Suspension and steering).
The power steering system does not develop the required force
1. The power steering pump drive belt is worn or damaged, or its tension adjustment is incorrect (Chapter Suspension and steering).
2. The hydraulic fluid level has dropped excessively (Chapter Suspension and steering).
3. The hydraulic system hoses or lines are clogged. Check and replace if necessary.
4. Air has entered the hydraulic system. Bleed the system (Chapter Suspension and steering).
There is excessive wear on the treads (not in one particular area)
1. The tires are not inflated correctly.
2. Wheel balance is disturbed. Contact a tire shop
3. Wheel disks are damaged. Check and replace if necessary.
4. Excessively worn suspension or steering components (Chapter Suspension and steering).
There is excessive wear on the outer edge of the treads
1. The tires are not inflated correctly.
2. Turns are made too sharply. Reduce speed.
3. The front wheel alignment angles are out of adjustment (excessive convergence). Contact a workshop for professional adjustment.
4. Bent or twisted suspension arm (Chapter Suspension and steering).
There is excessive wear on the inner edge of the treads
1. The tires are not inflated correctly.
2. The front wheel alignment angles are out of adjustment (divergence). Have the adjustment done at a car service workshop.
3. Steering components are damaged or loose (Chapter Suspension and steering).
There is localized wear of the tread
1. Wheel balance is disturbed.
2. The disks are damaged or bent. Check and replace if necessary.
3. There is a defect in the tires.
Windscreen wiper blade defects
Slippage
1. The rubber bands are dirty. Clean the rubber bands with a stiff nylon brush and a detergent solution or alcohol.
2. The edges of the brushes are frayed, the rubber bands are worn or torn. Replace the rubber bands.
3. Old rubber bands, cracked surfaces. Replace the rubber bands.
In the cleaning field, the remaining water immediately collects into drops
The windshield is contaminated with varnish polish or oil. Clean the windshield with a clean cloth and remover of grease, oil, silicones.
The brush cleans one-sidedly - one way is good, the other is not
1. The rubber band is deformed to one side "does not tip over anymore". Install a new rubber band.
2. The wiper arm is twisted, the blade does not fit precisely on the glass. Carefully turn the arm until the vertical position is reached.
Uncleaned surfaces
1. The elastic has come loose from the frame. Carefully insert the elastic into the frame.
2. The brush does not fit evenly to the glass because the spring bars or plates are bent. Replace the brush. This malfunction primarily occurs when the spare brush is installed carelessly.
3. The force of the lever pressing is too low. Lightly lubricate the wiper arm pivots and springs or install a new arm.
Tyre defects
Severe tire wear on both sides of the working surface
Tire pressure too low.
Severe wear of the tire in the middle of the working surface, around the entire circumference
Tire pressure is too high.
Uneven tread wear
Static and dynamic imbalance of the wheel. Possibly too much lateral runout of the disc, too much play in the bearing joints.
Uneven wear in the middle of the tread
Static wheel imbalance. Possible consequence of strong vertical runout.
Severe wear in certain areas in the middle of the working surface
Traces of blocking under full braking.
Saw-tooth tread wear. Often with a tear in the fabric base that is not visible from the outside
Overloading the vehicle. Check the inside of the tire for base tears.
Rubber tongues on the side edges of the tread
Incorrect wheel alignment. Tire is worn. Also check the condition of the shock absorber on the rear wheels.
Formation of burrs on one side of the front wheel tread
Incorrect toe adjustment. Tire is worn. Frequent driving on wavy surfaces. Fast driving on turns.
Cord breaks. At first only visible from the inside
Driving over sharp rocks, tire impacts, etc. at high speed.
One-sided worn working surface
1. Check the camber adjustment.
2. ABS damage. Check the reliability of the connection to the housing at the return pump (in the hydraulic block).
This article is available at russian, bulgarian, belarusian, ukrainian, serbian, croatian, romanian, polish, slovak, hungarian
Article verified: Sevastyanov Nikolay
Share information:
Previous articles
БМВ E46: Manual
Next articles
Similar articles on other types of BMW cars:
Troubleshooting electrical equipment BMW 5 Series E39 (1995-2003)
Troubleshooting the Fuel Injection System BMW 5 Series E28 (1981-1988)
Troubleshooting electrical equipment BMW 7 Series E32 (1986-1994)
Troubleshooting — General Information and Preliminary Checks BMW 7 Series E38 (1994-2001)
Daily checks and troubleshooting BMW X3 E83 (2003-2010)
Troubleshooting the COMMON-RAIL system at low pressure BMW X5 E53 (1999-2006)
Link in different formats to this page
Visitor comments
No comments yet
- General information
- Manual
- Maintenance
- Power unit
- Engine repair
- Cooling system
- Power system (gasoline)
- Injection system (gasoline)
- Fuel system (diesel)
- Exhaust system
- Ignition system
- Charge and launch systems
- Transmission
- Car gearbox
- Clutch and drive shafts
- Chassis
- Brake system
- Suspension front and rear
- Steering
- Body
- Body care and repair
- Exterior
- Interior
- Electrical equipment
- Troubleshooting
- Lighting and signaling
- Equipment and devices
- Heater and air conditioner
- Electrical circuits
- General information
- Manual
- Repair on the road
- Weekly checks
- Maintenance
- Troubleshooting
- Power unit
- 4 cylinder engines
- 6 cylinder engines
- Engine overhaul
- Cooling and heating
- Fuel and exhaust system
- Starting and charging system
- Ignition system
- Transmission
- Clutch
- Mechanical gearbox
- Automatic gearbox
- Cardan and drive shafts
- Chassis
- Brake system
- Wheel suspension
- Steering
- Body
- Exterior
- Interior
- Electrical equipment
- Equipment and devices
- Electrical circuits
- General information
- Maintenance
- Power unit
- Engine repair
- Cooling system
- Ignition system
- Supply system
- Fuel injection system
- Exhaust system
- Transmission
- Clutch
- Car gearbox
- Front and rear axle
- Chassis
- Steering
- Brake system
- Body
- Exterior
- Interior
- Electrical equipment
- Heating system
- Equipment and devices
- Power devices
- Electrical circuits
- Power unit
- M10/M20 engine
- M40 engine
- Ignition system
- Lubrication system
- Cooling system
- Supply system
- Fuel injection
- Exhaust system
- Transmission
- Clutch
- Manual gearbox
- Front axle
- Rear axle
- Chassis
- Steering
- Brake system
- Body
- Exterior
- Interior
- Electrical equipment
- Heating system
- Equipment and devices
- Electrical circuits
- General information
- Specifications
- Operation and maintenance
- 4-cylinder engine
- Engine repair
- Cooling and lubrication system
- Supply system
- Ignition system
- 6-cylinder engine
- Engine repair
- Cooling and lubrication system
- Supply system
- Fuel injection system
- Ignition system
- Transmission
- Clutch
- 4-speed manual gearbox
- 5-speed manual gearbox
- Automatic gearbox
- Cardan and rear axle
- Chassis
- Steering
- Front suspension
- Rear suspension
- Brake system
- Electrical equipment
- Equipment and devices
- Electrical circuits