
Table of contents: Removal ↓ Installation ↓
- Home
- BMW 7 Series
- E32
- Power unit
- Minor engine repair
- Cylinder Head Cover — Removal and Installation
Cylinder Head Cover — Removal and Installation (BMW 7 Series E32)
Removal
Disconnect the ground cable from the battery.
Separate the breather hose from the cylinder head cover.
Where necessary, loosen and remove the intake manifold bracket and, if equipped, the sensor bracket or idle air flow stabilizer (disconnect the electrical connectors from the sensors and stabilizer).
Where necessary, disconnect the air flow sensor electrical connector. Release the wiring harness from the brackets and move it to the side.
Where necessary, disconnect the pipes and hoses from the intake air duct, then loosen the clamp and separate the air duct from the throttle body. Unscrew the mounting nuts of the air cleaner housing and remove the housing together with the hose and air flow sensor.
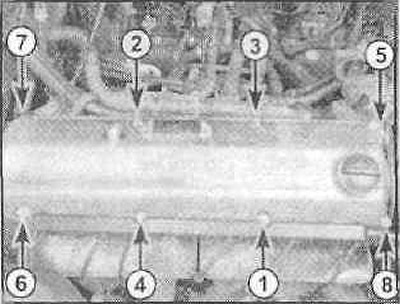
Loosen the valve cover mounting nuts in a specific sequence.
Some engines have nine mounting nuts/bolts. Additional (the ninth bolt), the one located in the front part of the cover near the ignition distributor is the last one to be unscrewed.
Where necessary, disconnect the spark plug wires from the distributor cap and set them aside. It is not usually necessary to disconnect the wires from the spark plugs.
Remove the valve cover and gasket. Discard the old gasket, use a new one when installing. Remove the camshaft cover where necessary. If fitted, remove the semi-circular rubber seal from the slot on the front of the cylinder head.
Installation
Use a scraper to remove old sealant from the mating surfaces of the valve cover and cylinder head.
Caution: Be very careful not to scratch the surfaces. There are special compounds on the market that will make the task much easier. After all traces of the sealant have been removed, wipe the surfaces with a rag soaked in a suitable solvent.
Install a new semi-circular rubber seal into the slot on the front side of the cylinder head (if necessary). Apply a special sealant to the contact surface of the seal with the valve cover gasket.
Caution: Within ten minutes of applying the sealant, the valve cover must be installed and the nuts tightened.
Install the camshaft cover (some engines), valve cover and a new gasket. Install the washers and nuts, tightening the nuts evenly and securely in the reverse order shown (see fig above). Do not overtighten the nuts - they should not deform the valve cover.
Next, install in the reverse order of removal.
This article is available at russian, bulgarian, belarusian, ukrainian, serbian, croatian, romanian, polish, slovak, hungarian
Article verified: Sevastyanov Nikolay
Share information:
Previous articles
БМВ E32: Minor engine repair
Next articles
Similar articles on other types of BMW cars:
Removal and installation the cylinder head cover BMW 3 Series E30 (1982-1994)
Cylinder Head Cover — Removal and Installation BMW 3 Series E46 (1998-2006, petrol)
Removal and installation the cylinder head cover BMW 5 Series E34 (1988-1996)
Removal and installation the cylinder head cover BMW 5 Series E28 (1981-1988)
Removal and installation the cylinder head BMW X3 E83 (2003-2010)
Replacing the cylinder head cover seal BMW X5 E53 (1999-2006)
Link in different formats to this page
Visitor comments
No comments yet
- General information
- Introduction to guide
- Manual
- Maintenance
- Power unit
- Engine M60/1, M60/2 (petrol)
- M62 engine (petrol)
- M57 engine (diesel)
- M67 engine (diesel)
- Cooling system
- Fuel system (petrol)
- Fuel system (diesel)
- Exhaust system
- Ignition and control systems
- Charge and launch systems
- Transmission
- Clutch
- Mechanical gearbox
- Automatic gearbox
- Cardan and drive shafts
- Chassis
- Brake system
- Front suspension
- Rear suspension
- Steering
- Body
- Exterior
- Interior
- Electrical equipment
- Equipment and devices
- Lighting
- Heating and air conditioning
- Electrical circuits
- General information
- Care and maintenance
- Power unit
- Minor engine repair
- Engine overhaul
- Lubrication system
- Cooling system
- Ignition system
- Supply system
- Injection system (petrol)
- Injection system (diesel)
- Exhaust system
- Transmission
- Clutch
- Manual gearbox
- Automatic gearbox
- Cardan gear
- Rear axle and shafts
- Chassis
- Front suspension
- Rear suspension
- Steering
- Wheels and tires
- Brake system
- Body
- Body elements
- Electrical equipment
- Equipment and devices
- Electrical circuits