
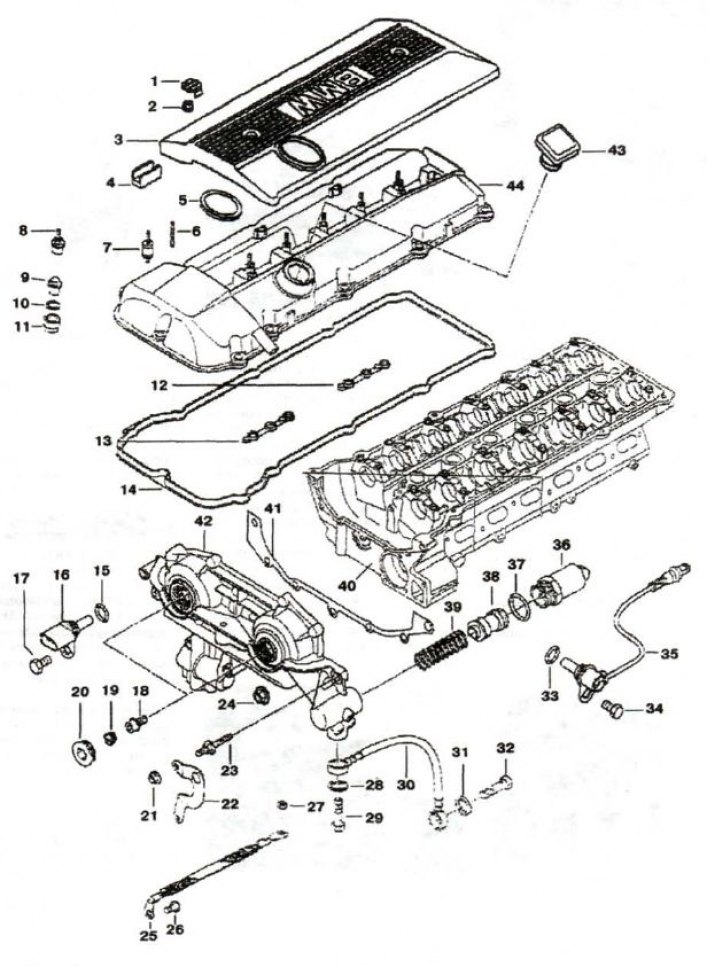
Fig. 3.63. Cylinder head cover: 1, 19 - plug; 2 - nut; 3 - protective cover; 4 - overlay; 5, 28, 31, 33, 39 - sealing ring; 6, 23 - mounting pin; 7 - rubber-metal hinge; 8, 9 - cap nut; 10 - spacer washer; 11 - seal; 12, 13, 14 - profile gasket; 15, 37 - sealing ring (17x3); 16, 35 - camshaft sensor; 17, 34 - bolt (M6x16); 18 - precision bolt; 20 - plug with sealing ring; 21 - flange hook; 22 - fastening; 24 - nut M6; 25 - "mass" jumper; 26 - bolt (M6x10); 27 - nut M8; 29, 32 - hollow bolt; 30 - oil pipeline; 36 - EMC; 37 - ring (17x3); 38 - piston; 39 - spring; 40 - cylinder head; 41 - metal seal; 42 - actuator unit; 43 - oil filler cap; 44 - head cover
Replacement of seal (12, 13, 14) the engine cylinder head covers must be removed in the following order. Remove the upper protective soundproof casing (3) covering the engine. Remove the ignition coils. Release the ignition coil wire harness from the clamps and move it to the side.
Press the clamps and disconnect the engine crankcase ventilation hose from the cover (44). Remove the jumpers (Fig. 3.64) connecting to the ground.
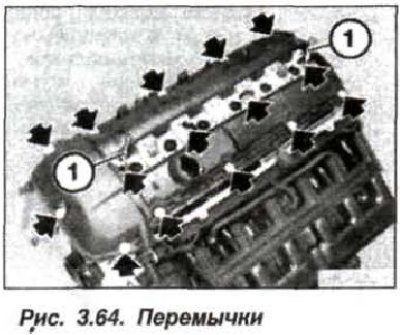
Loosen the fasteners (15 pcs.) of the cylinder head cover, unscrew them and remove the cover.
Clean the sealing surfaces of the cylinder head and head cover from the remains of the old seal. Use a hardwood scraper to clean the surfaces (beech, hornbeam, oak).
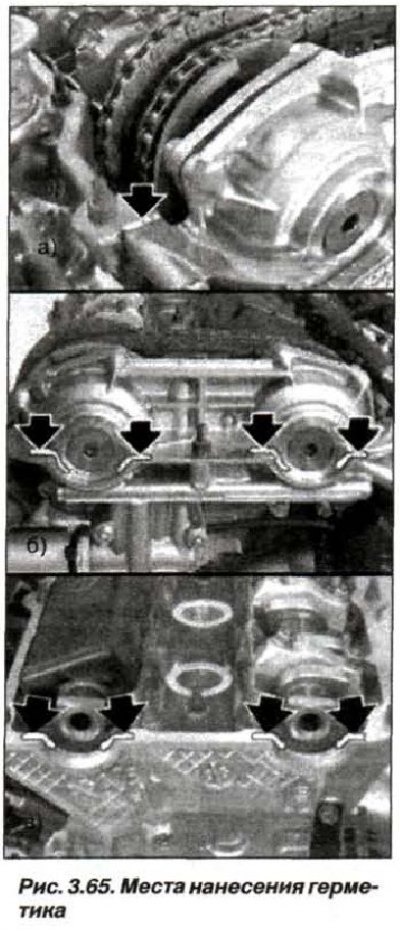
Before installing the cylinder head cover, in places with a crash - between the cylinder head and the actuators of the D-VANOS system on the left and right sides (arrow, Fig. 3.65,a); in places of rounding of the actuator unit (arrows, Fig. 3.65,b) and in places where the rear part of the cylinder head is rounded (arrows, Fig. 3.65,c) - apply an even thin layer of sealant such as Drei Bond 1209.
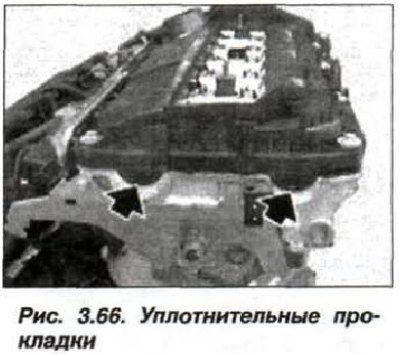
Check the condition of the sealing gaskets and replace them if necessary. Make sure the sealing gasket is installed correctly (arrows, Fig. 3.66) at the rear and front of the cylinder head.
Insert the cover mounting bolts and align it with the cylinder head. Screw in all the cover mounting bolts (M6) by hand, but do not tighten them completely. Check the cover alignment, and tighten the cover mounting bolts in a crosswise order, moving from the middle to the edges.
(Read the original source on the website BMWMAN)