

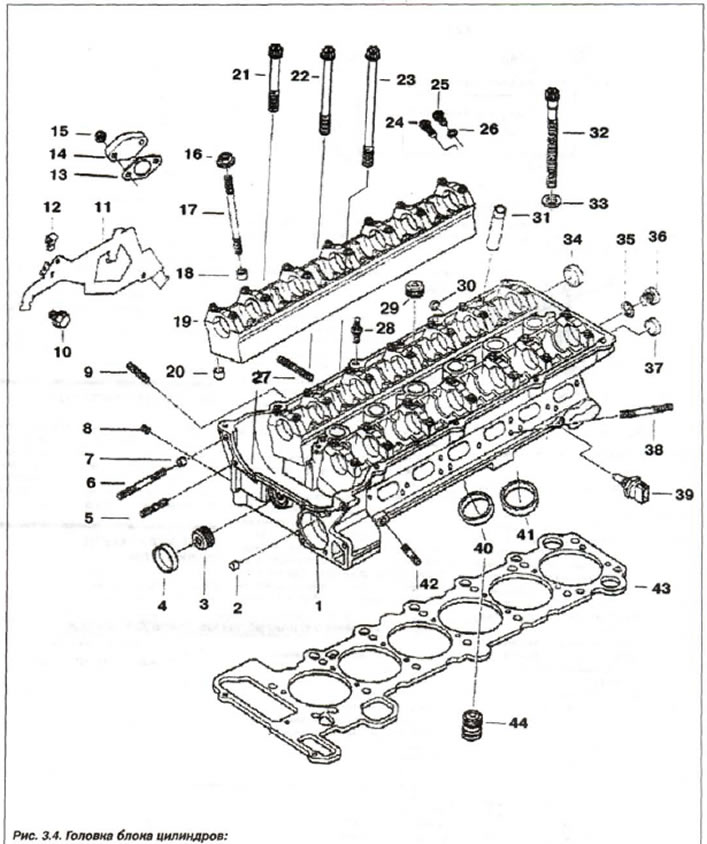
1 - cylinder head; 2.7 - centering sleeve; 3.8 - threaded plug (M8x1); 4 - cover (∅ 28); 5 - stud (M6x30); 6 - stud (M6x60); 9 - stud (M6x28); 10 - bolt (M8x28); 11 - harness holder; 12 - spacer; 13 - seal; 14.30 - lid; 15 - self-locking nut.; 16 - nut (M7); 17 - stud (M7x95); 18, 20 - center, bushing (∅ 9.5); 19 - support bar; 21 - bolt T (M6x50); 22 - bolt T (M6x70); 23 - bolt 7 (M6x100); 24 - threaded plug with sealing ring (M12x1.5x26); 25 - bolt; 26.35 - sealing ring; 27 - stud (M7x39); 28 - hairpin (M7/6x29.5); 29 - threaded plug (M18x1.5); 31 - guide bushing; 32 - head bolt (M10x110); 33 - spacer washer; 34 - cover (∅ 22); 36 - threaded plug (M10x1.0); 37 - cover (∅ 18); 38 - stud (M7x55); 39 - sensor; 40 - exhaust valve seat; 41 - valve seat; 42 - stud (M6x25); 43 - sealing gasket; 44 - check valve
Signs of damage are:
- loss of power;
- coolant level drop;
- oil level drop;
- presence of coolant in oil;
- presence of oil in the coolant;
- foaming of coolant;
- lack of compression in adjacent cylinders.
Replacing the cylinder head gasket involves three steps: removing the cylinder head, replacing the gasket, and installing the cylinder head.
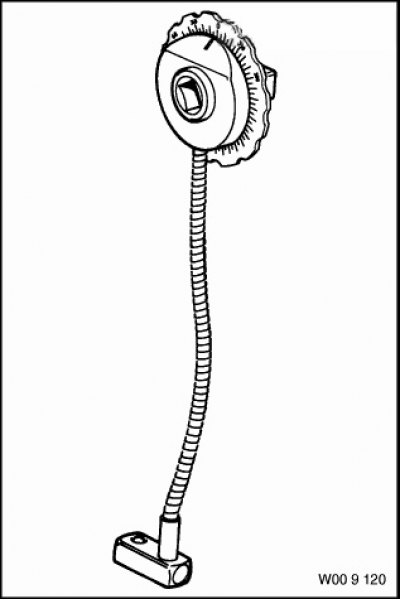
Removal of the engine cylinder head must be carried out in the following order. Prepare the device "00.9.120".
Remove both exhaust manifolds and the air filter housing together with the air flow meter.
Remove the cylinder head cover and unscrew all spark plugs. Remove the intake manifold, drain the coolant by unscrewing the plug on the engine cylinder block. Disconnect the cooling system pipes and remove the thermostat housing.
unscrew the hollow bolt (29, see Fig. 3.63) and disconnect the pressure oil line of the D-VANOS valve timing system actuator.
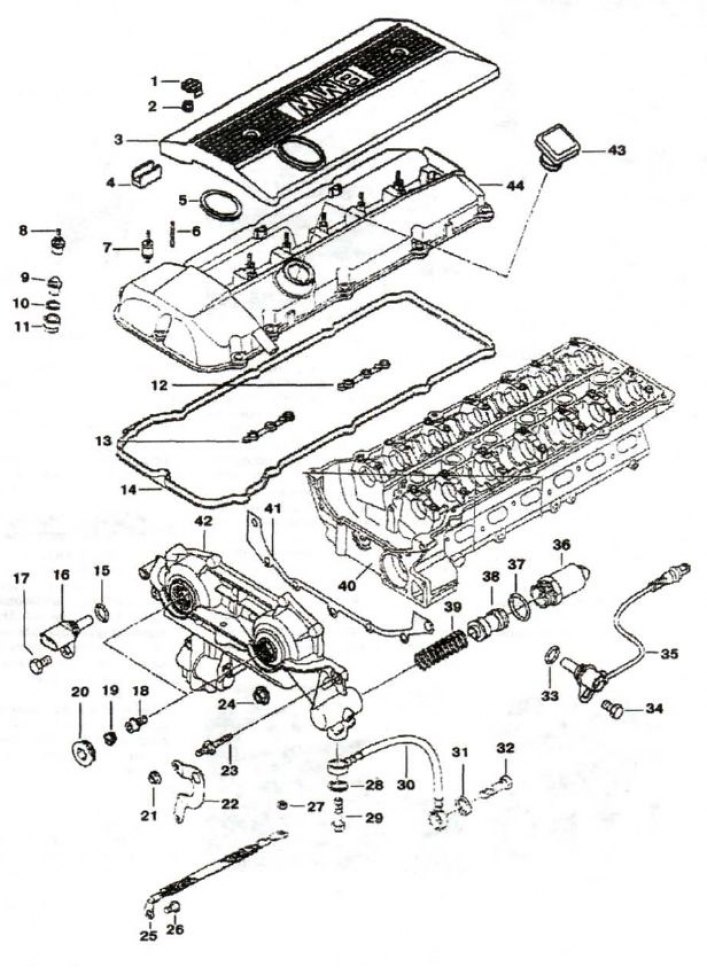
Fig. 3.63. Cylinder head cover: 1, 19 - plug; 2 - nut; 3 - protective cover; 4 - overlay; 5, 28, 31, 33, 39 - sealing ring; 6, 23 - mounting pin; 7 - rubber-metal hinge; 8, 9 - cap nut; 10 - spacer washer; 11 - seal; 12, 13, 14 - profile gasket; 15, 37 - sealing ring (17x3); 16, 35 - camshaft sensor; 17, 34 - bolt (M6x16); 18 - precision bolt; 20 - plug with sealing ring; 21 - flange hook; 22 - fastening; 24 - nut M6; 25 - "mass" jumper; 26 - bolt (M6x10); 27 - nut M8; 29, 32 - hollow bolt; 30 - oil pipeline; 36 - EMC; 37 - ring (17x3); 38 - piston; 39 - spring; 40 - cylinder head; 41 - metal seal; 42 - actuator unit; 43 - oil filler cap; 44 - head cover
Remove the D-VANOS actuator. Remove the camshafts together with the support strips (19, see Fig. 3.4) bearings.

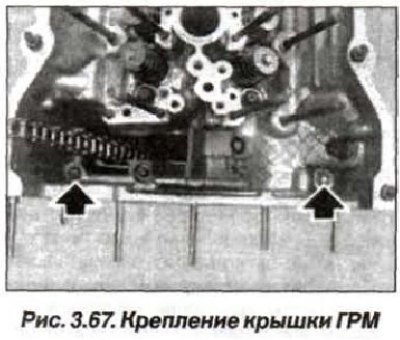
Remove the vertical bolts securing the timing belt cover to the cylinder head (arrows, Fig. 3.67).
Remove the upper guide mounting bolts (9,10,15, see Fig. 3.13) chains.
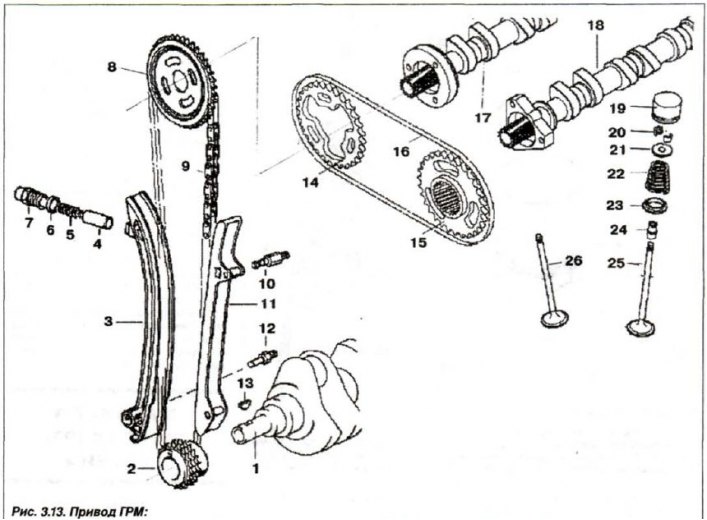
1— crankshaft; 2,8,14,15—asterisk; 3—tensioner bar; 4 — piston; 5—spring; 6 - sealing ring; 7—cover bolt; 9.16 — chain; 10,12—bar bolt; 13 — key; 17—exhaust camshaft; 18 — intake camshaft; 19 — hydraulic pusher; 20 - valve crackers; 21 - top plate; 22—spring; 23 - bottom plate; 24 — oil seal; 25 — inlet valve; 26 - exhaust valve
Unscrew the cylinder head mounting bolts from the edges to the middle in sequence 14-1 (Fig. 3.68) and remove the cylinder head.

Replacing the sealing gasket (43, see Fig. 3.4) must be carried out in the following order. Remove the old sealing gasket, it is not subject to further use.
Clean the seals (docking) surfaces on the timing belt cover, cylinder head and engine block, using only a hardwood scraper for this purpose (oak, hornbeam, beech). At the same time, make sure that the remains of the seal do not burst into the air, oil and coolant supply channels.
To remove traces of liquid (oil), blow out the threaded holes in the cylinder block and cylinder head of the engine with compressed air. The presence of liquid leads to cracks and incorrect determination of the tightening torque.
Check the centering bushings (arrows, Fig. 3.69) for the absence of damage and correct installation.
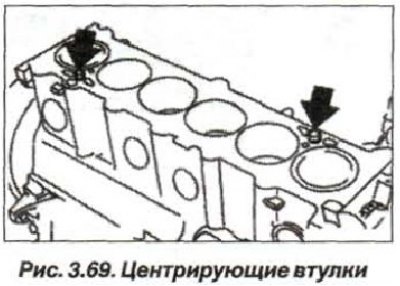
Apply a sealing compound such as Drei Bond 1209 to the joints with the timing belt cover. Replace the cylinder head gasket by installing it on the centering bushings.
Attention! For the cylinder head with treated sealing surface, install a thicker (0.3 mm) sealing gasket.
Install the cylinder head in the following order: Lightly lubricate the mating surface of the washers and the threads of the new cylinder head mounting bolts with engine oil.
Insert new cylinder head bolts and tighten them by hand, crosswise, starting from the middle and moving towards the edges of the engine. Using a pressure wrench and tool "00.9.120".

Device 00.9.120
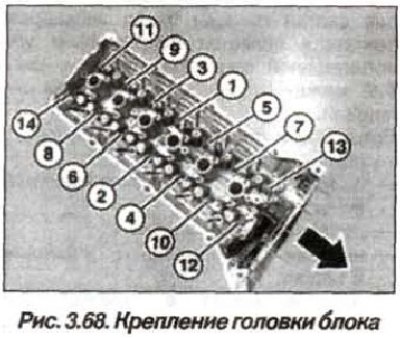
Tighten new cylinder head bolts in sequence 1-14 (see fig. 3.68) in three consecutive doses:
- first, tighten to 40 Nm (4.0 kgf·m);
- second, turn it to an angle of 90°;
- third, turn another 90° angle.
- Install the upper chain guide. Insert the bolts and tighten the threaded connections of the timing belt cover to the cylinder head. Install the camshafts.
- Install the actuator unit of the Doppel-VANOS system, tighten the hollow bolt (M 14x1.5) of the oil line to a torque of 32 N·m (3.2 kgf·m), while replacing its sealing rings.
- Assemble the engine, replacing the gasket of the bolt (M14x1.5) of the drain hole of the engine block, and tighten it to a torque of 25 N·m (2.5 kgf·m). Fill the cooling system, bleed it and check for leaks.
(The original entry can be found on the portal: bmwman.ru)