
- Home
- BMW 7 Series
- E32
- Power unit
- Minor engine repair
- Drive chain and sprockets — removal, inspection and installation
Drive chain and sprockets — removal, inspection and installation (BMW 7 Series E32)
In the M30 engine, the timing mechanism is driven by a chain. It ensures synchronous rotation of the camshaft twice as slow as the crankshaft.
The small volume of the combustion chambers of this engine also does not allow the valve to open when the piston is near TDC. This can happen if the chain or camshaft is incorrectly installed relative to the crankshaft. In this case, the valve will collide with the piston, and the engine will fail.
To prevent the chain (2) of the camshaft drive (8) from sagging and making noise, it must be constantly tensioned. For this purpose, a plastic-coated tensioner shoe (4) is used, which is pressed against the chain by a spring-loaded tensioner piston (2). To dampen chain vibrations, there is an oil damper (3), which prevents the tensioner piston from swinging. The opposite branch of the chain is enclosed on both sides between damper bars (7).
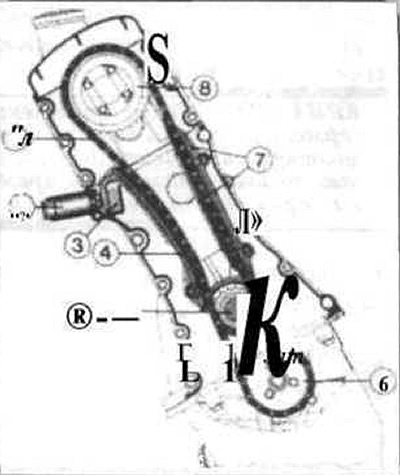
The oil pump (6) is driven by a separate chain. This short chain is often the cause of whining noises in older engines, as it does not have a tensioner and can therefore wobble when the engine is running.
Set the piston of the first cylinder to TDC in the compression stroke.
Remove the valve cover. Make sure that the piston of the first cylinder is at TDC in the compression stroke (the rocker arms of the first cylinder do not compress the valve springs).
Remove the upper timing chain cover. Note the location of the camshaft timing marks, which should now line up. On six-cylinder engines, the line drawn through the two opposite camshaft sprocket mounting bolts should be exactly vertical, and the line drawn through the other two bolts should be horizontal. Also, the hole for the dowel pin should be in the lower left corner (between 7 and 8 o'clock).
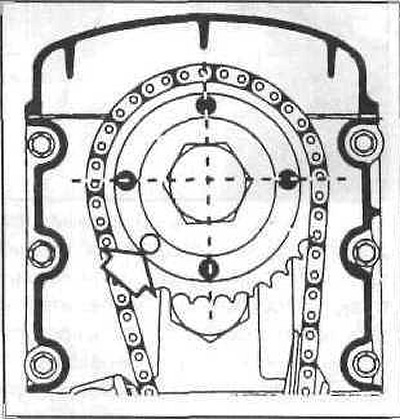
Lock the crankshaft with a key by installing it on the central bolt of the vibration damper, then loosen it (but don't take it off) four bolts securing the sprocket to the camshaft. Be very careful not to turn the camshaft or crankshaft.
Remove the lower drive chain cover.
Loosen and remove the four camshaft sprocket bolts, then move the chain away from the crankshaft sprocket and carefully remove the chain from the engine along with the camshaft sprocket.
Inspect the crankshaft and camshaft sprocket teeth for signs of wear. If the sprocket is worn, the working sides of the teeth will be slightly concave. In this case, the sprockets must be replaced.
The chain should be replaced if it cannot be tightened sufficiently (excessive noise occurs during operation) or if the sprockets are worn. It is recommended to change the chain every time the engine is overhauled.
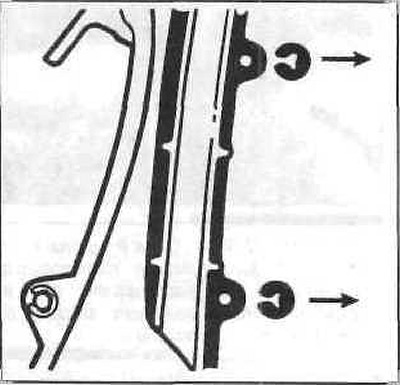
Inspect the chain guide and tensioner guide for grooves made by the chain. Replace them if they are excessively worn. The guides can be replaced after removing the snap rings.
Shake the tensioner plunger and check for a tapping sound from the ball inside. If no sound is heard, replace the plunger.
Blow first into the closed end of the plunger, then into its splined end. In the first case, air should not pass through the plunger, and in the second, it should flow through it freely. If this is not the case, replace the tensioner.
Install the tensioner guide and chain guide.
Temporarily install the lower drive chain cover and vibration damper, check the alignment of the crankshaft timing marks, and remove the vibration damper and cover again.
Route the drive chain over the crankshaft sprocket and then over the camshaft sprocket and, placing the chain between the chain guide and the tensioner guide, install the sprocket onto the camshaft. Make sure the camshaft timing marks are aligned.
Next, install in the reverse order of removal.
The small volume of the combustion chambers of this engine also does not allow the valve to open when the piston is near TDC. This can happen if the chain or camshaft is incorrectly installed relative to the crankshaft. In this case, the valve will collide with the piston, and the engine will fail.
To prevent the chain (2) of the camshaft drive (8) from sagging and making noise, it must be constantly tensioned. For this purpose, a plastic-coated tensioner shoe (4) is used, which is pressed against the chain by a spring-loaded tensioner piston (2). To dampen chain vibrations, there is an oil damper (3), which prevents the tensioner piston from swinging. The opposite branch of the chain is enclosed on both sides between damper bars (7).
The oil pump (6) is driven by a separate chain. This short chain is often the cause of whining noises in older engines, as it does not have a tensioner and can therefore wobble when the engine is running.
Caution: Do not rotate the camshaft or crankshaft while the timing chain is removed, as this may cause the valves to strike the pistons, resulting in costly repairs.
Removal
Set the piston of the first cylinder to TDC in the compression stroke.
Remove the valve cover. Make sure that the piston of the first cylinder is at TDC in the compression stroke (the rocker arms of the first cylinder do not compress the valve springs).
Remove the upper timing chain cover. Note the location of the camshaft timing marks, which should now line up. On six-cylinder engines, the line drawn through the two opposite camshaft sprocket mounting bolts should be exactly vertical, and the line drawn through the other two bolts should be horizontal. Also, the hole for the dowel pin should be in the lower left corner (between 7 and 8 o'clock).
Note: Since the engine is mounted at an angle in the engine bay, all references to horizontal and vertical positions when adjusting the camshaft position are in relation to the crankshaft, not to the ground.
Lock the crankshaft with a key by installing it on the central bolt of the vibration damper, then loosen it (but don't take it off) four bolts securing the sprocket to the camshaft. Be very careful not to turn the camshaft or crankshaft.
Caution: The camshaft sprocket bolts on some early models have locking tabs. Bend these out before loosening the bolts.
Remove the lower drive chain cover.
Loosen and remove the four camshaft sprocket bolts, then move the chain away from the crankshaft sprocket and carefully remove the chain from the engine along with the camshaft sprocket.
Inspection
Stars
Inspect the crankshaft and camshaft sprocket teeth for signs of wear. If the sprocket is worn, the working sides of the teeth will be slightly concave. In this case, the sprockets must be replaced.
Caution: The crankshaft sprocket is pressed onto the crankshaft and can only be removed with a puller after removing the woodruff key and oil pump. It is recommended that a new sprocket be installed on the crankshaft after heating it to 200°C. For this reason, if the crankshaft sprocket requires replacement, it is recommended that the crankshaft be removed, taken to a workshop and have the sprocket replaced by a specialist.
Drive chain
The chain should be replaced if it cannot be tightened sufficiently (excessive noise occurs during operation) or if the sprockets are worn. It is recommended to change the chain every time the engine is overhauled.
Chain guide and tensioning mechanism
Inspect the chain guide and tensioner guide for grooves made by the chain. Replace them if they are excessively worn. The guides can be replaced after removing the snap rings.
Shake the tensioner plunger and check for a tapping sound from the ball inside. If no sound is heard, replace the plunger.
Blow first into the closed end of the plunger, then into its splined end. In the first case, air should not pass through the plunger, and in the second, it should flow through it freely. If this is not the case, replace the tensioner.
Installation
Install the tensioner guide and chain guide.
Temporarily install the lower drive chain cover and vibration damper, check the alignment of the crankshaft timing marks, and remove the vibration damper and cover again.
Route the drive chain over the crankshaft sprocket and then over the camshaft sprocket and, placing the chain between the chain guide and the tensioner guide, install the sprocket onto the camshaft. Make sure the camshaft timing marks are aligned.
Next, install in the reverse order of removal.
This article is available at russian, bulgarian, belarusian, ukrainian, serbian, croatian, romanian, polish, slovak, hungarian
Article verified: Sevastyanov Nikolay
Share information:
Previous articles
БМВ E32: Minor engine repair
Next articles
Similar articles on other types of BMW cars:
Sprockets and chain tensioners — removal, inspection and installation BMW 3 Series E46 (1998-2006, petrol)
Removal, installation and adjusting the tension of the camshaft drive… BMW 3 Series E21 (1975-1983)
Removal, inspection and installation of the timing chain and its… BMW 5 Series E28 (1981-1988)
Removal and installation the wheel drive shaft BMW 5 Series E12 (1972-1981)
Pistons — removal and installation BMW X3 E83 (2003-2010)
Removal and installation the alternator drive belt BMW X5 E53 (1999-2006)
Sprockets and chain tensioners — removal, inspection and installation BMW 3 Series E46 (1998-2006, petrol)
Removal, installation and adjusting the tension of the camshaft drive… BMW 3 Series E21 (1975-1983)
Removal, inspection and installation of the timing chain and its… BMW 5 Series E28 (1981-1988)
Removal and installation the wheel drive shaft BMW 5 Series E12 (1972-1981)
Pistons — removal and installation BMW X3 E83 (2003-2010)
Removal and installation the alternator drive belt BMW X5 E53 (1999-2006)
Link in different formats to this page
Visitor comments
No comments yet
- General information
- Introduction to guide
- Manual
- Maintenance
- Power unit
- Engine M60/1, M60/2 (petrol)
- M62 engine (petrol)
- M57 engine (diesel)
- M67 engine (diesel)
- Cooling system
- Fuel system (petrol)
- Fuel system (diesel)
- Exhaust system
- Ignition and control systems
- Charge and launch systems
- Transmission
- Clutch
- Mechanical gearbox
- Automatic gearbox
- Cardan and drive shafts
- Chassis
- Brake system
- Front suspension
- Rear suspension
- Steering
- Body
- Exterior
- Interior
- Electrical equipment
- Equipment and devices
- Lighting
- Heating and air conditioning
- Electrical circuits
- General information
- Care and maintenance
- Power unit
- Minor engine repair
- Engine overhaul
- Lubrication system
- Cooling system
- Ignition system
- Supply system
- Injection system (petrol)
- Injection system (diesel)
- Exhaust system
- Transmission
- Clutch
- Manual gearbox
- Automatic gearbox
- Cardan gear
- Rear axle and shafts
- Chassis
- Front suspension
- Rear suspension
- Steering
- Wheels and tires
- Brake system
- Body
- Body elements
- Electrical equipment
- Equipment and devices
- Electrical circuits