
- Home
- BMW 5 Series
- E28
- Power unit
- Engine in a car
- Removal, inspection and installation of the timing chain and its tensioner sprockets
Removal, inspection and installation of the timing chain and its tensioner sprockets (BMW 5 Series E28)
This procedure applies to M10 and M30 engines only.
After the engine is at TDC, do not turn the camshaft or crankshaft until the timing chain has been installed. If the camshaft or crankshaft is turned with the timing chain removed, the valves may strike the pistons, causing serious internal engine damage.
Removal
1. Bring cylinder #1 to the top dead center (TDC) position of the compression stroke (see section Bringing the piston of the first cylinder to the top dead center (TDC) position).
2. Remove the cylinder head cover (see section Removal and installation the cylinder head cover). Once again, make sure that cylinder #1 is in the TDC position of the compression stroke and its rocker arms are not compressing the valve springs.
3. Remove the upper cover of the distribution chain (see section Removal and installation timing chain covers). Note the position of the camshaft timing marks, which should now be aligned. On four-cylinder engines (M10), there is usually a mark stamped on the camshaft flange that coincides with the protruding mark on the top of the cylinder head; also, the camshaft sprocket dowel pin hole will be at its lowest point. On M30 six-cylinder engines, a line drawn through two opposing camshaft sprocket bolts will be perfectly vertical, while a line drawn through the other two bolts will be exactly horizontal. Also, the dowel pin should be in the lower left corner (between 7 and 8 o'clock). Before disassembling, make sure you have correctly determined the TDC position for the camshaft, since the correct valve timing depends on whether you have accurately aligned them during assembly.
Since the engine is mounted at an angle in the engine compartment, all vertical and horizontal adjustments must be made in relation to the crankshaft, not the ground.
4. Secure the crankshaft stationary to the damper center bolt using a socket and ratchet, then loosen (but don't unscrew it completely) four bolts securing the camshaft sprocket to the camshaft. Be very careful not to turn the crankshaft or camshaft.
Some earlier models may have locking tabs for the camshaft sprocket bolts. If this is the case, bend the tabs down before loosening the bolts. These tabs are no longer manufactured by the manufacturer and will not be needed for assembly.
5. Remove the lower cover of the distribution chain (see section Removal and installation timing chain covers).
6. Loosen the four camshaft sprocket mounting bolts, then separate the chain from the crankshaft sprocket and carefully remove it and the camshaft sprocket from the engine. You may need to gently pry the camshaft sprocket with a screwdriver.
Inspection
Distribution stars
Inspect the camshaft and crankshaft sprocket teeth for signs of wear. Each tooth is shaped like an inverted "V." When worn, one side of each tooth will be slightly concave under stress compared to the other side (i.e., one side of the "V" will be more concave, and the letter will appear crooked). If the teeth appear worn, the sprocket should be replaced.
The crankshaft sprocket is pressed onto the shaft and can be removed using a crank puller after removing the woodruff key and oil pump (see section Removal, inspection and installation of the oil pump). However, BMW experts recommend pressing the new sprocket onto the crankshaft by heating it to a temperature of 80°C for M10 engines and 200°C for M30 engines. For this reason, if the crankshaft sprocket requires replacement, we recommend removing the crankshaft (see Part Engine Component Overhaul Procedures of this Chapter) and take it to a mechanical workshop to have the old sprocket removed and a new one pressed on.
Distribution chain
The chain should be replaced if the sprockets are worn or the chain becomes loose (this is indicated by excessive noise during its operation). It is best to replace the chain every time the engine is overhauled. If the chain is very worn, small grooves may form on the tension rollers. To avoid problems in the future, if you have any doubts about the condition of the chain, replace it.
Chain guide and tensioner
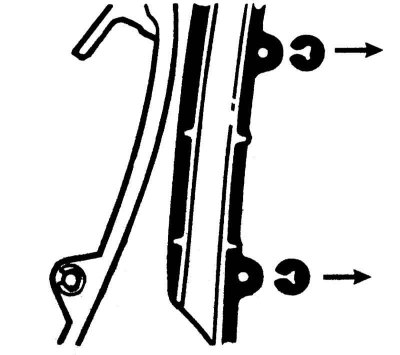
1. Inspect the chain guide and tensioner shoe for deep grooves caused by contact with the chain. If they are too worn, replace them. The guides can be replaced by removing the snap rings with a sharp tool or needle-nose pliers.
2. Shake the tensioner plunger and listen for the ball valve to rattle. If it does not rattle, replace the plunger.
3. To further check the tensioner plunger, blow first through its closed end, then through the end with a slot (guide). When blowing through the closed end, air should not pass through it, and when blowing through the end with a slot, on the contrary, it should pass freely. If the plunger does not pass this test, replace it.
Installation
1. Install the tensioner shoe and chain guide if removed.
2. Temporarily install the lower timing chain cover and the vibration damper. To check the crankshaft timing marks. After checking the alignment of the TDC marks, remove the vibration damper and cover.
3. Install the timing chain on the crankshaft sprocket, then on the camshaft sprocket, and passing it between the chain guide and the tensioner shoe, install the camshaft sprocket on the camshaft. Check the alignment of the camshaft timing marks.
4. Perform the rest of the installation procedure in the reverse order of removal. Remember to tighten the fasteners to the required torque.
This article is available at russian, bulgarian, belarusian, ukrainian, serbian, croatian, romanian, polish, slovak, hungarian
Article verified: Zhuravleva Isolda
Share information:
Previous articles
БМВ E28: Engine in a car
Next articles
Similar articles on other types of BMW cars:
Timing Chain Sprockets and Tensioner — Removal and Installation BMW 3 Series E46 (1998-2006, petrol)
Removal and installation, checking of the chain tensioner BMW 3 Series E30 (1982-1994)
Drive chain and sprockets — removal, inspection and installation BMW 7 Series E32 (1986-1994)
Removal and installation timing chain covers BMW 7 Series E38 (1994-2001)
Pistons — removal and installation BMW X3 E83 (2003-2010)
Replacing the hydraulic timing chain tensioner BMW X5 E53 (1999-2006)
Link in different formats to this page
Visitor comments
No comments yet
- General information
- Governing bodies
- Manual
- Maintenance
- Power unit
- Engine repair
- Lubrication system
- Cooling system
- Ignition system
- Supply system
- Injection system (gasoline)
- Injection system (diesel)
- Exhaust system
- Transmission
- Clutch
- Car gearbox
- Front axle
- Rear axle
- Chassis
- Steering
- Brake system
- Wheels and tires
- Body
- Interior
- Exterior
- Heating system
- Electrical equipment
- Equipment and devices
- Power devices
- Windscreen wipers
- Electrical circuits
- General information
- Manual
- Maintenance
- Power unit
- Engine repair
- Ignition system
- Engine lubrication system
- Cooling system
- Fuel system (gasoline)
- Fuel system (diesel)
- Exhaust system
- Transmission
- Clutch
- Car gearbox
- Chassis
- Front and rear suspension
- Steering
- Brake system
- Body
- Exterior
- Interior
- Electrical equipment
- Heating system
- Equipment and devices
- Power devices
- Electrical circuits
- General information
- Manual
- Maintenance
- Power unit
- Engine in a car
- Engine overhaul
- Cooling system
- Supply system
- Ignition system
- Control system
- Transmission
- Clutch
- Manual gearbox
- Automatic gearbox
- Transmission line
- Chassis
- Steering
- Front suspension
- Rear suspension
- Brake system
- Body
- Body elements
- Car care and painting
- Electrical equipment
- Heater and air conditioner
- Equipment and devices
- Starter and generator
- Electrical circuits
- General information
- Operation and maintenance
- Specifications
- Power unit
- Engine repair
- Cooling and lubrication system
- Supply system
- Ecotronic power supply system
- Fuel injection system
- Ignition system
- Transmission
- Clutch
- Gearbox BMW 242/4
- Gearbox Getrag 262/8
- Gearbox Getrag 265/6
- Automatic gearbox
- Cardan gear
- Rear axle
- Chassis
- Steering
- Front suspension
- Rear suspension
- Brake system
- Electrical equipment
- Equipment and devices
- Electrical circuits