
Table of contents: Engine M43TU ↓ Engine N42 ↓
- Home
- BMW 3 Series
- E46
- Power unit
- 4 cylinder engines
- Timing Chain Sprockets and Tensioner — Removal and Installation
Timing Chain Sprockets and Tensioner — Removal and Installation (BMW 3 Series E46)
Engine M43TU
Stars
1. Removing the sprockets is described in paragraph 7 as part of the chain removal procedure.
Tensioner
2. Set the engine to the TDC position of piston No.1 and secure the crankshaft as described in paragraph 3.
3. Remove the chain covers as described in paragraph 6.
4. Press the lower end of the tensioner shoe to loosen the chain and push the tensioner plunger down until the groove on the plunger aligns with the hole in the tensioner body. Lock the plunger in this position by inserting a rod or drill of the appropriate diameter into the hole and groove.
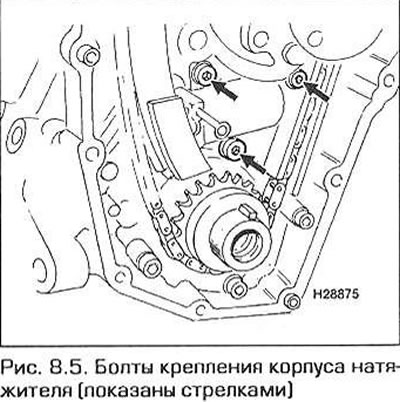
5. Unscrew the tensioner housing mounting bolts and remove it from the engine (Fig. 8.5).
6. Do not remove the tensioner rod until the tensioner is installed. Do not attempt to disassemble the tensioner - a special proprietary device is required for its assembly.
7. If a new tensioner is purchased, it is also locked in the depressed position. Do not pull out the lock until the tensioner is installed in place.
8. Installation is carried out in the reverse order of removal, taking into account the following notes.
- a) Check the condition of the sealing ring and replace it if necessary.
- b) Do not remove the retainer until the tensioner is in place.
- c) Install the chain covers as described in paragraph 6.
Engine N42
Stars
9. Removing the sprockets is described in paragraph 7 as part of the chain removal procedure.
Tensioner
10. The hydraulic chain tensioner acts on the right guide shoe. Unscrew the tensioner assembly (see fig. 7.29). Be prepared for oil to leak from the hole. The sealing ring will need to be replaced during assembly.
11. If the tensioner plunger needs to be replaced, hold the unit vertically with the hex head facing down. Push down on the plunger to squeeze all the oil out of the housing. Repeat the procedure if necessary.
12. Replace the sealing ring and screw the unit back into place. Tighten the plug to the required torque.
This article is available at russian, bulgarian, belarusian, ukrainian, serbian, croatian, romanian, polish, slovak, hungarian
Article verified: Ilyinsky Matvey
Share information:
Previous articles
БМВ E46: 4 cylinder engines
Next articles
Similar articles on other types of BMW cars:
Removal, inspection and installation of the timing chain and its… BMW 5 Series E28 (1981-1988)
Removal and installation the timing belt BMW 5 Series E34 (1988-1996)
Timing Chain Covers — Removal and Installation BMW 7 Series E32 (1986-1994)
Removal and installation timing chain covers BMW 7 Series E38 (1994-2001)
Pistons — removal and installation BMW X3 E83 (2003-2010)
Replacing the hydraulic timing chain tensioner BMW X5 E53 (1999-2006)
Link in different formats to this page
Visitor comments
No comments yet
- General information
- Manual
- Maintenance
- Power unit
- Engine repair
- Cooling system
- Power system (gasoline)
- Injection system (gasoline)
- Fuel system (diesel)
- Exhaust system
- Ignition system
- Charge and launch systems
- Transmission
- Car gearbox
- Clutch and drive shafts
- Chassis
- Brake system
- Suspension front and rear
- Steering
- Body
- Body care and repair
- Exterior
- Interior
- Electrical equipment
- Troubleshooting
- Lighting and signaling
- Equipment and devices
- Heater and air conditioner
- Electrical circuits
- General information
- Manual
- Repair on the road
- Weekly checks
- Maintenance
- Troubleshooting
- Power unit
- 4 cylinder engines
- 6 cylinder engines
- Engine overhaul
- Cooling and heating
- Fuel and exhaust system
- Starting and charging system
- Ignition system
- Transmission
- Clutch
- Mechanical gearbox
- Automatic gearbox
- Cardan and drive shafts
- Chassis
- Brake system
- Wheel suspension
- Steering
- Body
- Exterior
- Interior
- Electrical equipment
- Equipment and devices
- Electrical circuits
- General information
- Maintenance
- Power unit
- Engine repair
- Cooling system
- Ignition system
- Supply system
- Fuel injection system
- Exhaust system
- Transmission
- Clutch
- Car gearbox
- Front and rear axle
- Chassis
- Steering
- Brake system
- Body
- Exterior
- Interior
- Electrical equipment
- Heating system
- Equipment and devices
- Power devices
- Electrical circuits
- Power unit
- M10/M20 engine
- M40 engine
- Ignition system
- Lubrication system
- Cooling system
- Supply system
- Fuel injection
- Exhaust system
- Transmission
- Clutch
- Manual gearbox
- Front axle
- Rear axle
- Chassis
- Steering
- Brake system
- Body
- Exterior
- Interior
- Electrical equipment
- Heating system
- Equipment and devices
- Electrical circuits
- General information
- Specifications
- Operation and maintenance
- 4-cylinder engine
- Engine repair
- Cooling and lubrication system
- Supply system
- Ignition system
- 6-cylinder engine
- Engine repair
- Cooling and lubrication system
- Supply system
- Fuel injection system
- Ignition system
- Transmission
- Clutch
- 4-speed manual gearbox
- 5-speed manual gearbox
- Automatic gearbox
- Cardan and rear axle
- Chassis
- Steering
- Front suspension
- Rear suspension
- Brake system
- Electrical equipment
- Equipment and devices
- Electrical circuits