
M43TU Engine - Top Cover
Note. Installing the cover will require a new gasket and a suitable sealant. To install the cover, you will need to screw two studs into the holes of the bolts that secure the cover. In addition, you will need a thin metal plate.
Withdrawal
1. Drain the coolant (see chapter 1).
2. Remove the cylinder head cover as directed in paragraph 4.
3. Remove the camshaft position sensor from the cover (if necessary, see chapter 4A).
4. Remove the clips and remove the electrical wiring from the circuit cover.
5. Remove the thermostat (see chapter 3).
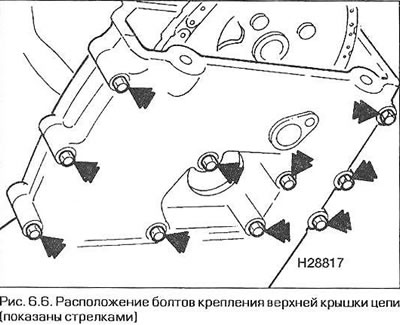
6. Remove the screws securing the chain cover and remove the cover (pic. 6.6). Remove the pads.
7. Remove the rubber seal from the top side of the lower chain cover.
8. There is usually a common gasket under the top and bottom covers. If in your case such a gasket is indeed installed, and you are not going to remove the bottom cover, cut off the top of the gasket flush with the top plane of the bottom cover. Cut from inside out. Spare parts are supplied with a gasket under the top cover separately from the bottom one.
Installation
9. To begin with, thoroughly clean all mating surfaces.
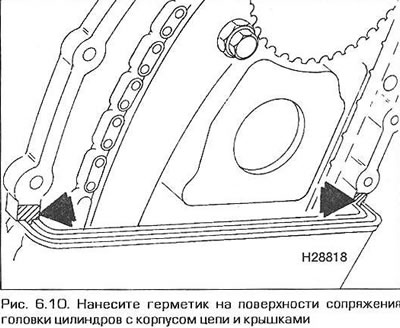
10. Apply a layer of sealant to the mating surfaces of the cylinder head with the chain case and covers (pic. 6.10).
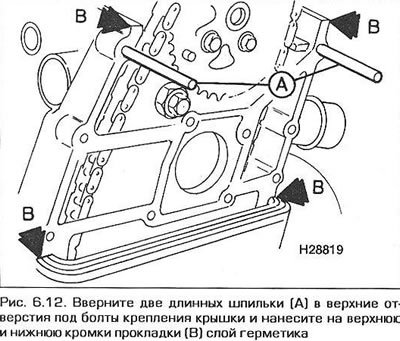
11. Screw in two long hairpins (or bolts with sheared heads) into the threaded holes of the bolts that secure the top cover of the chain.
12. Lay a new gasket under the top cover on the surface of the chain case. Apply a thin layer of sealant to the top and bottom edges of the gasket (pic. 6.12).
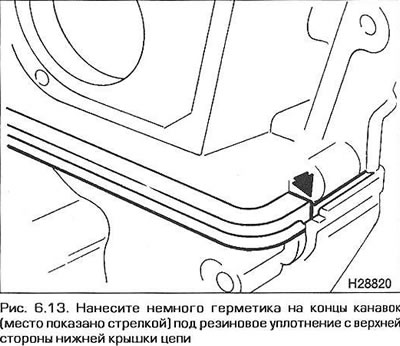
13. Apply some sealant to the ends of the rubber seal grooves on the top side of the lower chain cover (pic. 6.13).
14. Insert the rubber seal into the grooves of the bottom cover.
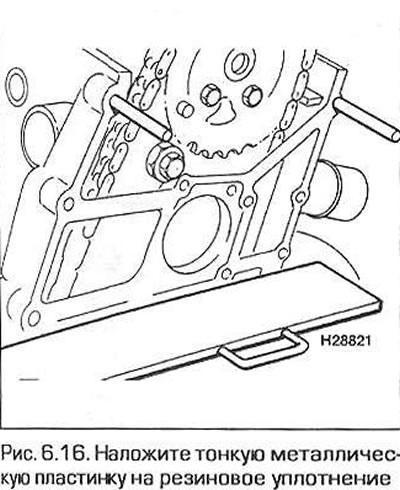
15. The manufacturer recommends using tool 11 2 330 to prevent the rubber seal on the bottom cover from shifting when the top cover is installed. The tool can be replaced with a very thin metal plate. The plate must be large enough to cover the entire seal.
16. Lubricate both sides of the plate with a light coat of grease and place the plate on the seal (pic. 6.16).
17. Slide the top chain cover onto the mounting studs. Secure the cover with the lower outer bolts, hand-tight for now.
18. Carefully pull the metal plate out from under the cover.
19. Replace the cylinder head cover without gasket.
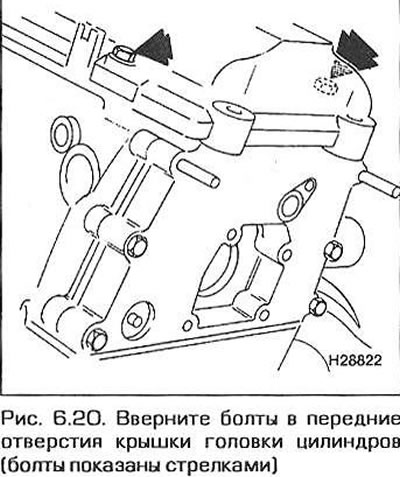
20. Screw two M6 bolts with large washers into the front holes of the cylinder head cover (screw in the bolts with which the cover is attached to the head of the block, and not to the chain cover) (pic. 6.20).
21. Tighten the cylinder head cover screws to move the chain cover down until it rests against the surface of the cylinder head.
22. Tighten the previously screwed chain cover bolts to the required torque.
23. Turn out adjusting hairpins of a cover of a chain and screw instead of them bolts of fastening of a cover. Tighten the bolts to the required torque.
24. Turn out two bolts М6 of a cover of a head of cylinders. Remove the cover.
25. Replace the thermostat (see chapter 3).
26. Install the camshaft position sensor (if necessary see chapter 4A, paragraph 12)
27. Install the cylinder head cover as indicated in paragraph 4.
28. Fill the cooling system with liquid (see chapter 1).
29. Attach the electrical wiring removed earlier to the chain cover.
M43TU Engine - Bottom Cover
Note. Installation will require a new gasket and a suitable sealant.
Withdrawal
30. Remove the top chain cover as above.
31. Remove the accessory drive belt as directed in chapter 1.
32. Turn out bolts and remove a pulley of the water pump. To stop the pulley from turning, wrap the old drive belt around it and squeeze it firmly.
33. Turn away bolts of fastening of the gauge of position of a cranked shaft to an arm, remove the gauge and move it aside (for more information, please contact paragraph 12 chapter 4A). In order not to damage the sensor, it is better to remove it completely.
34. Remove the wiring and hoses from the cover and slide them out of the work area.
35. Remove crankshaft pulley with damper and hub (see paragraph 5).
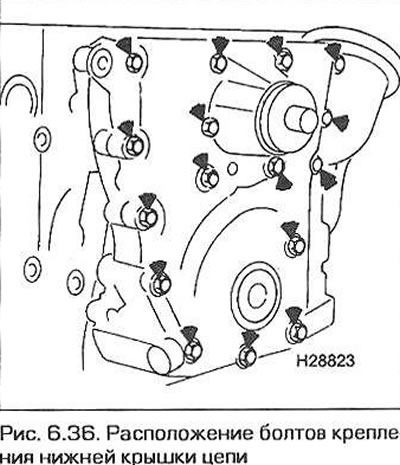
36. Turn out bolts of fastening of the bottom cover of a chain (remember their location) and remove the cover (pic. 6.36). Refer to point 8.
37. To begin with, thoroughly clean all mating surfaces.
38. Note the installation depth of the cuff in the lower chain cover, then remove the cuff.
39. Clean bore 8 on the cover under the cuff, then insert a new cuff and press it in to the previously marked depth. To press the cuff, you can use a piece of pipe or a large socket head, the diameter of which is slightly smaller than the outer diameter of the cuff.
40. Check that the cover dowel pins are in the chain case.
41. Apply a new gasket to the mounting surface of the housing under the cover. To keep the gasket from falling off "glue" with a small amount of grease. Keep the following in mind:
- A) Install a single spacer under the lower and upper chain covers. Apply some sealant to the top end of the gasket.
- b) Install the top chain cover as above. Since there is a single gasket under both covers, omit any instructions regarding a separate gasket under the top cover. There is also no need to screw in the studs when installing the top cover.
42. Replace the bottom cover, secure it with bolts and tighten the bolts to the required torque.
43. Install the hub and pulley with damper on the crankshaft (see paragraph 5).
44. Fix on a cover earlier removed hoses and electroconducting.
45. Reinstall the crankshaft position sensor.
46. Install the pulley on the water pump shaft and tighten the pulley mounting bolts.
47. Install the accessory drive belt as specified in chapter 1.
N42 engine
49. On these engines, the chain case is made as one piece with the cylinder block, without covers.