
Examination
1. The function, material and design of the belt is such that it will age and break over time. To prevent problems when the belt breaks while driving, it must be periodically inspected and, if necessary, replaced.
2. Depending on the number of auxiliary units that the car is equipped with, there may be several belts to drive them. The belts drive the water pump, generator, air conditioning compressor, steering pump.
3. To inspect the belts, first remove the cooling fan with shroud (see chapter 3).
4. Stop the engine, open the hood, inspect and feel the belts for cracks and detachments. Also inspect the belts for burn marks and shiny spots. Inspect both surfaces of the belt, turning it as needed. To inspect the entire length of the belts, turn the engine as needed with a socket wrench on the head of the crankshaft center bolt.
Replacement - M43TU engine
Compressor drive belt
5. The best access to the belt is from under the car. Raise the front of the vehicle and place it on jack stands (see appendix: Lifting the vehicle and placing it on stands). Remove the crankcase protection from under the engine.
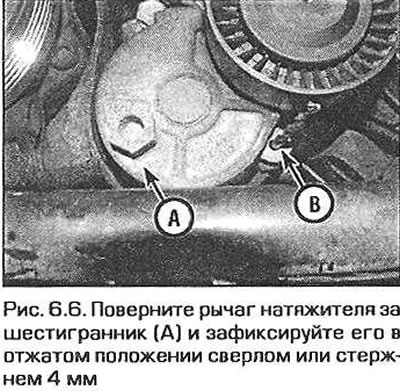
6. Put the wrench on the hex of the tensioner lever and turn the lever fully clockwise. After loosening the belt tension in this way, remove it from the pulleys. Fix the position of the tensioner by inserting a 4 mm drill or a suitable rod into the hole of the lever (pic. 6.6).
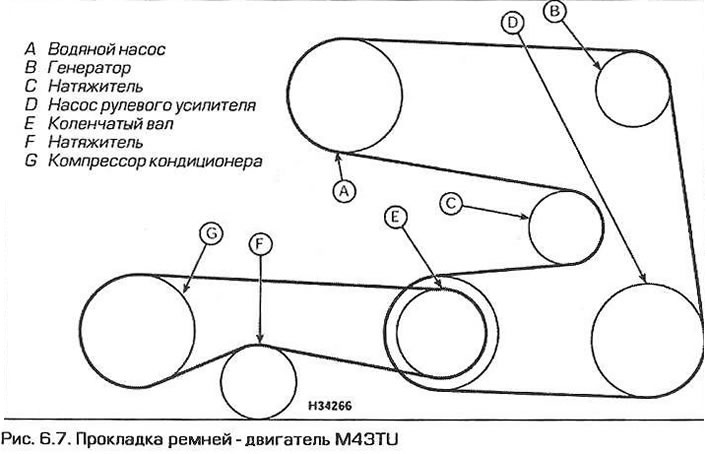
7. Put a new belt on the pulleys. Press the tensioner lever with a hexagon wrench and pull out the fixing rod (or drill). Release the lever, let it turn and tighten the belt (pic. 6.7).
8. Replace the crankcase protection and lower the vehicle.
Water pump drive belt, alternator and steering pump (with hydraulic tensioner)
9. Remove the compressor drive belt as above (if there is a compressor).
10. If the belt is going to be installed again and used further, mark the direction of rotation of the belt before removing it.
11. For better access, remove the cooling fan along with its casing (see chapter 3).
12. Before removing the belt, remember its gasket.
13. Loosen the tensioner with an open-end wrench (sink the plunger) and remove the belt from the pulleys.
14. Release the tensioner.
15. If a previously working belt is installed, take into account the label indicating the direction of its rotation.
16. Retract the tensioner and put the belt on the pulleys, routing it in the same way as before. Make sure. that the belt is in the correct position relative to the pulley grooves.
17. Reinstall the cooling fan and shroud (if necessary, contact for details chapter 3).
18. Install the compressor drive belt (if there is a compressor), as mentioned above.
Water pump drive belt, alternator and steering pump (with mechanical tensioner)
19. Remove the compressor drive belt as above (if there is a compressor).
20. If the belt is going to be installed again and used further, mark the direction of rotation of the belt before removing it.
21. For better access, remove the cooling fan along with its casing (see chapter 3).
22. Before removing the belt, remember its gasket.
23. Remove the cover from the center of the tensioner pulley.
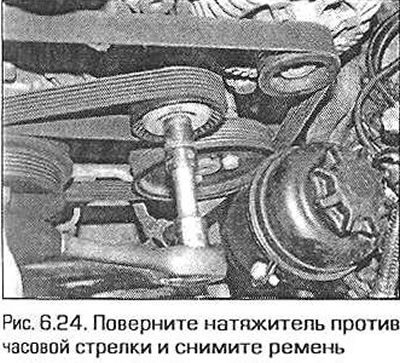
24. With a wrench on the head of the pulley bolt, turn the tensioner counterclockwise. Remove the belt from the pulleys (pic. 6.24).
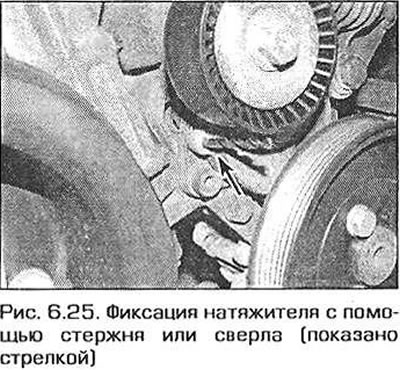
25. To facilitate the installation of the tensioner belt, it can be fixed in the wrung out state by inserting a suitable rod into the holes of the tensioner and its base plate (pic. 6.25). Please note that the tensioner has a fairly strong spring, so the fixing rod must be strong enough.
26. If a previously working belt is installed, take into account the label indicating the direction of its rotation.
27. If the tensioner was not fixed in the depressed state, wring it out with a key and put the belt on the pulleys (see fig. 6.7). Make sure that the belt lugs fit into the pulley grooves.
28. If the tensioner has been fixed, wring it out and pull out the fixing rod (drill). Release tensioner.
29. Reinstall the cooling fan and shroud.
30. Install the compressor drive belt as described earlier in this paragraph.
Replacement - N42 engine
31. Open the hood. Remove the intake duct cover at the front of the engine compartment. To do this, pull the center pins out of the casing latches, and then remove the latches themselves. Pull the cover out of the engine compartment.
32. If the belt is going to be installed again and used further, mark the direction of rotation of the belt before removing it.
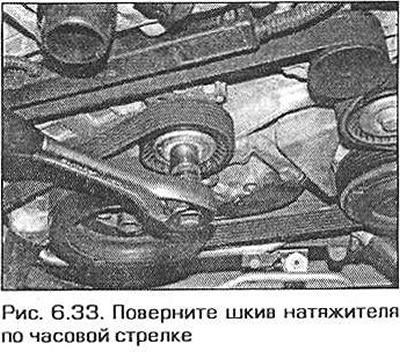
33. Use a wrench to turn the tensioner clockwise to loosen the belt tension. Remove the belt from the pulleys (pic. 6.33).
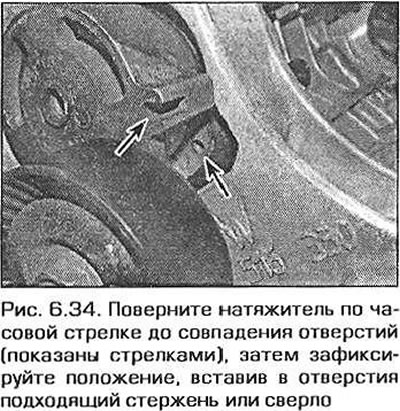
34. If desired, to facilitate installation of the belt, the tensioner can be turned to the end and fixed in the depressed position with a rod of a suitable diameter (pic. 6.34). Please note that the tensioner has a fairly strong spring, so the fixing rod must be strong enough.
35. If a previously working belt is installed, take into account the label indicating the direction of its rotation.
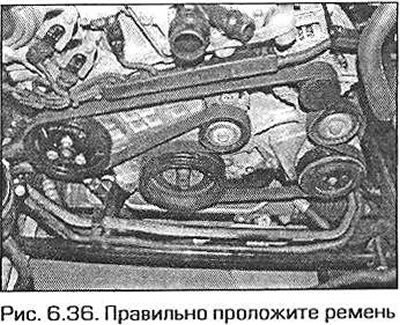
36. If the tensioner was not fixed in the depressed state, wring it out with a key and put the belt on the pulleys, observing the order of its laying (pic. 6.36). Make sure that the belt lugs fit into the pulley grooves.
37. If the tensioner has been fixed, wring it out and pull out the fixing rod (drill). Release tensioner.
38. Reinstall the intake duct shroud.
Replacement - 6-cylinder engine
A/C Compressor Drive Belt
39. The best access to the belt is from under the car. Raise the front of the vehicle and place it on jack stands (see in the appendix: Lifting the vehicle and placing it on stands). Remove the crankcase protection from under the engine.
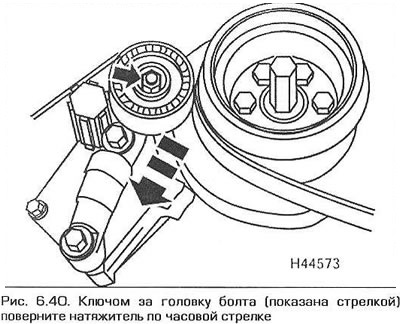
40. On models with a hydraulic tensioner, remove the cover from the center of the tensioner pulley. Using a wrench on the head of the pulley bolt, turn the tensioner clockwise (pic. 6.40). Remove the belt from the pulleys.
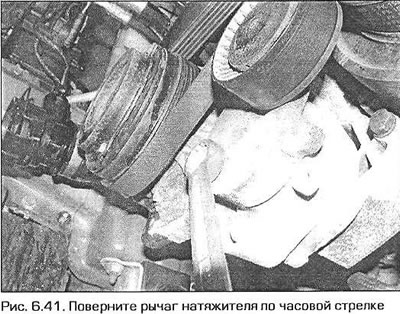
41. On models with a mechanical tensioner, turn the tensioner lever clockwise with a hex wrench and remove the belt from the pulleys (pic. 6.41).
42. On all models, depress the tensioner so that you can put a new belt on the pulleys, then release the tensioner. Make sure that the belt lugs fit into the pulley grooves.
43. Replace the tensioner pulley cover and lower the vehicle.
Water pump drive belt, alternator and steering pump
44. Remove the compressor drive belt as above.
45. If the belt is to be installed again and used further, mark the direction of rotation of the belt before removing it.
46. For better access, remove the cooling fan along with its casing (see chapter 3).
47. Before removing the belt, remember its gasket.
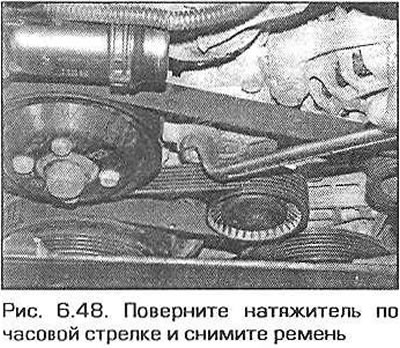
48. Using the Allen wrench on the tensioner lever, turn the lever clockwise and remove the belt from the pulleys (pic. 6.48).
49. If a previously working belt is installed, take into account the label indicating the direction of its rotation.
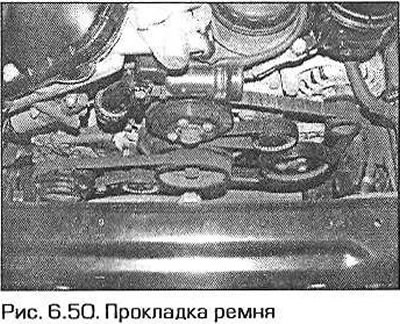
50. Depress the tensioner and put the belt on the pulleys, observing the previous belt routing (pic. 6.50). Make sure that the belt lugs fit into the pulley grooves.
51. Replace the cooling fan and its shroud (see chapter 3).
52. Install the compressor drive belt as described earlier in this paragraph.