
- Home
- BMW 5 Series
- E28
- General information
- Maintenance
- Checking the condition, adjusting the tension and replacing the drive belts
Checking the condition, adjusting the tension and replacing the drive belts (BMW 5 Series E28)
Twice a year or every 10,000 km (whichever comes first).
Checking the status
Drive belts, sometimes called V-belts or simply fan belts, are located at the front of the engine and play a vital role in the operation of the vehicle and its individual components. Due to the nature of the material and operating conditions, drive belts wear out over time and should therefore be checked periodically and the tension adjusted to avoid serious engine damage.
The number of belts used on a particular vehicle depends on the components and systems installed on it. Drive belts are used to drive the alternator, steering pump, water pump, and air conditioning compressor. Depending on the arrangement of the pulleys, one belt can drive several components at once.
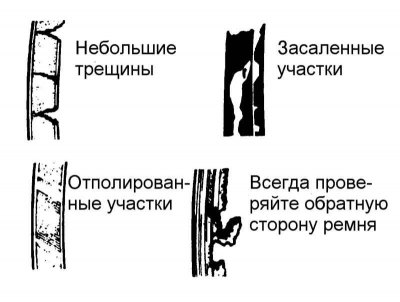
Turn off the engine, open the hood and locate the various drive belts at the front of the engine. Use your fingers (and using a flashlight if necessary) walk the entire length of each belt, feeling for cracks and delamination. Also check for any frayed or polished areas. Each belt should be inspected on both sides, which means twisting it to check the condition of the reverse side.
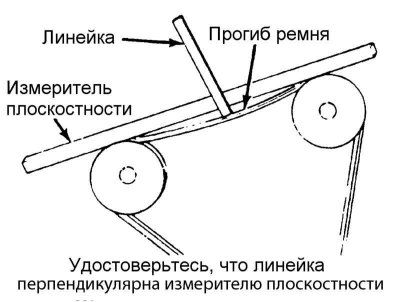
Belt tension is checked by pressing firmly with your thumb and determining the amount of deflection. Measure the amount of deflection with a ruler. The rule of thumb is that if the distance between pulley centers is between 180 and 280 mm, the amount of deflection should be 6 mm. If the distance between pulley centers is between 300 and 400 mm, the deflection should be 13 mm.
Adjustment
If it is necessary to adjust the belt tension towards its increase or decrease, this is done by moving the unit driven by the belt on its mounting bracket. In the case where the belt drives more than one unit, it is usually sufficient to move only one of them to adjust it.
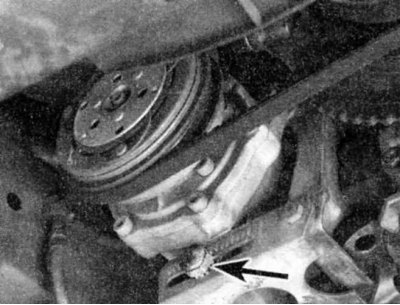
1. Each unit has an adjusting bolt and an axle bolt. To move it on the bracket, you need to slightly loosen both bolts. For some units, the drive belt tension can be adjusted by turning the adjusting bolt after loosening the lock bolt.
2. After both bolts are loosened, move the unit away from the engine to increase belt tension, or toward the engine to loosen it.
3. Fix the unit in the new position and check the belt tension. If no further adjustment is required, tighten both bolts and check the tension again. If nothing has changed, tighten the bolts completely.
Often it is necessary to use a lever to move the unit to adjust the belt tension. If this is necessary, proceed with extreme caution to avoid damaging the unit being moved or the element being used as a support point.
Replacement
To replace the belt, follow the adjustment instructions above, but remove the belt from the pulleys.
In some cases, you will have to remove more than one belt due to the way they are located at the front of the engine. For this reason, and because belts tend to fail at the same time, it is best to replace them at the same time. Mark each belt and its corresponding groove on the pulley to ensure that the new belts are installed correctly.
When purchasing new belts, it is convenient to take the old ones with you so that you can directly compare them in length, width and design.
Check the tension of new belts after driving several hundred kilometers.
(The website served as the basis for the text bmwman.ru)
This article is available at russian, bulgarian, belarusian, ukrainian, serbian, croatian, romanian, polish, slovak, hungarian
Article verified: Zhuravleva Isolda
Share information:
Previous articles
БМВ E28: Maintenance
Next articles
Similar articles on other types of BMW cars:
Adjusting the tension of the drive belts and the power steering pump BMW 3 Series E21 (1975-1983)
Checking the condition of ribbed drive belts BMW 3 Series E46 (1998-2006)
Checking the condition of the protective covers of the CV joints of… BMW 7 Series E38 (1994-2001)
Valve guides — checking and replacing BMW 7 Series E32 (1986-1994)
Replacing the drive chain BMW X3 E83 (2003-2010)
Checking the condition of drive belts BMW X5 E53 (1999-2006)
Link in different formats to this page
Visitor comments
No comments yet
- General information
- Governing bodies
- Manual
- Maintenance
- Power unit
- Engine repair
- Lubrication system
- Cooling system
- Ignition system
- Supply system
- Injection system (gasoline)
- Injection system (diesel)
- Exhaust system
- Transmission
- Clutch
- Car gearbox
- Front axle
- Rear axle
- Chassis
- Steering
- Brake system
- Wheels and tires
- Body
- Interior
- Exterior
- Heating system
- Electrical equipment
- Equipment and devices
- Power devices
- Windscreen wipers
- Electrical circuits
- General information
- Manual
- Maintenance
- Power unit
- Engine repair
- Ignition system
- Engine lubrication system
- Cooling system
- Fuel system (gasoline)
- Fuel system (diesel)
- Exhaust system
- Transmission
- Clutch
- Car gearbox
- Chassis
- Front and rear suspension
- Steering
- Brake system
- Body
- Exterior
- Interior
- Electrical equipment
- Heating system
- Equipment and devices
- Power devices
- Electrical circuits
- General information
- Manual
- Maintenance
- Power unit
- Engine in a car
- Engine overhaul
- Cooling system
- Supply system
- Ignition system
- Control system
- Transmission
- Clutch
- Manual gearbox
- Automatic gearbox
- Transmission line
- Chassis
- Steering
- Front suspension
- Rear suspension
- Brake system
- Body
- Body elements
- Car care and painting
- Electrical equipment
- Heater and air conditioner
- Equipment and devices
- Starter and generator
- Electrical circuits
- General information
- Operation and maintenance
- Specifications
- Power unit
- Engine repair
- Cooling and lubrication system
- Supply system
- Ecotronic power supply system
- Fuel injection system
- Ignition system
- Transmission
- Clutch
- Gearbox BMW 242/4
- Gearbox Getrag 262/8
- Gearbox Getrag 265/6
- Automatic gearbox
- Cardan gear
- Rear axle
- Chassis
- Steering
- Front suspension
- Rear suspension
- Brake system
- Electrical equipment
- Equipment and devices
- Electrical circuits