
Table of contents: Removal ↓ Installation ↓
- Home
- BMW 5 Series
- E28
- Power unit
- Engine in a car
- Removal and installation timing chain covers
Removal and installation timing chain covers (BMW 5 Series E28)
This procedure applies to M10 and M30 engines.
The upper timing chain cover can be removed separately. If you need to remove both the upper and lower covers, you will need special tools. Before starting work, read points 8 and 9.
Removal
1. Disconnect the negative battery cable.
If your vehicle's radio is equipped with an anti-theft system, make sure you enter the correct code before disconnecting the battery.
If the instrument cluster displays the wrong language after connecting the battery, refer to Section Anti-theft audio system and instrument cluster language, which describes the procedure for installing the required language.
2. If you remove the lower cover of the distribution chain (the top cover can be removed separately), remove the cooling fan and fan shroud, radiator and fan drive belt pulley (see chapter Cooling system).
3. On the M10 engine only, remove the water pump (see chapter Cooling system).
4. On engines where the distributor cap is mounted directly to the timing chain cover, remove the distributor cap, rotor and black plastic cover under the rotor (see chapter Routine car maintenance).
5. On the M30 engine equipped with the L-Jetronic fuel system, remove the distributor from the upper timing chain cover (see chapter Ignition system).
6. Remove the cylinder head cover (see section Removal and installation the cylinder head cover).
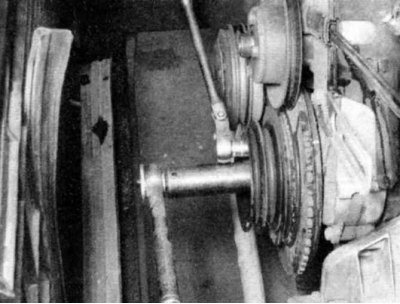
7. If you are removing the lower timing chain cover from an M30 engine, remove the crankshaft pulley from the vibration damper/hub. Hold the pulley stationary on the center bolt with a socket and loosen the pulley bolts with another socket.
8. If you are removing the lower timing chain cover, remove the shock absorber/hub by blocking the crankshaft and loosening the large center bolt. Since this bolt is very tight, you will need a long wrench and socket. On M30 engines, BMW recommends using a 3/4-inch socket and wrench, since the center bolt is particularly tight on these engines. To block the crankshaft while loosening the bolt, use BMW special tool No.11 2 100 (or its equivalent).
9. On M10 engines, if you were unable to obtain the special tool described in the previous point (8), you can try to lock the crankshaft by removing the flywheel/drive plate cover and inserting a wide-bladed screwdriver into the teeth of the flywheel ring. On M30 engines, after the center bolt has been released, you may need to use a puller with a jaw to remove the vibration damper from the crankshaft. Place the jaw on the inside groove of the pulley and very slowly tighten the puller's center bolt, checking all the time that the pulley has not bent.
If the pulley is stuck to the crankshaft, you can try lubricating the hub area with a small amount of penetrating oil and then tapping it lightly with a hammer.
10. Unscrew the plug and remove the timing chain tensioner spring.
11. The tensioner plunger may come out with the spring. If not, remove the plunger from the tensioner spring hole. To check the plunger operation, see Section Removal, inspection and installation of the timing chain and its tensioner sprockets.
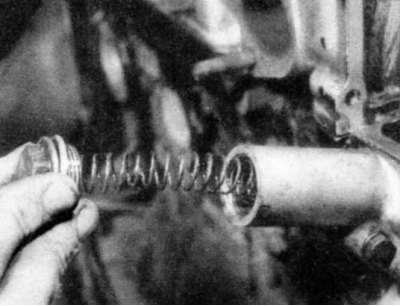
The spring is compressed and this may cause the plug to be thrown out of the hole abruptly. Hold the plug while unscrewing and release the spring slowly.
12. On M30 engines, if you remove the upper distribution cover, unbolt the thermostat cover and remove the thermostat (see chapter Cooling system).
13. On M30 engines, if you are removing the lower distributor cap, loosen the alternator mounting bolts and move the alternator to the side. Remove the front lower mounting bracket bolt and loosen the remaining bolts. Also loosen the power steering pump mounting bracket and move it to the side.
14. Loosen the nuts and bolts that secure the upper timing chain cover to the cylinder block and remove the cover. Draw a simple diagram of the bolt locations so that when reassembling, they can be installed in the same holes from which they were removed. Remove the upper timing chain cover. If it is stuck to the cylinder block, gently tap it with a rubber-faced hammer or place a wooden block against it and tap it with a hammer. On M30 engines equipped with the L-Jetronic fuel system, remove the distributor drive shaft.
15. Remove the nuts and bolts securing the lower timing chain cover to the cylinder block. Don't forget to remove the three bolts securing the front of the oil pan to the lower part of the front cover.
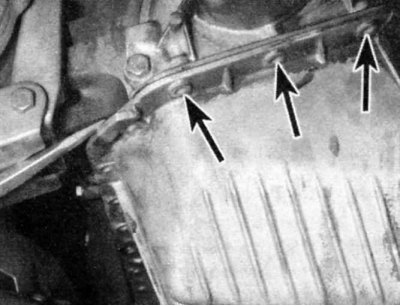
16. Loosen the remaining oil pan bolts.
17. Run a thin, sharp knife between the oil pan gasket and the lower timing chain cover, thus separating the gasket from the cover. Be very careful not to damage or stain the gasket so that you can reuse it later.
18. Break the sealant between the lower timing chain cover and the cylinder block by tapping the cover with a rubber-faced hammer or a regular hammer and a wooden block. Do not push anything between the cover and the block to avoid damaging the gasket surfaces.
19. Using a scraper, remove all traces of the old gasket material from the mating surfaces of the covers and the cylinder block.
Be extremely careful not to damage or scratch the soft aluminum surfaces. Also, be careful not to damage or stain the oil pan gasket. Special gasket remover solvents are available and may be helpful. Once the gasket material has been completely removed, the gasket surfaces can be degreased by wiping them with a cloth dampened with a suitable solvent.
Installation
1. Replace the front oil seals (see section Replacing the front oil seals). It is not worth risking leaving the old seals, because replacing them with the covers removed is not difficult. Do not forget to apply a little oil to the lips of the front seals.
2. Apply a thin layer of RTV type sealant to the surface of the oil pan gasket that meets the lower timing cover. Apply more sealant to the edges where the gasket contacts the engine block.
If the oil pan gasket is damaged, instead of replacing the entire gasket, you can try cutting off the front of the gasket where it meets the engine block, then cutting off the front of the new gasket so that it is exactly the same size.
3. Cover the inside surface of the pan with a piece of rag, then clean all traces of the old gasket material from the mating surfaces. Attach a piece of new gasket to the pan with a special adhesive, then apply RTV sealant as described at the beginning of this paragraph.
4. Coat both sides of the new gasket with RTV sealant, attach the lower timing chain cover to the front of the engine. Install the bolts and tighten them to the specified torque. Tighten the bolts one by one in a crisscross pattern to ensure even tightening.
First tighten the lower cover to block bolts, then tighten the oil pan to cover bolts. If the gasket protrudes above the cover to block joint or forms folds in the cover to pan joint, trim it so that it sits correctly.
After applying the RTV sealant, assembly must be completed within 10 minutes to allow time for the sealant to cure.
5. Install the upper timing chain cover in the same manner as the lower one. If the gasket protrudes above the cover-to-cylinder block joint, trim off the excess with a razor.
6. Perform the rest of the installation procedure in the reverse order of removal.
This article is available at russian, bulgarian, belarusian, ukrainian, serbian, croatian, romanian, polish, slovak, hungarian
Article verified: Zhuravleva Isolda
Share information:
Previous articles
БМВ E28: Engine in a car
Next articles
Similar articles on other types of BMW cars:
Timing Chain Covers — Removal and Installation BMW 3 Series E46 (1998-2006, petrol)
Removal and installation the timing belt BMW 3 Series E30 (1982-1994)
Timing Chain Covers — Removal and Installation BMW 7 Series E32 (1986-1994)
Removal and installation timing chain covers BMW 7 Series E38 (1994-2001)
Pistons — removal and installation BMW X3 E83 (2003-2010)
Removal and installation the engine BMW X5 E53 (1999-2006)
Link in different formats to this page
Visitor comments
No comments yet
- General information
- Governing bodies
- Manual
- Maintenance
- Power unit
- Engine repair
- Lubrication system
- Cooling system
- Ignition system
- Supply system
- Injection system (gasoline)
- Injection system (diesel)
- Exhaust system
- Transmission
- Clutch
- Car gearbox
- Front axle
- Rear axle
- Chassis
- Steering
- Brake system
- Wheels and tires
- Body
- Interior
- Exterior
- Heating system
- Electrical equipment
- Equipment and devices
- Power devices
- Windscreen wipers
- Electrical circuits
- General information
- Manual
- Maintenance
- Power unit
- Engine repair
- Ignition system
- Engine lubrication system
- Cooling system
- Fuel system (gasoline)
- Fuel system (diesel)
- Exhaust system
- Transmission
- Clutch
- Car gearbox
- Chassis
- Front and rear suspension
- Steering
- Brake system
- Body
- Exterior
- Interior
- Electrical equipment
- Heating system
- Equipment and devices
- Power devices
- Electrical circuits
- General information
- Manual
- Maintenance
- Power unit
- Engine in a car
- Engine overhaul
- Cooling system
- Supply system
- Ignition system
- Control system
- Transmission
- Clutch
- Manual gearbox
- Automatic gearbox
- Transmission line
- Chassis
- Steering
- Front suspension
- Rear suspension
- Brake system
- Body
- Body elements
- Car care and painting
- Electrical equipment
- Heater and air conditioner
- Equipment and devices
- Starter and generator
- Electrical circuits
- General information
- Operation and maintenance
- Specifications
- Power unit
- Engine repair
- Cooling and lubrication system
- Supply system
- Ecotronic power supply system
- Fuel injection system
- Ignition system
- Transmission
- Clutch
- Gearbox BMW 242/4
- Gearbox Getrag 262/8
- Gearbox Getrag 265/6
- Automatic gearbox
- Cardan gear
- Rear axle
- Chassis
- Steering
- Front suspension
- Rear suspension
- Brake system
- Electrical equipment
- Equipment and devices
- Electrical circuits