
- Home
- BMW 5 Series
- E28
- Power unit
- Engine in a car
- Removal, inspection and installation of the timing belt and its tensioner sprockets
Removal, inspection and installation of the timing belt and its tensioner sprockets (BMW 5 Series E28)
This procedure applies to M20 and M40 engines only.
Before removing the camshaft sprocket from the M40 engine, it is necessary to purchase a tool to hold the camshaft during the installation procedure (see item 12).
If your vehicle's radio is equipped with an anti-theft system, make sure you enter the correct code before disconnecting the battery.
If the instrument cluster displays the wrong language after connecting the battery, refer to Section Anti-theft audio system and instrument cluster language, which describes the procedure for installing the required language.
Removal
1. Disconnect the negative battery cable.
2. Remove the timing belt covers (see section Removal and installation timing belt covers).
3. On M40 engines, drain the cooling system (see chapter Routine car maintenance), then disconnect the hose, unbolt the thermostat housing and remove the thermostat (see chapter Cooling system).
4. Bring piston No.1 to the TDC position (see section Bringing the piston of the first cylinder to the top dead center (TDC) position).
After the engine is at TDC, do not turn the camshaft or crankshaft until the timing chain has been installed. If the camshaft or crankshaft is turned with the timing chain removed, the valves may strike the pistons, causing serious internal engine damage.
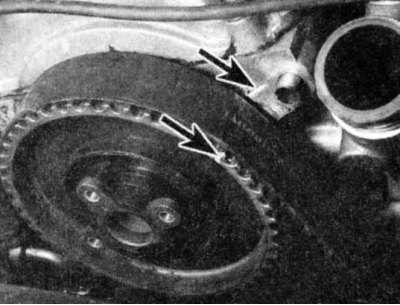
5. On M20 engines, the mark on the crankshaft must be aligned with the mark on the inner cover.
6. The mark on the camshaft sprocket must be aligned with the convex line on the cylinder head.
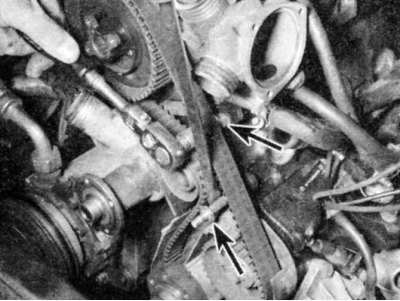
7. On M40 engines, apply an alignment mark to the camshaft sprocket and to the rear timing cover for subsequent correct assembly.
8. On M20 engines, loosen the two tensioner pulley mounting bolts slightly and move the tensioner toward the water pump. After loosening the timing belt, tighten the mounting bolt.
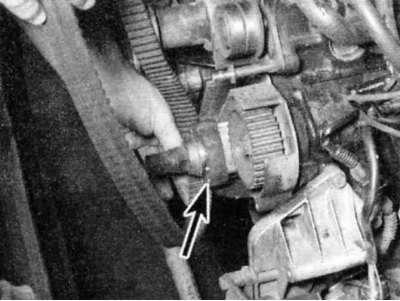
9. On M40 engines, loosen the tensioner retaining nut and use an Allen key to turn the tensioner clockwise. This will relieve the tension on the timing belt. Tighten the retaining nut to secure the tensioner in this position.
10. If you are going to install the same belt, mark it with an arrow indicating the direction of rotation.
It is not recommended to use a removed belt unless it is brand new. For M40 engines, BMW recommends replacing the timing belt every time the tensioner pulley becomes loose.
11. Remove the timing belt from the pulley(s) and other sprockets. When removing the timing belt from engines on models with a two-piece crankshaft hub, it can be very difficult to remove it from the hub, but it is much easier than removing the entire crankshaft hub assembly, which is held in place by a very tight bolt
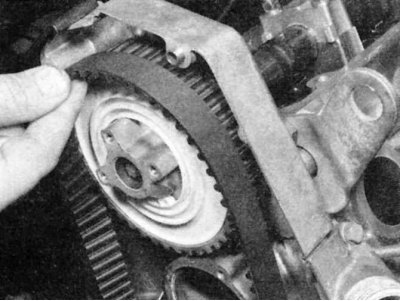
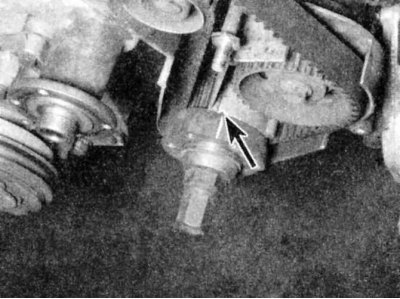
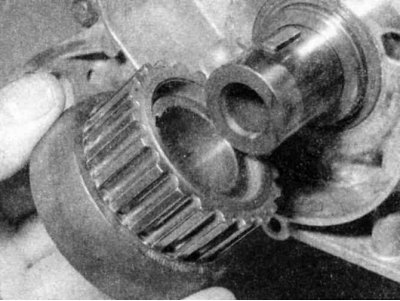
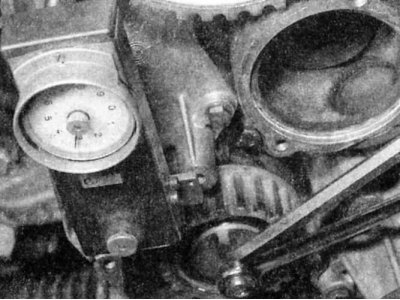
12. If it becomes necessary to remove the crankshaft or intermediate shaft sprocket, loosen the sprocket bolt while holding the sprocket still. To hold the sprocket, wrap it with a piece of old timing belt (so that the side with the teeth engages with the teeth of the sprocket) or a piece of leather, then hold it with a special wrench. If you do not have such a wrench, tightly squeeze the ends of the piece of belt or leather with a clamp. Before loosening the bolt, make sure you have the necessary tool for installing the camshaft, described in the next paragraph. Removing the timing belt from the crankshaft sprocket for the M40 engine is shown in the photo. Removing the camshaft sprocket for the M40 engine is shown in the photo.
Do not use the belt you are about to install to hold the sprocket. Also, the camshaft sprocket must be held very securely, as if it turns more than a few degrees, the valves can hit the pistons.
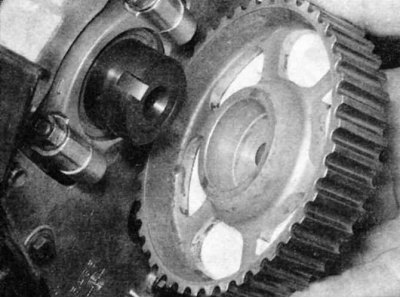
On M40 engines, the sprocket is not installed directly on the camshaft with a key, since a groove on the end of the camshaft allows the sprocket to rotate a few degrees in both directions. A mounting bolt secures the sprocket to the cone after the camshaft is installed with a special tool.

13. The special BMW tool for installing the camshaft on M40 engines is a metal plate that fits onto the square protrusion next to the cams of cylinder #1 on the camshaft - the cylinder head cover must be removed first.
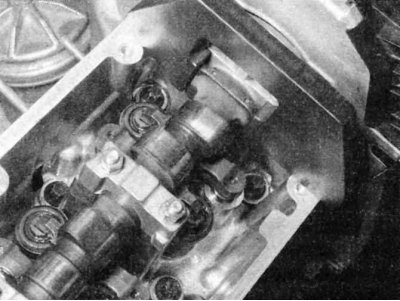
14. If you were unable to acquire such a tool, you can make one at home from a metal plate. The task is to ensure that this tool holds the square protrusion on the camshaft at the required angles in relation to the upper plane of the cylinder head (i.e. come into contact with the surface of the cylinder head cover).
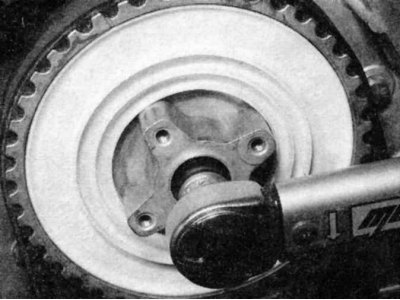
15. If it becomes necessary to remove the crankshaft sprocket, loosen the crankshaft hub center bolt while holding the crankshaft still.
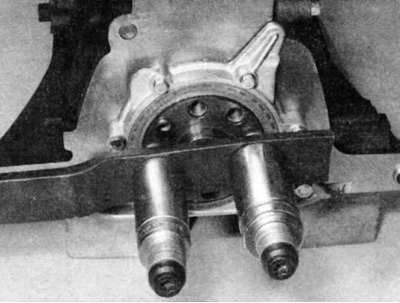
Releasing the crankshaft hub mounting bolt requires the use of a heavy-duty holding device, as this bolt is tightened with very high force. BMW has a special tool for this purpose, #112150 (for M20 engines) or 112170 (for M40 engines). If you are unable to purchase or borrow such a tool, check your local auto parts store or body shop for something suitable for the job. Note that tool #112170 bolts to the back of the cylinder head and engages the flywheel ring gear, so this tool can only be used with the transmission removed or the engine out of the vehicle.
Pictured is a homemade tool used to hold the crankshaft still while loosening the crankshaft pulley bolt (engine removed for better visibility).
On models with a two-piece hub, after removing the outer hub, you will need to remove the sprocket using a puller with a clamp (which is available for sale at any auto parts store). When working with a puller, tighten the crankshaft center bolt approximately three turns and use it as a bearing point for the puller center bolt.

Inspection
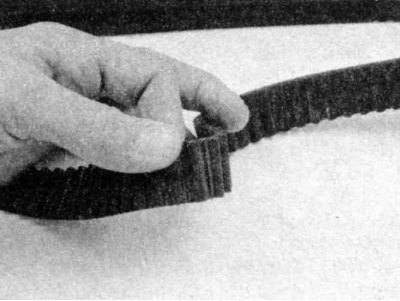
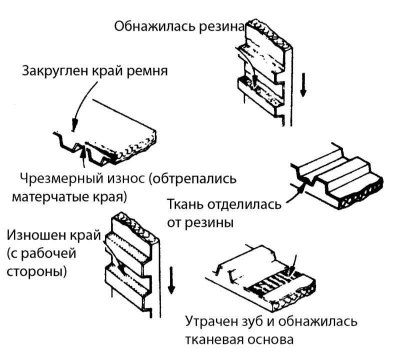
1. Check the timing belt for cracks, signs of wear and damage. If any of these defects are found, replace it.
2. Also inspect the sprockets for any signs of uneven wear or damage that requires sprocket replacement.
When replacing any parts, consult your dealer to ensure that you are using compatible parts. On M20 engines, the latest sprockets, tension rollers and timing belts are marked "Z 127". Replacing the timing belt on M20 engines means that the latest model tensioner must also be installed if this has not already been done.
3. Inspect the tensioner pulley and, on M20 engines, the tensioner spring. Spin the tensioner pulley to ensure that it rotates freely, without noise or play.
When installing a new timing belt, it is recommended to also install a new tensioner.
Installation
1. On the M20 engine, install the spring/tensioner so that the timing belt can be installed without tension.
2. Install the sprockets in the reverse order of removal; tighten the mounting bolts to the required torque. On M40 engines, turn the camshaft sprocket clockwise as far as the installation groove allows, then tighten the mounting bolt to an initial torque of 1 to 3 Nm.
3. If you are installing an old belt, make sure that the arrow previously applied to indicate the correct direction of rotation is pointing in the correct direction (the belt should rotate clockwise when looking at the engine).
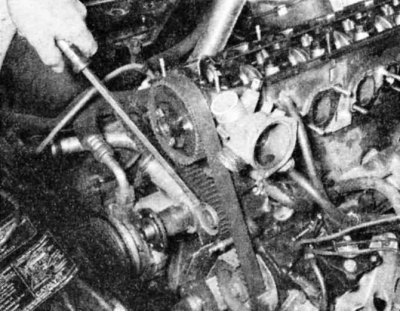
4. Install the timing belt by first placing it under the crankshaft sprocket so that it goes around the housing. Loop the belt around the remaining sprockets.
5. Finally, place the belt on the tensioner rollers.
6. On M20 engines, loosen the tensioner bolts to allow the spring to tighten the belt.
7. On M20 engines, apply light pressure to the tensioner from the rear to ensure that the spring is tensioning the belt. Do not tighten the bolts while applying pressure to the tensioner; tighten them slightly only after you release it.
8. On M40 engines, loosen and remove the cylinder head cover, then use a special tool to secure the camshaft in the TDC position (see item 13).
9. On M40 engines, loosen the tensioner pulley retaining nut and use a hex key to turn the pulley counterclockwise until the belt is tensioned. The 90° rotation method for checking timing belt tension is not accurate enough for this engine, so it is highly recommended to have a special BMW belt tension testing tool (mark 32±2 divisions on the tool).
10. An Allen key and spring scale can also be used with sufficient accuracy.
11. Make sure that the spring scale is installed as shown in the photo, because the tensioner roller is mounted on an eccentric, otherwise the reading will be different from the actual reading. The spring scale should be fixed on the Allen key at a distance of 85 mm from the center of the tension roller, and the force applied should be 2.0 kg.
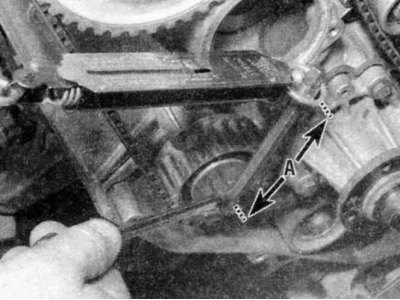
Size A = 85 mm.
12. Tighten the mounting nut to the required torque to secure the tensioner in the desired position.
It is very important that the timing belt is tensioned correctly. If it is too tight, it will hum and can be easily damaged. If it is too loose, it can "bounce" on the sprockets.
13. Check the correct alignment of the timing marks on the camshaft and crankshaft.
14. Turn the crankshaft clockwise two full turns. (First remove the installation tool from the M40 engine camshaft).
The new belt needs to be stretched. If this is not done, the belt tensioner will be too loose, which can cause damage.
15. On the M20 engine, loosen the tensioner roller bolts, then tighten them to the required torque.
16. On the M40 engine, loosen the tensioner roller mounting nut and adjust the timing belt tension as described in step 8. Finally, tighten the tensioner roller mounting nut, then fully tighten the camshaft sprocket bolt if it was previously loosened.
17. Check the alignment of the timing marks again. If they are not completely aligned, remove and install the timing belt.
18. Perform the rest of the installation in the reverse order of removal.
The original text is available on the website: «BMWMan»
This article is available at russian, bulgarian, belarusian, ukrainian, serbian, croatian, romanian, polish, slovak, hungarian
Article verified: Zhuravleva Isolda
Share information:
Previous articles
БМВ E28: Engine in a car
Next articles
Similar articles on other types of BMW cars:
Timing Chain Sprockets and Tensioner — Removal and Installation BMW 3 Series E46 (1998-2006, petrol)
Removal and installation the timing belt BMW 3 Series E30 (1982-1994)
Drive chain and sprockets — removal, inspection and installation BMW 7 Series E32 (1986-1994)
Removal and installation the timing belt cover BMW 7 Series E38 (1994-2001)
Lower timing belt cover BMW X3 E83 (2003-2010)
Removal and installation the alternator drive belt BMW X5 E53 (1999-2006)
Link in different formats to this page
Visitor comments
No comments yet
- General information
- Governing bodies
- Manual
- Maintenance
- Power unit
- Engine repair
- Lubrication system
- Cooling system
- Ignition system
- Supply system
- Injection system (gasoline)
- Injection system (diesel)
- Exhaust system
- Transmission
- Clutch
- Car gearbox
- Front axle
- Rear axle
- Chassis
- Steering
- Brake system
- Wheels and tires
- Body
- Interior
- Exterior
- Heating system
- Electrical equipment
- Equipment and devices
- Power devices
- Windscreen wipers
- Electrical circuits
- General information
- Manual
- Maintenance
- Power unit
- Engine repair
- Ignition system
- Engine lubrication system
- Cooling system
- Fuel system (gasoline)
- Fuel system (diesel)
- Exhaust system
- Transmission
- Clutch
- Car gearbox
- Chassis
- Front and rear suspension
- Steering
- Brake system
- Body
- Exterior
- Interior
- Electrical equipment
- Heating system
- Equipment and devices
- Power devices
- Electrical circuits
- General information
- Manual
- Maintenance
- Power unit
- Engine in a car
- Engine overhaul
- Cooling system
- Supply system
- Ignition system
- Control system
- Transmission
- Clutch
- Manual gearbox
- Automatic gearbox
- Transmission line
- Chassis
- Steering
- Front suspension
- Rear suspension
- Brake system
- Body
- Body elements
- Car care and painting
- Electrical equipment
- Heater and air conditioner
- Equipment and devices
- Starter and generator
- Electrical circuits
- General information
- Operation and maintenance
- Specifications
- Power unit
- Engine repair
- Cooling and lubrication system
- Supply system
- Ecotronic power supply system
- Fuel injection system
- Ignition system
- Transmission
- Clutch
- Gearbox BMW 242/4
- Gearbox Getrag 262/8
- Gearbox Getrag 265/6
- Automatic gearbox
- Cardan gear
- Rear axle
- Chassis
- Steering
- Front suspension
- Rear suspension
- Brake system
- Electrical equipment
- Equipment and devices
- Electrical circuits