
Table of contents: Checking the status ↓ Replacement ↓
- Home
- BMW 5 Series
- E28
- Power unit
- Engine in a car
- Checking the condition and replacing the power unit supports
Checking the condition and replacing the power unit supports (BMW 5 Series E28)
Powertrain mounts rarely require attention; broken or worn mounts should be replaced immediately, otherwise the additional loads on the transmission line components that arise in this case will lead to their intensive wear and failure.
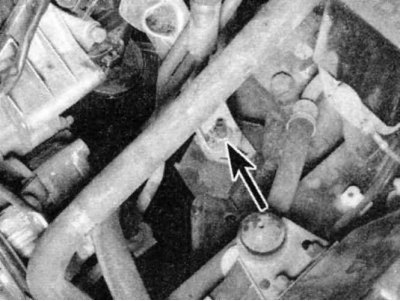
1. During the inspection, the power unit should be slightly raised to remove its weight from the supports.
2. Jack up the vehicle and support it securely on its axle stands, then slide the jack under the oil pan. Place a large block of wood between the jack head and the pan, then carefully lift the engine with the jack just enough to take its weight off the jack stands.
3. Check the rubber parts of the mounts for cracks, hardening or separation from the metal components.
4. Sometimes the rubber part splits right down the center.
5. Check whether the support brackets and the elements of the power unit and the car body move relative to each other (use a large screwdriver or crowbar as a lever for this purpose). If movement occurs, lower the engine and tighten the mounting bolts or nuts.
6. To reduce wear, apply a special rubber preservative to the supports.
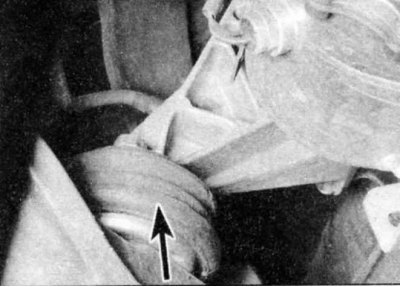
7. On models with the M40 engine, check the condition of the dampers on each support by removing them and trying to compress and stretch them.
8. If the damper offers only very little resistance, it should be replaced.
1. If you have to replace the dampers on the M40 engine, simply loosen the bolts, then install the new dampers and tighten the bolts.
2. To replace the mounts, disconnect the negative battery cable, then jack up the vehicle and support it securely on the axle stands if you have not already done so.
3. Support the power unit as described in point 2.
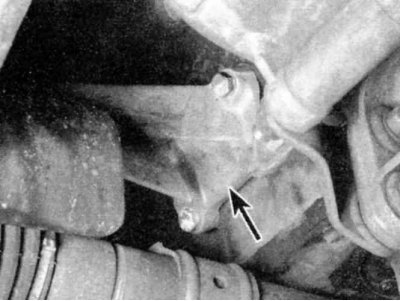
4. Loosen the large nut securing the bracket to the support (indicated by the arrow).
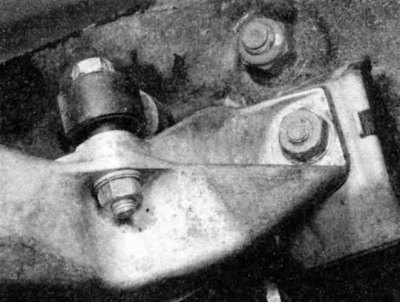
5. Raise the engine slightly, then loosen the lower nuts/bolts securing the mount to the subframe and remove the mount.
6. Install the support in the reverse order of removal. For greater reliability of tightening the nuts/bolts of the supports, apply a special thread sealant to them.
(This publication was borrowed from an online resource «bmwman.ru»)
Checking the status
1. During the inspection, the power unit should be slightly raised to remove its weight from the supports.
2. Jack up the vehicle and support it securely on its axle stands, then slide the jack under the oil pan. Place a large block of wood between the jack head and the pan, then carefully lift the engine with the jack just enough to take its weight off the jack stands.
DO NOT place any part of your body under an engine supported only by a jack!
3. Check the rubber parts of the mounts for cracks, hardening or separation from the metal components.
4. Sometimes the rubber part splits right down the center.
5. Check whether the support brackets and the elements of the power unit and the car body move relative to each other (use a large screwdriver or crowbar as a lever for this purpose). If movement occurs, lower the engine and tighten the mounting bolts or nuts.
6. To reduce wear, apply a special rubber preservative to the supports.
7. On models with the M40 engine, check the condition of the dampers on each support by removing them and trying to compress and stretch them.
8. If the damper offers only very little resistance, it should be replaced.
Replacement
1. If you have to replace the dampers on the M40 engine, simply loosen the bolts, then install the new dampers and tighten the bolts.
2. To replace the mounts, disconnect the negative battery cable, then jack up the vehicle and support it securely on the axle stands if you have not already done so.
If your vehicle's radio is equipped with an anti-theft system, make sure you enter the correct code before disconnecting the battery.
If the instrument cluster displays the wrong language after connecting the battery, refer to Section Anti-theft audio system and instrument cluster language, which describes the procedure for installing the required language.
3. Support the power unit as described in point 2.
4. Loosen the large nut securing the bracket to the support (indicated by the arrow).
5. Raise the engine slightly, then loosen the lower nuts/bolts securing the mount to the subframe and remove the mount.
6. Install the support in the reverse order of removal. For greater reliability of tightening the nuts/bolts of the supports, apply a special thread sealant to them.
(This publication was borrowed from an online resource «bmwman.ru»)
This article is available at russian, bulgarian, belarusian, ukrainian, serbian, croatian, romanian, polish, slovak, hungarian
Article verified: Zhuravleva Isolda
Share information:
Previous articles
БМВ E28: Engine in a car
Next articles
Similar articles on other types of BMW cars:
Checking the condition and replacing the engine compartment hoses BMW 3 Series E46 (1998-2006)
Checking the level and replacing the oil in the automatic transmission BMW 3 Series E21 (1975-1983)
Checking the condition and replacing hoses and tubes in the engine… BMW 7 Series E38 (1994-2001)
Checking the Power Steering Fluid Level BMW 7 Series E32 (1986-1994)
Checking the operation of the power steering pump BMW X3 E83 (2003-2010)
Checking the engine oil level and replacing it BMW X5 E53 (1999-2006)
Link in different formats to this page
Visitor comments
No comments yet
- General information
- Governing bodies
- Manual
- Maintenance
- Power unit
- Engine repair
- Lubrication system
- Cooling system
- Ignition system
- Supply system
- Injection system (gasoline)
- Injection system (diesel)
- Exhaust system
- Transmission
- Clutch
- Car gearbox
- Front axle
- Rear axle
- Chassis
- Steering
- Brake system
- Wheels and tires
- Body
- Interior
- Exterior
- Heating system
- Electrical equipment
- Equipment and devices
- Power devices
- Windscreen wipers
- Electrical circuits
- General information
- Manual
- Maintenance
- Power unit
- Engine repair
- Ignition system
- Engine lubrication system
- Cooling system
- Fuel system (gasoline)
- Fuel system (diesel)
- Exhaust system
- Transmission
- Clutch
- Car gearbox
- Chassis
- Front and rear suspension
- Steering
- Brake system
- Body
- Exterior
- Interior
- Electrical equipment
- Heating system
- Equipment and devices
- Power devices
- Electrical circuits
- General information
- Manual
- Maintenance
- Power unit
- Engine in a car
- Engine overhaul
- Cooling system
- Supply system
- Ignition system
- Control system
- Transmission
- Clutch
- Manual gearbox
- Automatic gearbox
- Transmission line
- Chassis
- Steering
- Front suspension
- Rear suspension
- Brake system
- Body
- Body elements
- Car care and painting
- Electrical equipment
- Heater and air conditioner
- Equipment and devices
- Starter and generator
- Electrical circuits
- General information
- Operation and maintenance
- Specifications
- Power unit
- Engine repair
- Cooling and lubrication system
- Supply system
- Ecotronic power supply system
- Fuel injection system
- Ignition system
- Transmission
- Clutch
- Gearbox BMW 242/4
- Gearbox Getrag 262/8
- Gearbox Getrag 265/6
- Automatic gearbox
- Cardan gear
- Rear axle
- Chassis
- Steering
- Front suspension
- Rear suspension
- Brake system
- Electrical equipment
- Equipment and devices
- Electrical circuits