Cars Mazda Cars Mitsubishi Cars Toyota Cars Chevrolet Cars AvtoVAZ Cars Kia Cars Nissan
English Русский
Български
Беларускі
Український
Српски
Hrvatski
Română
Polski
Slovenský
Magyar
| Articles | Contacts | Sitemap |   
BMWman.ru


3 series   5 series   7 series   BMW X3   BMW X5   BMW X6

E39 (1995-2003) E34 (1988-1996) E28 (1981-1988) E12 (1972-1981)
  • Home
  • BMW 5 Series
  • E28
  • Power unit
  • Engine in a car
  • Replacing the rear crankshaft oil seal

Replacing the rear crankshaft oil seal (BMW 5 Series E28)

            0

1. Remove the flywheel or drive disc (see section Removal and installation the flywheel/drive disc).

1. Remove the flywheel or drive disc (see section Removal and installation the flywheel/drive disc).


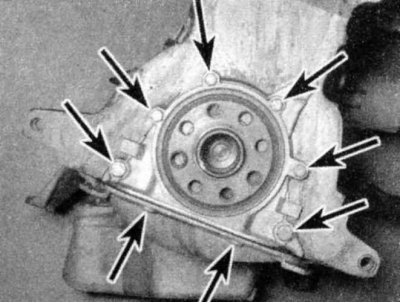
2. Remove the bolts and/or nuts securing the oil seal holder to the cylinder block. Don't forget to remove the two bolts (at the bottom) securing the rear of the oil pan to the bottom of the oil seal holder.

3. Run a thin, sharp knife between the oil pan gasket and the front cover, thus separating the gasket from the cover. Be very careful not to damage or stain the gasket so that you can reuse it later.

4. Break the sealant between the holder and the cylinder block by tapping the cover with a rubber-faced hammer or a regular hammer, using a wooden block. Do not insert anything between the cover and the block to avoid damaging the gasket surfaces.

5. Using a scraper, remove all traces of the old gasket material from the mating surfaces of the holder and cylinder block. Special solvents for removing gaskets are available and may be useful. After all gasket material has been removed, the gasket surfaces can be degreased by wiping them with a rag soaked in a suitable solvent.

Be extremely careful not to damage or scratch the soft aluminum surfaces. Also, be careful not to damage or stain the oil pan gasket.


Be extremely careful not to damage or scratch the soft aluminum surfaces. Also, be careful not to…


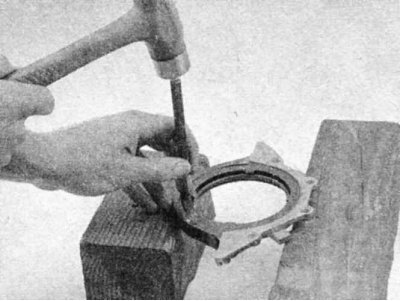
6. Support the holder with two wooden blocks and knock out the seal from the back side using a hammer and screwdriver.

7. Be careful not to damage the seal hole during operation.

7. Be careful not to damage the seal hole during operation.


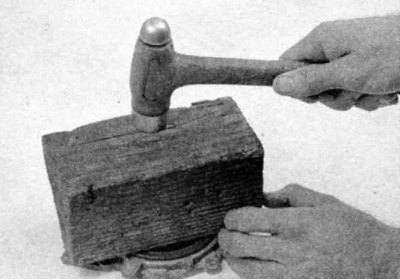
8. Coat the outside diameter and lips of the new seal with multi-purpose grease and install the seal into the holder using a hammer and wooden block.

9. Apply a thin bead of RTV type sealant to the oil pan gasket seal retainer mating surface. Apply more sealant to the edges where the gasket contacts the engine block.

If the oil pan gasket is damaged, instead of replacing the entire gasket, you can try cutting off the front of the gasket where it meets the engine block, then cutting off the front of the new gasket to exactly the same size. Cover the inside of the pan with a rag, then clean all traces of the old gasket material from the mating surfaces. Attach a piece of the new gasket to the pan with a special adhesive, then apply RTV sealant as described at the beginning of this section.


10. Coat both sides of the new gasket with RTV sealant, then connect the gasket to the seal retainer. Install the retainer onto the rear of the engine, then install the bolts and tighten them to the specified torque. Tighten the bolts one by one in a crisscross pattern to ensure even tightening.

First tighten the bracket-to-block mounting bolts, then the oil pan-to-cover bolts. If the gasket protrudes above the cover-to-block joint or forms folds in the cover-to-pan joint, trim it so that it sits correctly.


After applying the RTV sealant, assembly must be completed within 10 minutes to allow time for the sealant to cure.


11. Install the flywheel/drive plate (see section Removal and installation the flywheel/drive disc).

12. Install the transmission (for vehicles with manual transmission, see Chapter Manual transmission (MT); for vehicles with automatic transmission see Chapter Automatic transmission (AT)).

This article is available at russian, bulgarian, belarusian, ukrainian, serbian, croatian, romanian, polish, slovak, hungarian
Article verified: Zhuravleva Isolda

Share information:
Previous articles
БМВ E28: Engine in a car
Next articles

Removal and installation the flywheel/drive disc
Removal, inspection and installation of the oil pump
Removal and installation the oil pan
Removal and installation the cylinder head
Replacing the front oil seals
Checking the condition and replacing the power unit supports


Similar articles on other types of BMW cars:
Replacing the rear crankshaft oil seal BMW 3 Series E21 (1975-1983)
Rear Crankshaft Oil Seal — Replacement BMW 7 Series E32 (1986-1994)
Replacing crankshaft seals BMW 7 Series E38 (1994-2001)
Rear ashtray (optional) BMW X3 E83 (2003-2010)
Replacing the rear crankshaft oil seal BMW X5 E53 (1999-2006)
Link in different formats to this page


Visitor comments

No comments yet


How much 25 + 49 =


BMW E39 (1995-2003) 
  • General information
  • Governing bodies
  • Manual
  • Maintenance
  • Power unit
  • Engine repair
  • Lubrication system
  • Cooling system
  • Ignition system
  • Supply system
  • Injection system (gasoline)
  • Injection system (diesel)
  • Exhaust system
  • Transmission
  • Clutch
  • Car gearbox
  • Front axle
  • Rear axle
  • Chassis
  • Steering
  • Brake system
  • Wheels and tires
  • Body
  • Interior
  • Exterior
  • Heating system
  • Electrical equipment
  • Equipment and devices
  • Power devices
  • Windscreen wipers
  • Electrical circuits
BMW E34 (1988-1996) 
  • General information
  • Manual
  • Maintenance
  • Power unit
  • Engine repair
  • Ignition system
  • Engine lubrication system
  • Cooling system
  • Fuel system (gasoline)
  • Fuel system (diesel)
  • Exhaust system
  • Transmission
  • Clutch
  • Car gearbox
  • Chassis
  • Front and rear suspension
  • Steering
  • Brake system
  • Body
  • Exterior
  • Interior
  • Electrical equipment
  • Heating system
  • Equipment and devices
  • Power devices
  • Electrical circuits
BMW E28 (1981-1988) 
  • General information
  • Manual
  • Maintenance
  • Power unit
  • Engine in a car
  • Engine overhaul
  • Cooling system
  • Supply system
  • Ignition system
  • Control system
  • Transmission
  • Clutch
  • Manual gearbox
  • Automatic gearbox
  • Transmission line
  • Chassis
  • Steering
  • Front suspension
  • Rear suspension
  • Brake system
  • Body
  • Body elements
  • Car care and painting
  • Electrical equipment
  • Heater and air conditioner
  • Equipment and devices
  • Starter and generator
  • Electrical circuits
BMW E12 (1972-1981) 
  • General information
  • Operation and maintenance
  • Specifications
  • Power unit
  • Engine repair
  • Cooling and lubrication system
  • Supply system
  • Ecotronic power supply system
  • Fuel injection system
  • Ignition system
  • Transmission
  • Clutch
  • Gearbox BMW 242/4
  • Gearbox Getrag 262/8
  • Gearbox Getrag 265/6
  • Automatic gearbox
  • Cardan gear
  • Rear axle
  • Chassis
  • Steering
  • Front suspension
  • Rear suspension
  • Brake system
  • Electrical equipment
  • Equipment and devices
  • Electrical circuits
BMWman.ru © 2017-2026 · Mobile version · News and articles · Sitemap: EN BG BY UA RS HR RO PL SK HU · Feedback · Site search
3er E21 · 3er E30 · 3er E36 · 3er E46 [petrol] · 3er E46 · 5er E12 · 5er E28 · 5er E34 · 5er E39 · 7er E32 · 7er E38 · X3 E83 · X5 E53 ·
This site uses cookies 🍪, without them some features simply would not work.