
- Home
- BMW 3 Series
- E46
- General information
- Maintenance
- Coolant replacement (every 4 years)
Coolant replacement (every 4 years) (BMW 3 Series E46)
Warning! Allow the engine to cool before starting this work. Avoid contact with skin or painted surfaces of the vehicle body. Immediately wash away spilled liquid with plenty of water. Do not leave antifreeze on the floor in an open container.
1. When the engine has cooled down, wrap a thick cloth around the expansion tank cap and turn the cap counterclockwise. You will hear a hissing sound - the pressure in the cooling system is equalizing with the atmospheric pressure. When the hissing stops, turn the cap all the way and remove it.
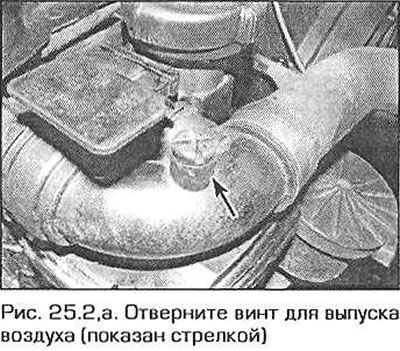
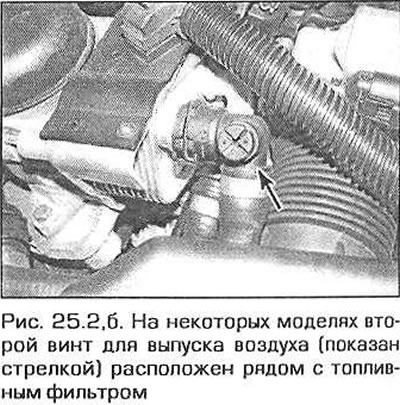
2. Remove the air bleed screw from the hose connection above the expansion tank. On some models, the air bleed screw is located next to the oil filter cover (fig. 25.2,a,b).
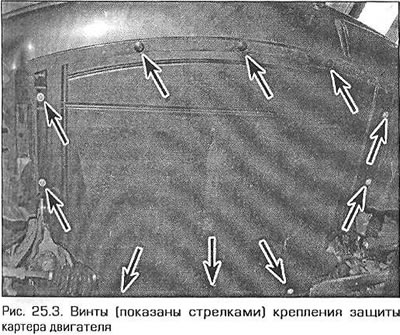
3. Remove the crankcase guard from under the engine (Fig. 25.3).
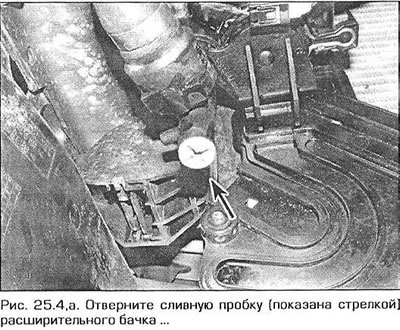
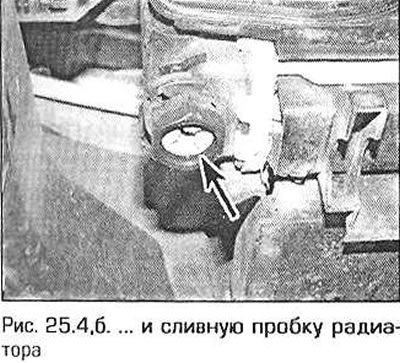
4. Place containers under the radiator drain plug and under the expansion tank. Unscrew the drain plugs and let the liquid drain into the containers (fig. 25.4,a, b).
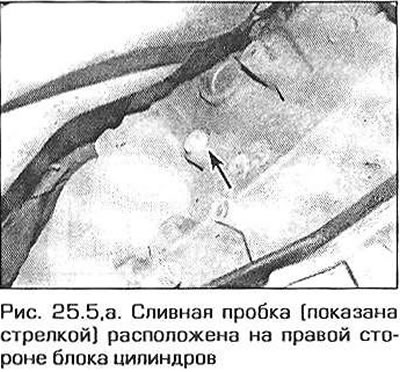
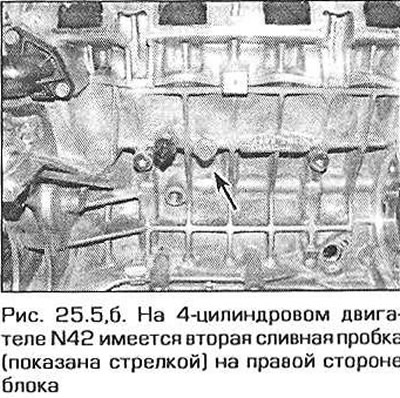
5. To completely drain the fluid, also unscrew the drain plug on the right side of the cylinder block and allow the remaining fluid to drain into a container. On the 4-cylinder N42 engine there is a second drain plug on the left side of the cylinder block (fig. 25.5.a, b).
6. If the fluid was drained for a reason other than replacement, it can be reused if it is less than two years old (although this is not recommended).
7. When all the fluid has drained, tighten the air bleed screws, replace the sealing washers on the cylinder block plugs, and screw in the plugs.
Flushing the cooling system
8. If the coolant has not been changed for a long time or if it is diluted with water, then over time the cooling system may lose its efficiency as the system channels become covered with corrosion, sediment and deposits. The efficiency of the cooling system can be restored by flushing.
9. The radiator should be flushed separately from the engine to avoid unnecessary contamination.
Radiator flushing
10. To flush the radiator, disconnect the upper and lower hoses from it, as well as all other hoses, if any (see chapter 3).
11. Insert a garden hose into the top radiator hose and turn on the water so that water circulates through the radiator. Continue flushing until clear water flows out of the bottom hose.
12. If after sufficient time the water coming out is still not clear, flush the radiator using a neutral detergent intended for cooling systems. Follow the detergent manufacturer's instructions. If the radiator is very dirty, flush it in the opposite direction by inserting a hose into the lower connection.
Engine flush
13. Before flushing the engine, remove the thermostat from it as indicated in chapter 3, then temporarily install the thermostat cover back.
14. Disconnect the upper and lower hoses from the radiator. Insert a garden hose into the upper radiator hose and turn on the water.
Flush the engine until clear water flows from the lower radiator hose.
15. After flushing is complete, reinstall the thermostat and connect the hoses (see chapter 3).
Filling the cooling system
16. Before filling the cooling system, check that all hoses and clamps are in place and in good condition. Check that the clamps are securely tightened and that the radiator and cylinder block drain plugs are screwed in place. Keep in mind that antifreeze should be used all year round, not just in cold weather, since the additives it contains prevent corrosion of the internal surfaces of the engine's water jacket.
17. Loosen the screws to bleed air from the cooling system (ohm. Fig. 25.2,a, b).
18. Turn on the ignition and set the heater control to the maximum temperature position and the fan speed to the minimum position. This will open the heater valve.
19. Remove the expansion tank cap. Pour coolant into the tank slowly to avoid air locks.
20. When replacing the fluid, first pour a couple of liters of water into the system, and then add the required amount of clean antifreeze. Bring the amount of fluid to the required level by pouring clean water into the system again.
21. When liquid without air bubbles flows from under the bleed screws, tighten and tighten the screws securely.
22. When the fluid level in the expansion tank starts to rise, squeeze and release the upper and lower radiator hoses to push out any air pockets from the system. If the fluid level in the tank drops after this operation, bring it to the MAX mark and tighten the expansion tank cap.
23. Start the engine, warm it up to operating temperature, then turn it off and let it cool.
24. With the engine running, check all affected areas for leaks. When the engine has cooled down, check the fluid level in the expansion tank and top up if necessary. Please note that the level marks correspond to a cold engine. If the expansion tank needs to be opened when the engine has not yet cooled down, cover the tank cap with a thick rag to avoid being scalded by the steam coming out of the tank. Unscrew the cap slightly until a hissing sound is heard and allow the pressure inside the cooling system to equalize with atmospheric pressure. When the hissing stops, unscrew the cap completely.
Coolant
25. The coolant should be changed at specified intervals. This is necessary because the antifreeze it contains loses its protective properties over time and corrosion may begin in the engine's water jacket.
26. To prepare the coolant, use ethylene glycol-based antifreeze, which is best suited for use in a cooling system made of different metals. The cooling system capacity and the percentage composition of the coolant are given in the Technical Data at the beginning of this chapter.
27. Before filling the system with fresh coolant, the old liquid should be completely drained and the cooling system flushed. At the same time, the condition of all cooling system hoses and the reliability of their fastening with clamps should be checked.
28. After replacing the coolant, attach a plate to the expansion tank with the date of filling, type and concentration of antifreeze. Until the next replacement, only the same liquid should be added to the system.
29. Never use antifreeze to fill the windshield washer reservoir, as antifreeze will ruin the paintwork. There are special additives for windshield washers.
This article is available at russian, bulgarian, belarusian, ukrainian, serbian, croatian, romanian, polish, slovak, hungarian
Article verified: Ilyinsky Matvey
Share information:
Previous articles
БМВ E46: Maintenance
Next articles
Similar articles on other types of BMW cars:
Replacing the coolant BMW 5 Series E12 (1972-1981)
Coolant temperature gauge BMW 5 Series E34 (1988-1996)
Checking the coolant level BMW 7 Series E32 (1986-1994)
Coolant temperature gauge BMW X3 E83 (2003-2010)
Wheel replacement BMW X5 E53 (1999-2006)
Replacing the coolant BMW 5 Series E12 (1972-1981)
Coolant temperature gauge BMW 5 Series E34 (1988-1996)
Checking the coolant level BMW 7 Series E32 (1986-1994)
Coolant temperature gauge BMW X3 E83 (2003-2010)
Wheel replacement BMW X5 E53 (1999-2006)
Link in different formats to this page
Visitor comments
No comments yet
- General information
- Manual
- Maintenance
- Power unit
- Engine repair
- Cooling system
- Power system (gasoline)
- Injection system (gasoline)
- Fuel system (diesel)
- Exhaust system
- Ignition system
- Charge and launch systems
- Transmission
- Car gearbox
- Clutch and drive shafts
- Chassis
- Brake system
- Suspension front and rear
- Steering
- Body
- Body care and repair
- Exterior
- Interior
- Electrical equipment
- Troubleshooting
- Lighting and signaling
- Equipment and devices
- Heater and air conditioner
- Electrical circuits
- General information
- Manual
- Repair on the road
- Weekly checks
- Maintenance
- Troubleshooting
- Power unit
- 4 cylinder engines
- 6 cylinder engines
- Engine overhaul
- Cooling and heating
- Fuel and exhaust system
- Starting and charging system
- Ignition system
- Transmission
- Clutch
- Mechanical gearbox
- Automatic gearbox
- Cardan and drive shafts
- Chassis
- Brake system
- Wheel suspension
- Steering
- Body
- Exterior
- Interior
- Electrical equipment
- Equipment and devices
- Electrical circuits
- General information
- Maintenance
- Power unit
- Engine repair
- Cooling system
- Ignition system
- Supply system
- Fuel injection system
- Exhaust system
- Transmission
- Clutch
- Car gearbox
- Front and rear axle
- Chassis
- Steering
- Brake system
- Body
- Exterior
- Interior
- Electrical equipment
- Heating system
- Equipment and devices
- Power devices
- Electrical circuits
- Power unit
- M10/M20 engine
- M40 engine
- Ignition system
- Lubrication system
- Cooling system
- Supply system
- Fuel injection
- Exhaust system
- Transmission
- Clutch
- Manual gearbox
- Front axle
- Rear axle
- Chassis
- Steering
- Brake system
- Body
- Exterior
- Interior
- Electrical equipment
- Heating system
- Equipment and devices
- Electrical circuits
- General information
- Specifications
- Operation and maintenance
- 4-cylinder engine
- Engine repair
- Cooling and lubrication system
- Supply system
- Ignition system
- 6-cylinder engine
- Engine repair
- Cooling and lubrication system
- Supply system
- Fuel injection system
- Ignition system
- Transmission
- Clutch
- 4-speed manual gearbox
- 5-speed manual gearbox
- Automatic gearbox
- Cardan and rear axle
- Chassis
- Steering
- Front suspension
- Rear suspension
- Brake system
- Electrical equipment
- Equipment and devices
- Electrical circuits