
Table of contents: Engine M43TU ↓ Engine N42 ↓
- Home
- BMW 3 Series
- E46
- Power unit
- 4 cylinder engines
- Pallet — removal and installation
Pallet — removal and installation (BMW 3 Series E46)
Engine M43TU
Removal
1. Drain the oil from the engine sump (see chapter 1).
2. Lower the front subframe as shown in paragraph 15.
3. Remove the bolt that secures the dipstick tube to the intake manifold, release the wiring harness secured to the dipstick tube, then pull the bottom of the tube out of the pan and remove the tube.
4. Disconnect the fuel lines and transmission cooler hoses from the pan (in case of automatic transmission). Move the tubes and hoses to the side.
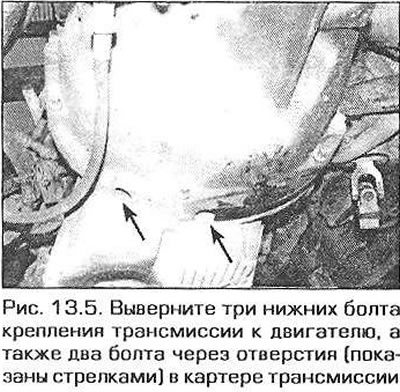
5. Disconnect the electrical connector from the oil level sensor from underneath the vehicle. Gradually and evenly unscrew all the oil pan mounting bolts, including the two rear bolts through the holes in the transmission housing. It is also necessary to unscrew the three lower transmission-to-engine mounting bolts, since they are screwed into the oil pan (Fig. 13.5).
6. Lower the pan and pull it back out from under the engine. If necessary, lower the subframe additionally using a jack.
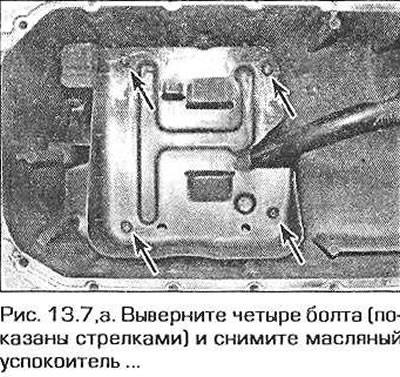
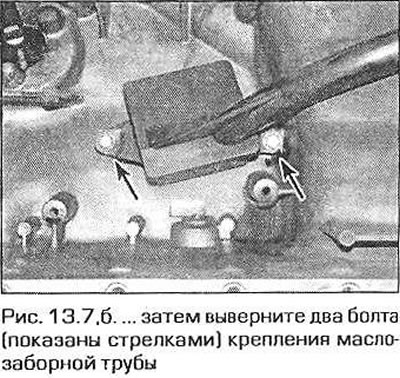
7. Remove the oil pan gasket. When installing, the gasket will need to be replaced with a new one. If necessary, remove the oil separator from the oil pan by unscrewing the four bolts that secure it to the pan, as well as the oil intake pipe by unscrewing two bolts (fig. 13.7, a, b).
Installation
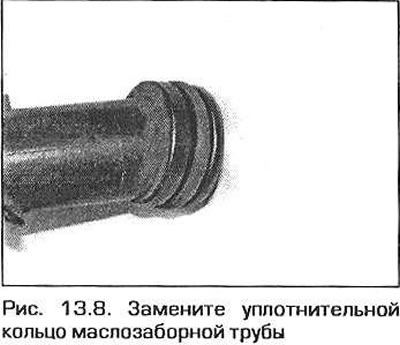
8. First, thoroughly clean the mating surfaces of the oil pan and crankcase. Install the oil intake pipe, replacing the sealing ring on it (Fig. 13.8), as well as the oil damper. Apply thread locking compound to the bolt threads.
9. Apply a small amount of Dreil Bond 1209 to the contact areas of the cylinder block with the rear seal housing and the chain housing.
10. Place a new gasket on the pan flange. If necessary, "glue" the gasket with sealant so that it does not shift when installing the pan.
11. Place the tray in the installation location, making sure that the gasket does not shift.
12. Screw in the pan mounting bolts and tighten them by hand for now.
13. Gradually tighten the pan mounting bolts to the required torque.
14. Tighten the transmission-to-engine mounting bolts and the oil pan mounting bolts hidden by the transmission housing to the specified torque.
15. Check the condition of the oil dipstick tube sealing ring on the sump side. Replace the ring if necessary. Reinsert the tube and tighten the mounting bolt.
16. On models with automatic transmission, secure the coolant hoses to the pan. If fuel lines were previously secured to the pan, secure them in their original locations.
17. Jack up the front subframe and secure it with new bolts. Tighten the subframe bolts to the specified torque.
18. Insert the bolts securing the lower suspension arms to the body (don't forget to put on the washers) and tighten the bolts to the required torque.
19. Lower the engine so that its supports rest on the subframe. Make sure that the protrusions on the engine supports enter the corresponding holes in the subframe. Screw new nuts onto the support studs and tighten them securely.
20. Install the front amplifier and tighten the new bolts to the specified torque.
21. Disconnect the lifting device from the engine.
22. Otherwise, installation is carried out in the reverse order of removal.
Engine N42
Removal
23. Drain the coolant.
24. Remove the air cleaner as described in chapter 4A.
25. Lower the front subframe as shown in paragraph 15.
26. Disconnect all wires attached to the dipstick tube and its bracket. Loosen the tube bracket mounting bolt and pull the tube out of the pan. Rotate the tube clockwise if necessary. Inspect the tube sealing ring and replace it if necessary.
27. Disconnect the electrical connector of the oil level sensor.
28. Cut the clamp that secures the wiring harness to the lower transmission housing cover. Loosen the bolts and remove the cover.
29. Remove the accessory drive belt idler roller from the front of the engine (if there is such a video).
30. Remove the oil pan mounting bolts. Lower the oil pan and pull it back out from under the car. If necessary, lower the subframe even lower. To make it easier to remove the oil pan, remove the bolts and the oil pickup pipe.
31. Remove the pan gasket. The gasket can be discarded.
Installation
32. First, thoroughly clean the mating surfaces of the oil pan and engine crankcase.
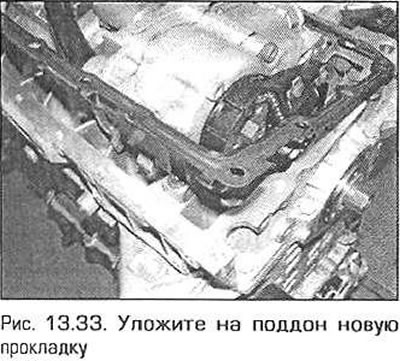
33. Place a new gasket on the pan flange (fig. 13.33).
34. Install the tray in place, screw in the bolts and tighten them to the required torque.
35. Otherwise, installation is carried out in the reverse order of removal, taking into account the following points.
- a) Tighten all fasteners to the required torque, if specified in the Technical Data.
- b) Fill the engine with oil as indicated in chapter 1.
- c) Install the accessory drive belt in place (if it was removed).
- d) Use new bolts to secure the subframe.
- d) Use new nuts to secure the engine support brackets.
[Original publication posted on the website: BMWMan]
This article is available at russian, bulgarian, belarusian, ukrainian, serbian, croatian, romanian, polish, slovak, hungarian
Article verified: Ilyinsky Matvey
Share information:
Previous articles
БМВ E46: 4 cylinder engines
Next articles
Cylinder head — removal, inspection and installation
Camshafts, rocker arms and hydraulic supports — removal and…
Valve timing drive (engine N42) — description and replacement of parts
Camshaft timing chain housing (M43TU engine) — removal and…
Timing Chain Sprockets and Tensioner — Removal and Installation
Camshafts, rocker arms and hydraulic supports — removal and…
Valve timing drive (engine N42) — description and replacement of parts
Camshaft timing chain housing (M43TU engine) — removal and…
Timing Chain Sprockets and Tensioner — Removal and Installation
Similar articles on other types of BMW cars:
Removal and installation the oil pan BMW 5 Series E12 (1972-1981)
Cylinder Head Cover — Removal and Installation BMW 7 Series E32 (1986-1994)
Pistons — removal and installation BMW X3 E83 (2003-2010)
Removal and installation the engine BMW X5 E53 (1999-2006)
Removal and installation the oil pan BMW 5 Series E12 (1972-1981)
Cylinder Head Cover — Removal and Installation BMW 7 Series E32 (1986-1994)
Pistons — removal and installation BMW X3 E83 (2003-2010)
Removal and installation the engine BMW X5 E53 (1999-2006)
Link in different formats to this page
Visitor comments
No comments yet
- General information
- Manual
- Maintenance
- Power unit
- Engine repair
- Cooling system
- Power system (gasoline)
- Injection system (gasoline)
- Fuel system (diesel)
- Exhaust system
- Ignition system
- Charge and launch systems
- Transmission
- Car gearbox
- Clutch and drive shafts
- Chassis
- Brake system
- Suspension front and rear
- Steering
- Body
- Body care and repair
- Exterior
- Interior
- Electrical equipment
- Troubleshooting
- Lighting and signaling
- Equipment and devices
- Heater and air conditioner
- Electrical circuits
- General information
- Manual
- Repair on the road
- Weekly checks
- Maintenance
- Troubleshooting
- Power unit
- 4 cylinder engines
- 6 cylinder engines
- Engine overhaul
- Cooling and heating
- Fuel and exhaust system
- Starting and charging system
- Ignition system
- Transmission
- Clutch
- Mechanical gearbox
- Automatic gearbox
- Cardan and drive shafts
- Chassis
- Brake system
- Wheel suspension
- Steering
- Body
- Exterior
- Interior
- Electrical equipment
- Equipment and devices
- Electrical circuits
- General information
- Maintenance
- Power unit
- Engine repair
- Cooling system
- Ignition system
- Supply system
- Fuel injection system
- Exhaust system
- Transmission
- Clutch
- Car gearbox
- Front and rear axle
- Chassis
- Steering
- Brake system
- Body
- Exterior
- Interior
- Electrical equipment
- Heating system
- Equipment and devices
- Power devices
- Electrical circuits
- Power unit
- M10/M20 engine
- M40 engine
- Ignition system
- Lubrication system
- Cooling system
- Supply system
- Fuel injection
- Exhaust system
- Transmission
- Clutch
- Manual gearbox
- Front axle
- Rear axle
- Chassis
- Steering
- Brake system
- Body
- Exterior
- Interior
- Electrical equipment
- Heating system
- Equipment and devices
- Electrical circuits
- General information
- Specifications
- Operation and maintenance
- 4-cylinder engine
- Engine repair
- Cooling and lubrication system
- Supply system
- Ignition system
- 6-cylinder engine
- Engine repair
- Cooling and lubrication system
- Supply system
- Fuel injection system
- Ignition system
- Transmission
- Clutch
- 4-speed manual gearbox
- 5-speed manual gearbox
- Automatic gearbox
- Cardan and rear axle
- Chassis
- Steering
- Front suspension
- Rear suspension
- Brake system
- Electrical equipment
- Equipment and devices
- Electrical circuits