
Table of contents: Front crankshaft oil seal ↓ Rear crankshaft oil seal ↓
- Home
- BMW 3 Series
- E46
- Power unit
- 4 cylinder engines
- Crankshaft seals — replacement
Crankshaft seals — replacement (BMW 3 Series E46)
Front crankshaft oil seal
Engine M43TU
1. Replacement of the cuff is described in paragraph 6 as part of the lower timing chain cover removal procedure.
Engine N42
2. Remove the pulley with the damper from the crankshaft nose (see paragraph 5). Do not remove the hub.
3. Mark the depth of the seal installation in the cover. On the engines we had to have a depot with, the seal was installed flush with the outer plane of the cover.
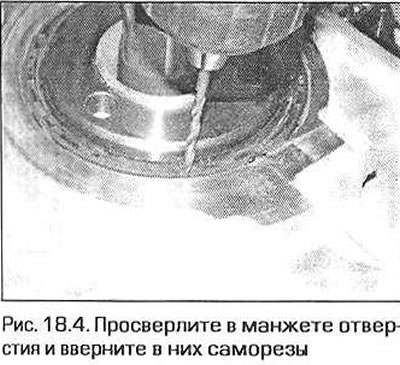
4. Remove the old cuff with some kind of hook. Alternatively, drill a couple of holes in the cuff, screw screws into them and pull the screws out with pliers together with the cuff (Fig. 18.4). Lubricate the drill with grease so that all the chips stick to it. Be careful not to damage the pulley hub or the working surfaces of the block and crankshaft under the cuff. If these methods fail to remove the cuff, remove the pulley hub and cut the cuff with a chisel.
5. Wipe the pulley hub and the surface under the seal in the housing. Lubricate the hub surface with engine oil.
6. The new seal is supplied with a mounting mandrel. Insert the new seal into the mandrel and place the mandrel on the hub.
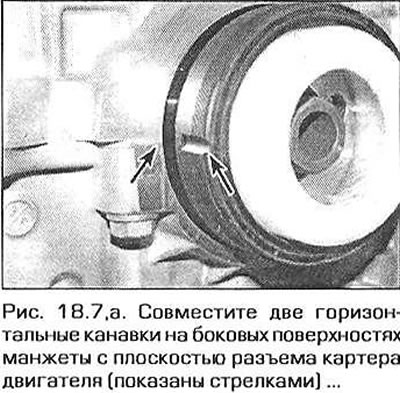
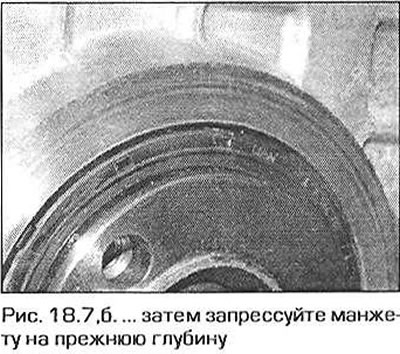
7. Align the two horizontal grooves on the side surfaces of the cuff with the parting plane of the engine crankcase (fig. 18.7,3). Then press the cuff to the previous depth using a piece of pipe that rests only on the outer, hard part of the cuff (fig. 18.7,6).
8. Using the tools included in the BMW seal replacement kit, coat the seal grooves with the primer included in the kit.
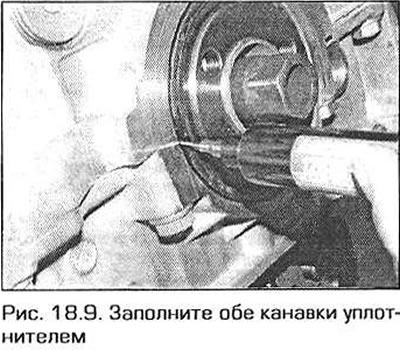
9. Using the syringe included in the kit, fill both grooves with sealing compound (Fig. 18.9). Cover the ends of the grooves with primer.
10. Install the pulley with damper on the crankshaft as described in paragraph 5.
Rear crankshaft oil seal
Engine M43TU
11. Perform the actions specified in paragraph 14 of Chapter 2B.
Engine N43
12. Remove the flywheel as described in paragraph 19.
13. Measure and record the cuff installation depth.
14. Drill a couple of holes in the cuff, screw in the screws and pull out the screws with pliers together with the cuff (see fig. 18.4).
15. Wipe the surfaces of the crankshaft and housing under the seal. Lubricate the surface of the crankshaft under the seal with engine oil.
16. The new seal is supplied with a mounting mandrel. Insert the new seal into the mandrel and place the mandrel on the nose of the crankshaft.
17. Align the two horizontal grooves on the side surfaces of the cuff with the parting plane of the engine crankcase (see fig. 18.7.a). Press the cuff to its previous depth using a piece of pipe that rests only on the outer, hard part of the cuff (see fig. 18.7,6).
18. Using the tools included in the BMW seal replacement kit, coat the seal grooves with the primer included in the kit.
19. Using the syringe included in the kit, fill both grooves with sealing compound (see fig. 18.9). Cover the ends of the grooves with primer.
20 Install the flywheel as described in paragraph 19.
This article is available at russian, bulgarian, belarusian, ukrainian, serbian, croatian, romanian, polish, slovak, hungarian
Article verified: Ilyinsky Matvey
Share information:
Previous articles
БМВ E46: 4 cylinder engines
Next articles
Similar articles on other types of BMW cars:
Engine suspension cushion replacement BMW 5 Series E12 (1972-1981)
Wheel replacement BMW 5 Series E34 (1988-1996)
Seals — replacement BMW 7 Series E32 (1986-1994)
Replacing crankshaft seals BMW 7 Series E38 (1994-2001)
Timing mechanism — replacement of the drive chain BMW X3 E83 (2003-2010)
Replacing crankshaft seals BMW X5 E53 (1999-2006)
Link in different formats to this page
Visitor comments
No comments yet
- General information
- Manual
- Maintenance
- Power unit
- Engine repair
- Cooling system
- Power system (gasoline)
- Injection system (gasoline)
- Fuel system (diesel)
- Exhaust system
- Ignition system
- Charge and launch systems
- Transmission
- Car gearbox
- Clutch and drive shafts
- Chassis
- Brake system
- Suspension front and rear
- Steering
- Body
- Body care and repair
- Exterior
- Interior
- Electrical equipment
- Troubleshooting
- Lighting and signaling
- Equipment and devices
- Heater and air conditioner
- Electrical circuits
- General information
- Manual
- Repair on the road
- Weekly checks
- Maintenance
- Troubleshooting
- Power unit
- 4 cylinder engines
- 6 cylinder engines
- Engine overhaul
- Cooling and heating
- Fuel and exhaust system
- Starting and charging system
- Ignition system
- Transmission
- Clutch
- Mechanical gearbox
- Automatic gearbox
- Cardan and drive shafts
- Chassis
- Brake system
- Wheel suspension
- Steering
- Body
- Exterior
- Interior
- Electrical equipment
- Equipment and devices
- Electrical circuits
- General information
- Maintenance
- Power unit
- Engine repair
- Cooling system
- Ignition system
- Supply system
- Fuel injection system
- Exhaust system
- Transmission
- Clutch
- Car gearbox
- Front and rear axle
- Chassis
- Steering
- Brake system
- Body
- Exterior
- Interior
- Electrical equipment
- Heating system
- Equipment and devices
- Power devices
- Electrical circuits
- Power unit
- M10/M20 engine
- M40 engine
- Ignition system
- Lubrication system
- Cooling system
- Supply system
- Fuel injection
- Exhaust system
- Transmission
- Clutch
- Manual gearbox
- Front axle
- Rear axle
- Chassis
- Steering
- Brake system
- Body
- Exterior
- Interior
- Electrical equipment
- Heating system
- Equipment and devices
- Electrical circuits
- General information
- Specifications
- Operation and maintenance
- 4-cylinder engine
- Engine repair
- Cooling and lubrication system
- Supply system
- Ignition system
- 6-cylinder engine
- Engine repair
- Cooling and lubrication system
- Supply system
- Fuel injection system
- Ignition system
- Transmission
- Clutch
- 4-speed manual gearbox
- 5-speed manual gearbox
- Automatic gearbox
- Cardan and rear axle
- Chassis
- Steering
- Front suspension
- Rear suspension
- Brake system
- Electrical equipment
- Equipment and devices
- Electrical circuits