
Table of contents: Camshaft Sprockets ↓ Crankshaft sprocket ↓ Secondary Target Tensioner ↓ Primary tensioner ↓
- Home
- BMW 3 Series
- E46
- Power unit
- 6 cylinder engines
- Sprockets and chain tensioners — removal, inspection and installation
Sprockets and chain tensioners — removal, inspection and installation (BMW 3 Series E46)
Camshaft Sprockets
1. Removal, inspection and installation of sprockets is described in paragraph 7 as part of the secondary chain removal and installation procedure.
Crankshaft sprocket
Removal
2. The camshaft drive sprocket is combined with the oil pump drive sprocket. On some models, the sprocket may be pressed onto the crankshaft nose.
3. Remove the primary chain as described in paragraph 7.
4. Remove the sprocket from the nose of the crankshaft. If the sprocket is pressed onto the shaft, use a three-jaw puller. To cover the threaded hole for the hub mounting bolt in the center of the shaft, temporarily screw a bolt into the hole. Remember which side of the sprocket faces outward so that you can install it correctly later,
5. After removing the sprocket, check whether the key is holding well on the shaft nose. If not, remove it and save it.
Inspection
6. Inspection of sprockets is described in paragraph 7.
Installation
7. Insert the key into the shaft groove (if the key has been removed).
8. Place the sprocket on the shaft nose. If the sprocket was installed using a press fit, heat it to 150°C before installing the sprocket. Do not exceed this temperature, otherwise the sprocket material will lose its strength characteristics.
9. After heating the sprocket, align its groove with the key and press the sprocket onto the shaft using a pipe of suitable diameter.
Warning! If the sprocket has been heated, be careful - the metal may remain hot for a long time.
10. Install the primary chain as described in paragraph 7.
Secondary Target Tensioner
Removal
11. Remove the secondary chain as described in paragraph 7.
12. Remove the bolts and tensioner housing from the cylinder head (see fig. 7.28).
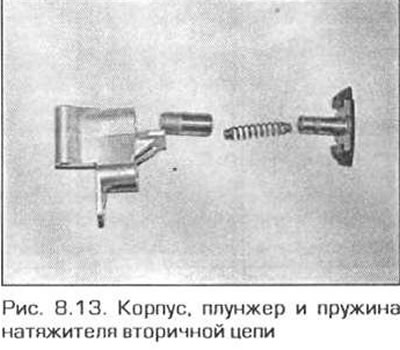
13. Pull out the locking rod that held the plunger in the depressed position, remove the plunger and spring (Fig. 8.13).
Inspection
14. Inspect the tensioner and replace it if necessary. Inspect the plunger and its bore for wear and damage. Inspect the tensioner spring and check its condition. Inspect the working surface of the tensioner shoe for wear. Replace worn or damaged parts.
15. When installing the plunger, keep in mind that after the tensioner is installed in place, the cutout in the plunger should be facing the right side of the engine.
Installation
16. Install the tensioner in place and securely tighten its mounting bolts.
17. Insert a rod or drill to secure the tensioner in the depressed position.
18. Install the secondary circuit as described in paragraph 7.
Primary tensioner
19. The removal and installation of the tensioner is described in paragraph 7 as part of the primary chain removal and installation procedure.
This article is available at russian, bulgarian, belarusian, ukrainian, serbian, croatian, romanian, polish, slovak, hungarian
Article verified: Ilyinsky Matvey
Share information:
Previous articles
БМВ E46: 6 cylinder engines
Next articles
Similar articles on other types of BMW cars:
Removal, inspection and installation of the timing chain and its… BMW 5 Series E28 (1981-1988)
Removal and installation, inspection of the rear shock absorber BMW 5 Series E34 (1988-1996)
Drive chain and sprockets — removal, inspection and installation BMW 7 Series E32 (1986-1994)
Removal and installation of cylinder heads, camshafts and their… BMW 7 Series E38 (1994-2001)
Pistons — removal and installation BMW X3 E83 (2003-2010)
Removal and installation the engine BMW X5 E53 (1999-2006)
Link in different formats to this page
Visitor comments
No comments yet
- General information
- Manual
- Maintenance
- Power unit
- Engine repair
- Cooling system
- Power system (gasoline)
- Injection system (gasoline)
- Fuel system (diesel)
- Exhaust system
- Ignition system
- Charge and launch systems
- Transmission
- Car gearbox
- Clutch and drive shafts
- Chassis
- Brake system
- Suspension front and rear
- Steering
- Body
- Body care and repair
- Exterior
- Interior
- Electrical equipment
- Troubleshooting
- Lighting and signaling
- Equipment and devices
- Heater and air conditioner
- Electrical circuits
- General information
- Manual
- Repair on the road
- Weekly checks
- Maintenance
- Troubleshooting
- Power unit
- 4 cylinder engines
- 6 cylinder engines
- Engine overhaul
- Cooling and heating
- Fuel and exhaust system
- Starting and charging system
- Ignition system
- Transmission
- Clutch
- Mechanical gearbox
- Automatic gearbox
- Cardan and drive shafts
- Chassis
- Brake system
- Wheel suspension
- Steering
- Body
- Exterior
- Interior
- Electrical equipment
- Equipment and devices
- Electrical circuits
- General information
- Maintenance
- Power unit
- Engine repair
- Cooling system
- Ignition system
- Supply system
- Fuel injection system
- Exhaust system
- Transmission
- Clutch
- Car gearbox
- Front and rear axle
- Chassis
- Steering
- Brake system
- Body
- Exterior
- Interior
- Electrical equipment
- Heating system
- Equipment and devices
- Power devices
- Electrical circuits
- Power unit
- M10/M20 engine
- M40 engine
- Ignition system
- Lubrication system
- Cooling system
- Supply system
- Fuel injection
- Exhaust system
- Transmission
- Clutch
- Manual gearbox
- Front axle
- Rear axle
- Chassis
- Steering
- Brake system
- Body
- Exterior
- Interior
- Electrical equipment
- Heating system
- Equipment and devices
- Electrical circuits
- General information
- Specifications
- Operation and maintenance
- 4-cylinder engine
- Engine repair
- Cooling and lubrication system
- Supply system
- Ignition system
- 6-cylinder engine
- Engine repair
- Cooling and lubrication system
- Supply system
- Fuel injection system
- Ignition system
- Transmission
- Clutch
- 4-speed manual gearbox
- 5-speed manual gearbox
- Automatic gearbox
- Cardan and rear axle
- Chassis
- Steering
- Front suspension
- Rear suspension
- Brake system
- Electrical equipment
- Equipment and devices
- Electrical circuits