
Table of contents: VANOS regulator unit ↓ Regulator solenoid valve ↓
- Home
- BMW 3 Series
- E46
- Power unit
- 6 cylinder engines
- Valve timing control (VANOS) components — removal, inspection and installation
Valve timing control (VANOS) components — removal, inspection and installation (BMW 3 Series E46)
VANOS regulator unit
Note: The valve timing adjuster is located on the ends of the camshafts on the front side of the engine.
Removal
1. Remove the cooling system fan with the shroud (see chapter 3).
2. Remove the cylinder head cover (see paragraph 4).
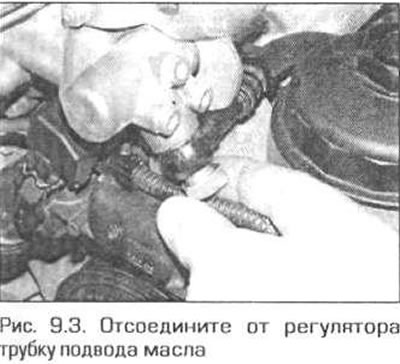
3. On the front side of the VANOS regulator, unscrew the oil supply pipe union bolt (Fig. 9.3). Remove the sealing rings.
4. Disconnect the electrical connectors of the exhaust shaft position sensor and the solenoid valves (Fig. 9.4).

5. Loosen the nut and remove the rigging bracket from the front of the engine.
6. Remove the plastic cover from the intake camshaft.
7. Set the engine to the TDC position of piston No.1 (see paragraph 3).
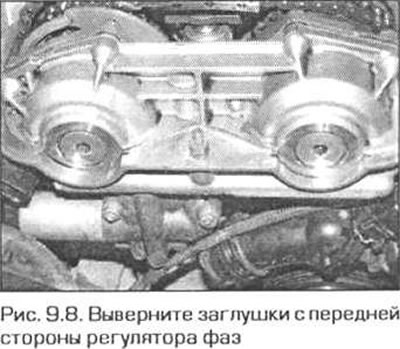
8. Unscrew the two plugs on the front side of the phase regulator (Fig. 9.8). Prepare for oil leakage. The sealing rings can be thrown away - new ones will be required during installation.
9. Using needle-nose pliers, remove the sealing plugs from the ends of the camshafts (Fig. 9.9).

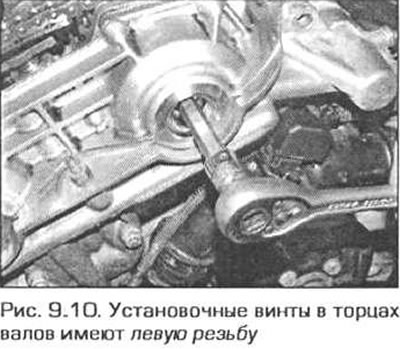
10. Using a slotted head, unscrew the set screws from the shafts (Fig. 9.10). Note: the screws have a left-hand thread.
11. Loosen the phase regulator mounting nuts and remove the VANOS regulator from the engine. Remove the gasket.
12. Do not rotate the crankshaft or camshafts while the phase adjuster is removed, otherwise the pistons may hit the valves.
Examination
13. To check the operation of the VANOS regulator, special BMW equipment is required. Contact your dealer or a specialized service station.
Installation
14. Make sure that the crankshaft and camshafts are in the TDC position of piston No.1 (see paragraph 3).
15. Make sure the locating bushings on the upper regulator mounting studs are in place.
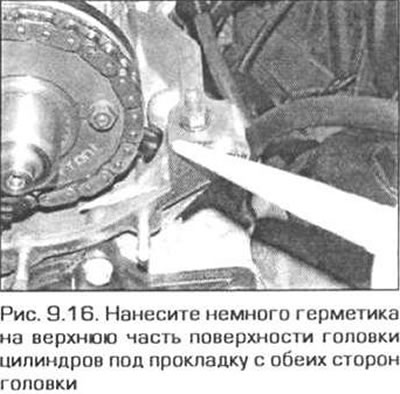
16. Apply a small amount of Drei Bond 1209 sealant to the corners of the mating surfaces of the cylinder head with the VANOS adjuster. Then place a new gasket on the mounting surface of the cylinder head under the adjuster (Fig. 9.16).
17. Install the VANOS regulator and tighten its mounting nuts securely.
18. Screw the set screws into the ends of the shafts and tighten them to the required torque. Remember that the screws have left-hand threads. Check the condition of the sealing rings on the end plugs of the shafts and insert the plugs.
19. Otherwise, installation is carried out in the reverse order of removal, observing the following notes.
- a) When connecting the oil supply pipe to the regulator, replace the sealing rings.
- b) Install the cylinder head cover as shown in paragraph 4.
- c) Install the cooling system fan with the shroud as specified in chapter 3.
- d) Before starting the engine, do not forget to remove the crankshaft lock from the flywheel.
Regulator solenoid valve
Note: The sealing ring must be replaced during installation.
Removal
20. Turn off the ignition.
21. Disconnect the electrical connector from the valve solenoid, which is attached to the engine wiring harness behind the oil filter.
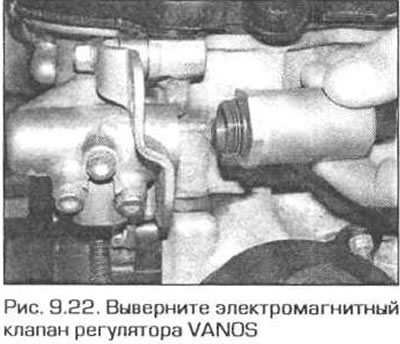
22. Unscrew the electromagnetic valve and remove the sealing ring from it (Fig. 9.22).
Examination
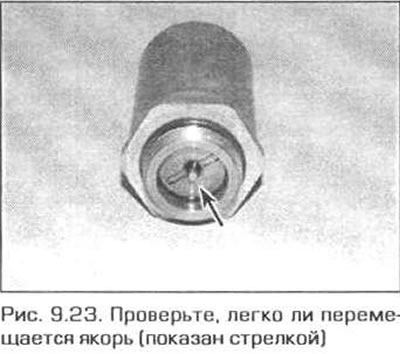
23. Check whether the anchor of the electromagnet can be easily moved back and forth by hand (Fig. 9.23). If the anchor sticks, replace the electromagnet.
Installation
24. Install the valve in the reverse order of removal.
This article is available at russian, bulgarian, belarusian, ukrainian, serbian, croatian, romanian, polish, slovak, hungarian
Article verified: Ilyinsky Matvey
Share information:
Previous articles
БМВ E46: 6 cylinder engines
Next articles
Similar articles on other types of BMW cars:
Removal and installation, checking of the idle speed control valve BMW 5 Series E34 (1988-1996)
Removal, inspection and installation of the timing belt and its… BMW 5 Series E28 (1981-1988)
Timing Chain Covers — Removal and Installation BMW 7 Series E32 (1986-1994)
Removal and installation the preheating valve BMW 7 Series E38 (1994-2001)
Removal and installation the airbag control unit BMW X3 E83 (2003-2010)
Removal and installation the engine BMW X5 E53 (1999-2006)
Link in different formats to this page
Visitor comments
No comments yet
- General information
- Manual
- Maintenance
- Power unit
- Engine repair
- Cooling system
- Power system (gasoline)
- Injection system (gasoline)
- Fuel system (diesel)
- Exhaust system
- Ignition system
- Charge and launch systems
- Transmission
- Car gearbox
- Clutch and drive shafts
- Chassis
- Brake system
- Suspension front and rear
- Steering
- Body
- Body care and repair
- Exterior
- Interior
- Electrical equipment
- Troubleshooting
- Lighting and signaling
- Equipment and devices
- Heater and air conditioner
- Electrical circuits
- General information
- Manual
- Repair on the road
- Weekly checks
- Maintenance
- Troubleshooting
- Power unit
- 4 cylinder engines
- 6 cylinder engines
- Engine overhaul
- Cooling and heating
- Fuel and exhaust system
- Starting and charging system
- Ignition system
- Transmission
- Clutch
- Mechanical gearbox
- Automatic gearbox
- Cardan and drive shafts
- Chassis
- Brake system
- Wheel suspension
- Steering
- Body
- Exterior
- Interior
- Electrical equipment
- Equipment and devices
- Electrical circuits
- General information
- Maintenance
- Power unit
- Engine repair
- Cooling system
- Ignition system
- Supply system
- Fuel injection system
- Exhaust system
- Transmission
- Clutch
- Car gearbox
- Front and rear axle
- Chassis
- Steering
- Brake system
- Body
- Exterior
- Interior
- Electrical equipment
- Heating system
- Equipment and devices
- Power devices
- Electrical circuits
- Power unit
- M10/M20 engine
- M40 engine
- Ignition system
- Lubrication system
- Cooling system
- Supply system
- Fuel injection
- Exhaust system
- Transmission
- Clutch
- Manual gearbox
- Front axle
- Rear axle
- Chassis
- Steering
- Brake system
- Body
- Exterior
- Interior
- Electrical equipment
- Heating system
- Equipment and devices
- Electrical circuits
- General information
- Specifications
- Operation and maintenance
- 4-cylinder engine
- Engine repair
- Cooling and lubrication system
- Supply system
- Ignition system
- 6-cylinder engine
- Engine repair
- Cooling and lubrication system
- Supply system
- Fuel injection system
- Ignition system
- Transmission
- Clutch
- 4-speed manual gearbox
- 5-speed manual gearbox
- Automatic gearbox
- Cardan and rear axle
- Chassis
- Steering
- Front suspension
- Rear suspension
- Brake system
- Electrical equipment
- Equipment and devices
- Electrical circuits