
Trim panels
1. Interior cladding panels are fixed with screws or various types of fasteners.
2. Before removing the panel, you need to check that the overlap of the adjacent panel does not interfere with this. Usually the sequence of removal operations can be determined by careful inspection.
3. Remove any fasteners you find, such as screws. If the panel does not come off, then it is held by clips or latches that are not visible. Usually they are located along the contour of the panel and are removed by pulling. However, they can be easily broken when removed. Therefore, you must have a replacement for them. In the absence of a special tool, it is best to use a large flathead screwdriver to remove the retainers and clips. Please note that in order to remove some retainers, you must first remove the center pin, and then remove the retainer itself. Keep in mind that it is often necessary to remove the sealing strip adjacent to the panel to remove it.
4. When removing the panel, never apply excessive force to avoid damaging it. Before removing a panel, always carefully check that all fasteners are removed or released.
5. Installation is made in an order, the return to removal. Secure all fasteners by pushing them into place. To prevent rattling, make sure that all components that have been disassembled are securely fastened.
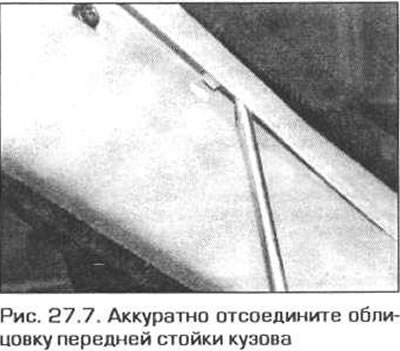
Facing of a forward rack of a body
6. Since airbag units are installed nearby, first disconnect the wire from the negative battery terminal (see chapter 5A).
7. Using a wooden or plastic flat tool, carefully pry the trim off the post (pic. 27.7).
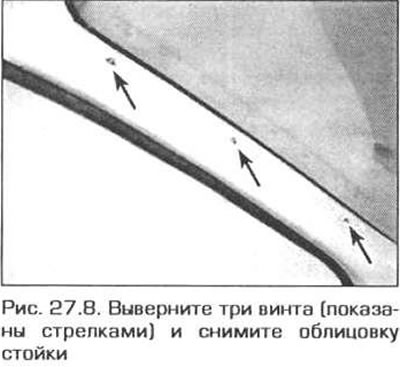
8. Turn out three screws and remove facing. starting from the top (pic. 27.8).
9. Installation is made in sequence, return to removal. Press firmly on all latches and make sure the cladding is securely fastened.
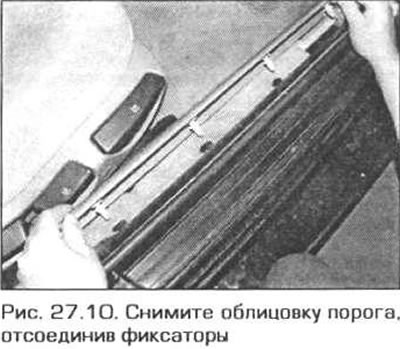
Facing of an average rack of a body (models "sedan" And "tourist")
10. Gently lift the front door sill trim and remove it from the clips (pic. 27.10).
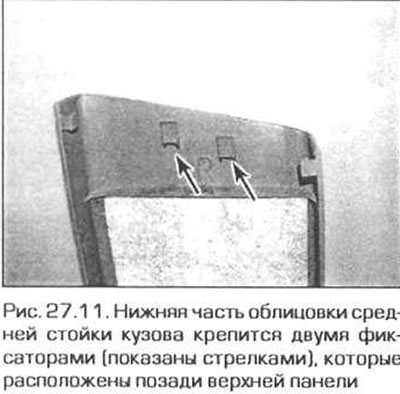
11. Starting from the bottom, pull the strut trim into the passenger compartment and disconnect it from the two clips. Remember how the bottom of the cladding connects to the top (pic. 27.11).
12. Turn out a bolt of fastening of a seat belt to an inertial coil.
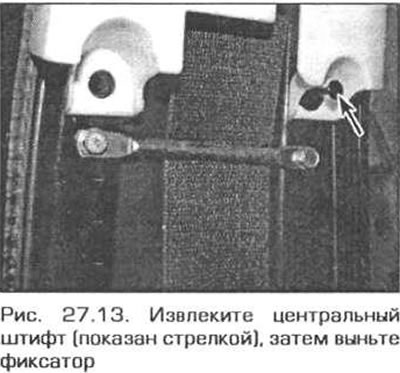
13. The lower edge of the upper cladding panel is fastened with two clamps with central pins. Remove the center pins, then remove the retainers themselves (pic. 27.13).
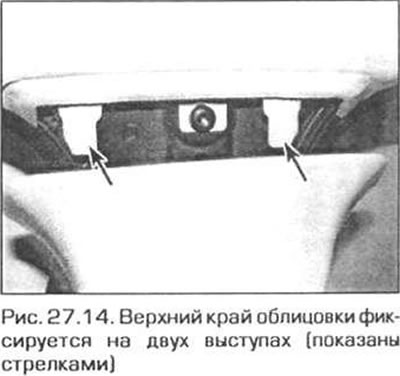
14. Pull the seat belt through the top anchor, then lower the trim down and remove it. Note how the top edge of the trim engages with the headliner (pic. 27.14).
15. Installation is made in sequence, return to removal. Press firmly on all latches and make sure the cladding is securely fastened.
Facing of an average rack of a body (model "coupe")
16. Gently lift the front door sill trim and disconnect it from the clips.
17. Remove the doorway rubber seal against the fascia, then detach the front edge of the fascia's rear side panel by prying it out of the retainers using the tool or a flathead screwdriver.
18. Remove the plastic plug and unscrew the front bolt securing the lower belt guide. Remove the belt from the guide.
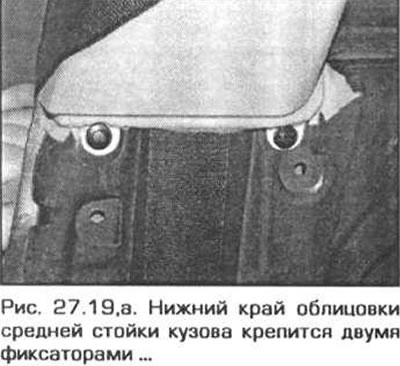
19. The lower edge of the upper cladding panel is fastened with two clamps with central pins. Remove the center pins, then remove the retainers themselves (pic. 27.19, a, b).

C-pillar trim (models "sedan" And "coupe")
20. Pick up the outer edge of the interior lamp cover and remove the cover from the facing. Disconnect from a plafond a socket of electroconducting.
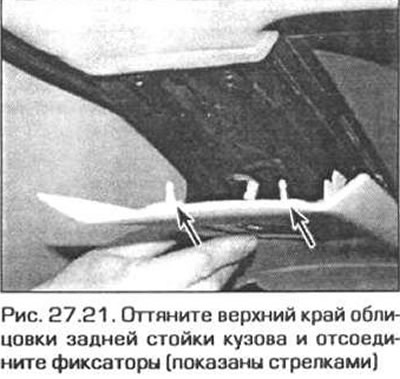
21. Remove the doorway rubber seal opposite the C-pillar trim. Pull the upper edge of the cladding, release it from the two latches and remove the cladding (pic. 27.21).
22. Installation is made in sequence, return to removal. Press firmly on all latches and make sure the cladding is securely fastened.
C-pillar trim (model "tourist")
23. Pull the top edge of the cladding (towards the center of the cabin) and remove the fasteners (pic. 27.23).
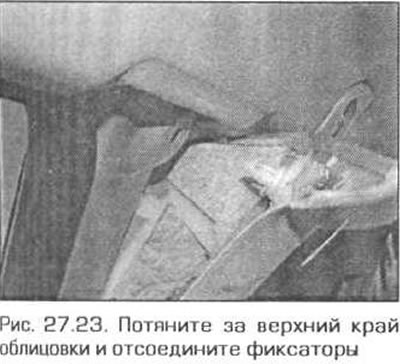
24. After the top edge of the cladding is detached, slide the cladding up and remove it.
25. Installation is made in sequence, return to removal.
Luggage compartment trim (model "tourist")
26. Open the tailgate, press the button and lower the tailgate side panel shield.
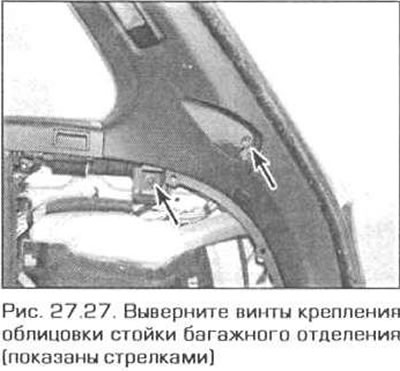
27. The rack trim is attached with two screws in the center and two latches on the top edge. Loosen the screws, pull the upper edge of the cladding and disconnect the clips, then remove the cladding (pic. 27.27). After removing the panel, disconnect the luggage compartment lamp wiring harness connector.
28. Installation is carried out in the reverse order of removal.
Side panel cladding (model "coupe")
Note. On models with rear seat airbags, first disconnect the cable from the negative battery terminal (see chapter 5A). Wait at least 5 seconds before continuing.
29. Using a plastic wedge, carefully remove the window band plug (pic. 15.2).
30. Disconnect the rod from the window (pic. 15.3).
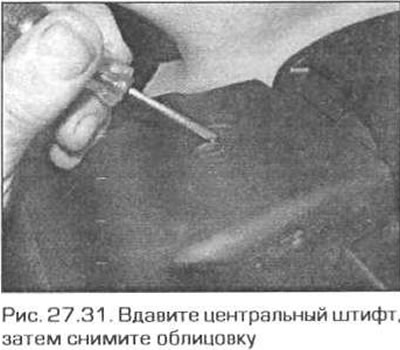
31. Move the seat belt to the side. then press in the center pin of the retainer that secures the plastic panel to the top of the side of the rear seat cushion (pic. 27.31). Remove the plastic lining from the window rod.
32. Remove the rear seat cushion (see paragraph 24).
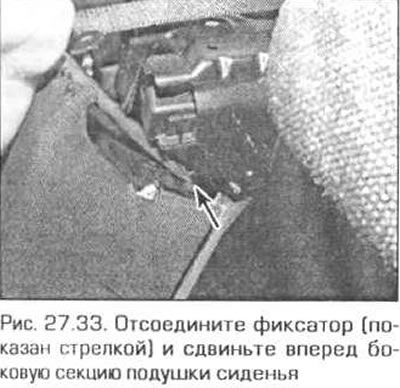
33. Slide the rear seat backrest forward and use a screwdriver to disconnect the upper retainer, then slide the side section of the seat cushion (pic. 27.33).
34. Carefully detach the front door sill lining from the latches, then remove the rubber seal of the doorway in the area of the facing panel.
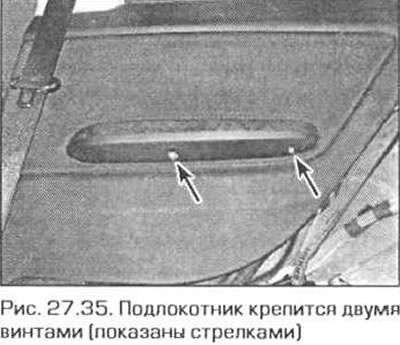
35. Carefully remove the airbag emblem (if it exists) from the side speaker grille, then remove the mounting screw under the emblem. Remove the two screws securing the armrest (pic. 27.35).
Z6. The side cladding panel is fastened with seven latches located around the perimeter of the panel, using a special tool or a flat screwdriver, disconnect the latches and remove the panel from the car. Disconnect electrical connectors from panel (remember their location).
37. Installation is carried out in sequence. reverse withdrawal. Press firmly on all latches and make sure. that the cladding is securely fastened. Pay attention to that. that the window rod plug has internal protrusions that must fit into the rod groove.
Luggage compartment lining (model "tourist")
38. Remove the lining from the rear rack and luggage rack (see above).
39. Move the rear seat forward, disconnect the upper part of the side section of the lining in the area of the doorway, then lift the panel up and remove it (pic. 24.14).
40. Disconnect the two clips of the front end and remove the facing of the inertial seat belt reel from the side panel (pic. 27.40).

41. Turn out a bolt of the bottom fastening of a seat belt.
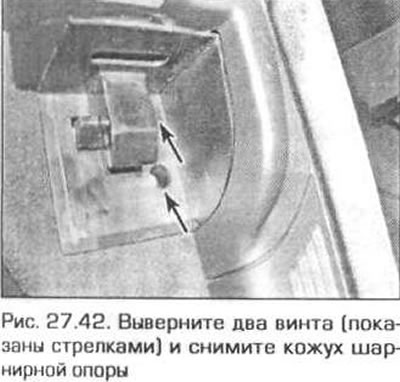
42. Turn out two screws of fastening and remove a cover of the hinged support of a luggage space from the lateral panel (pic. 27.42).
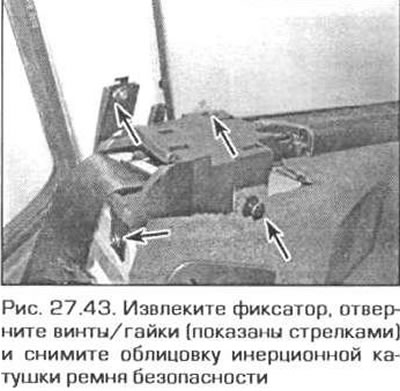
43. Remove the center pin, then remove the retainer, unscrew the screws / nuts and remove the facing of the inertial seat belt reel (pic. 27.43).
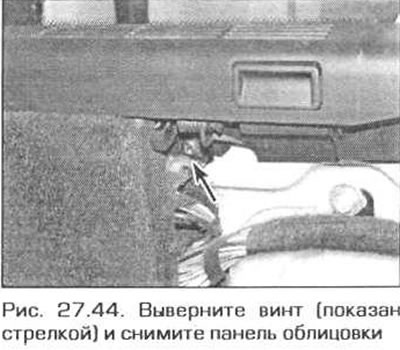
44. Turn out the screw and remove facing from the bottom edge of a back lateral window (pic. 27.44).
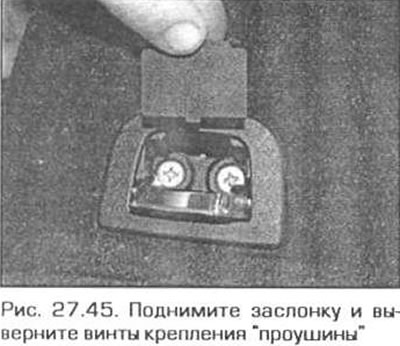
45. Raise the panel shutter, remove the screws and remove "eyelet" from the sidebar (pic. 27.45).
46. Carefully disconnect the 12V power connector from the side panel and disconnect the electrical wiring from the connector.
47. Remove the center pin, then remove the retainer securing the bottom edge of the side panel.
48. Pull back the top edge of the panel, then remove the panel by passing the power connector wiring through the hole in the panel.
Glove box
Driver's side glove box
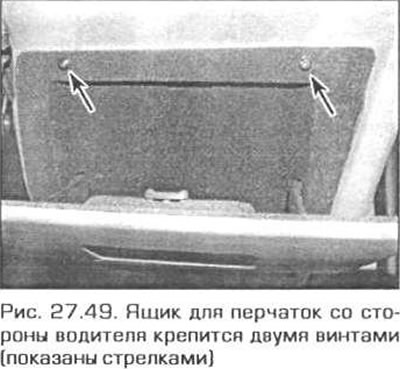
49 Open the glove box, remove the two screws and remove the glove box (pic. 27.49). Disconnect all wiring connectors from the box.
Passenger side glove box
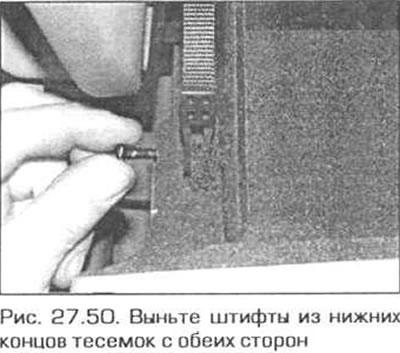
50. Open the glovebox and remove the pins from the lower strap/damper supports (pic. 27.50).
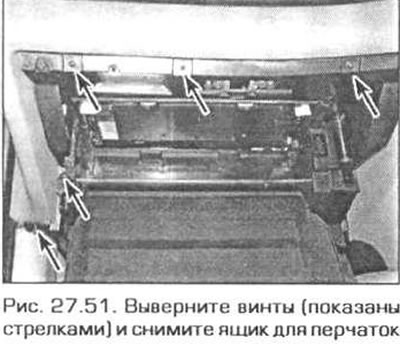
51. Remove the fastening screws from the front panel and remove the glove box along with the hinges and the bracket (pic. 27.51). Disconnect all wiring connectors from the box.
52. Installation is carried out in the reverse order of removal.
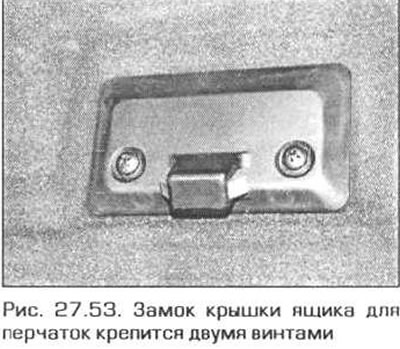
Glove box lock
53. Open the lid of the glove box, unscrew the two fixing screws and remove the lock (pic. 27.53).
Rugs
54. The floor mat is one-piece and is fixed at the edges with screws or clamps, which usually also secure adjacent trim panels.
55. Installing and removing the mat is a fairly simple procedure, but it requires a significant amount of time. This is because all adjacent trim panels must first be removed, as well as most components such as the seats, center console and lower seat belt anchorages.
Headlining
56. Headlining attached to the roof. It can only be removed after removing all attachments such as handlebars, sun visors, sunroof (in the presence of), windshield, rear side window sections and related cladding panels, and after removing door and sunroof seals.
57. Please note that experience is required to remove the upholstery of the ceiling without damaging it. Therefore, it is better to leave such work to specialists.
Coasters
58. Squeeze the edges of the tray and remove it, along with the cup holders, from the center console.
59. Install the drip tray first, then insert the cup holders into it.
Rear seat head restraints
60. Move the rear seat forward or remove the rear seat back (depending on the model) (see paragraph 24).
61. Press the center pin and remove the clips, then remove the trim of the front of the rear shelf
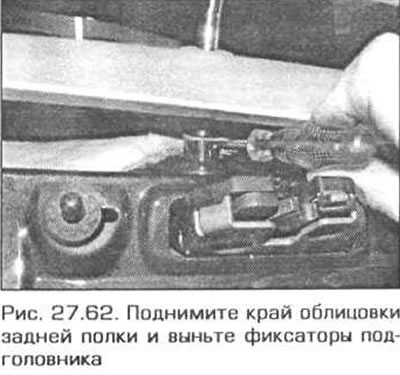
62. Raise the front edge of the rear shelf trim, remove the clips and remove the head restraint (pic. 27.62).
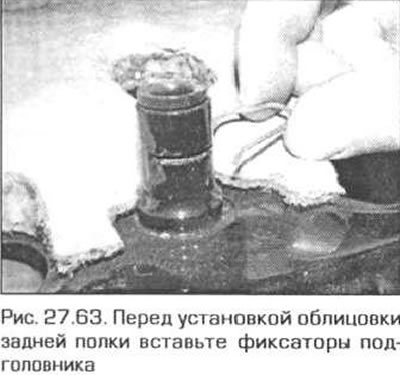
63. Installation is done in sequence. reverse withdrawal. Insert the head restraint clips before installing the rear shelf trim (pic. 27.63).
Rear shelf (models "sedan" And "coupe")
64. Move the rear seat forward or remove the rear seat back (depending on the model) (see paragraph 24).
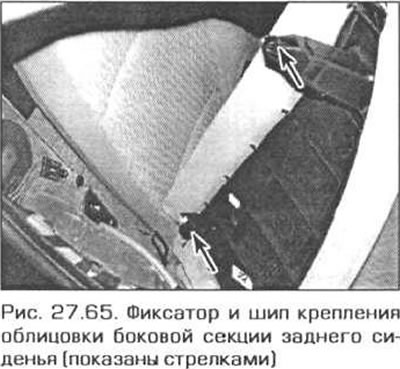
65. Slide the upper part of the rear seat side section trim forward, then lift and remove it (pic. 27.65). Repeat this procedure for facing on the other side.
66. Press the center pin and remove the clips, then remove the rear shelf front trim.
67. Remove the facings from the rear pillars of the body (see above).
68. Lift up the front edge of the rear shelf trim, remove the clips and remove the head restraints (pic. 27.62).
69. Carefully remove the rear shelf speaker trim. Turn out bolts, disconnect sockets of electroconducting and remove loudspeakers. Remove the fiber speaker jacks.
70. Pull the rear shelf forward. If necessary, remove the seat belt lower anchor bolt and pass the belt through the hole in the shelf.
71. Installation is carried out in the reverse order of removal. Before installing the butt, insert the clips into the rear seat head restraints (pic. 27.63).