
- Home
- BMW 3 Series
- E46
- Body
- Interior
- Mirrors and their accessories — removal and installation
Mirrors and their accessories — removal and installation (BMW 3 Series E46)
Outside mirror
1. Remove the door trim (see paragraph 12).
2. Carefully remove the plastic plug from the front inner corner of the door. In the "coupe" model, carefully detach the upper part of the triangular mirror mounting trim and remove it upwards (fig. 20.2, a, b).
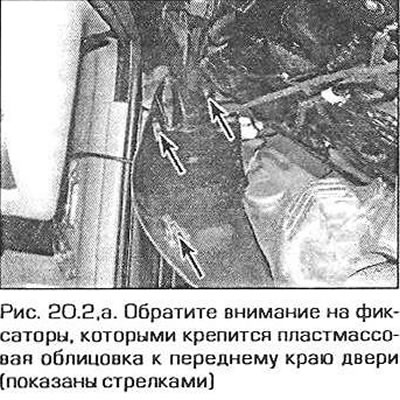
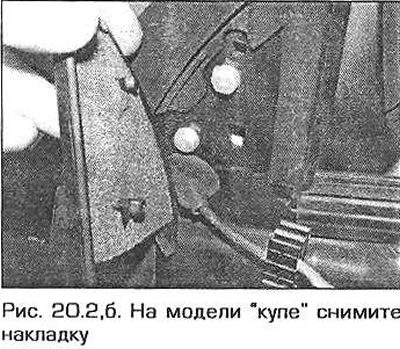
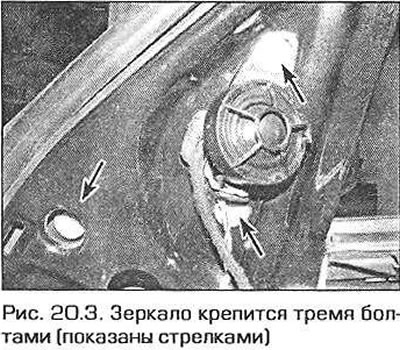
3. Unscrew the mounting bolts and remove the mirror from the door. Remove the rubber gasket located between the mirror and the door. If the gasket is damaged, replace it (Fig. 20.3). Disconnect the electrical wiring connectors from the mirror.
4. Installation is performed in the reverse order of removal. Tighten the mirror mounting bolts to the required torque.
Exterior mirror glass
Note: If you try to remove cold glass, there is a high probability of breaking the glass retainers.
5. Turn the glass upward as much as possible.
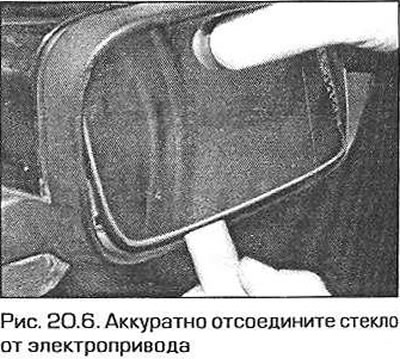
6. Insert a flat plastic or wooden tool between the lower edge of the glass and the mirror housing and carefully detach the glass from the electric drive (Fig. 20.6). When removing the glass, be extremely careful and do not apply significant force (otherwise you will break the glass).
7. Remove the glass and disconnect the electrical connector of the mirror heating element (if it exists).
8. When installing, connect the electrical wiring to the glass and fix the glass to the electric drive. Be careful not to break the glass.
Exterior mirror switch
9. See Chapter 12.
Electric outside mirror
10. Remove the mirror glass (see above).
11. Remove the three mounting screws and remove the electric drive, starting from the bottom corner (fig. 20.11). Disconnect the electrical wiring connector from the electric drive.
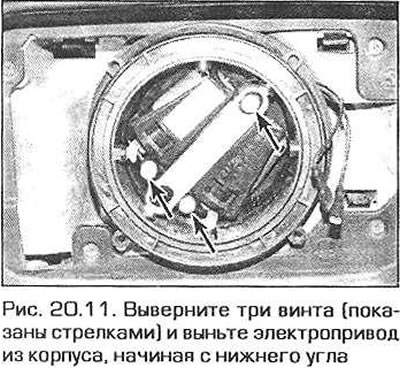
12. Installation is carried out in the reverse order of removal.
Outside mirror housing cover
13. Remove the mirror glass (see above).
14. Disconnect the four fasteners and remove (forward) the mirror cover (fig. 20.14).
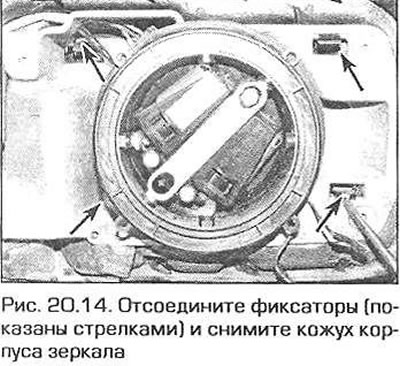
15. Installation is carried out in the reverse order of removal.
Interior mirror
16. There are two types of interior mirrors installed on cars (they differ in the way they are attached). In the first type of mirror, the electrical wiring connector is covered with a plastic casing. In the second type of mirror, the mirror arm is divided into two and behind it is the electrical wiring connector.
Mirror with plastic cover
17. Carefully remove the plastic cover and disconnect the electrical wiring connector (if it exists).
18. Strike the bottom of the mirror (forward) with your fist and disengage the mirror arm from the support.
Caution: Do not turn the lever to remove the mirror as this will break the mirror mount, and do not pull the lever backward as this will damage the windshield.
Mirror with split lever
19. Press the two halves of the lever cover towards the mirror and pull the halves of the cover apart. If the mirror is equipped with a rain sensor, press the bottom of the covers upwards and separate them (fig. 20.19, a, b).
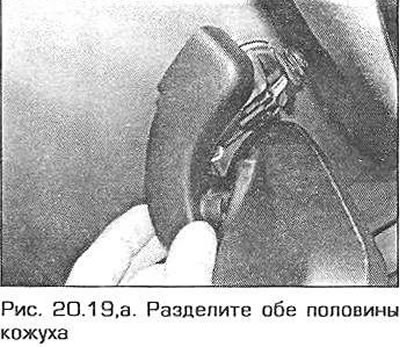
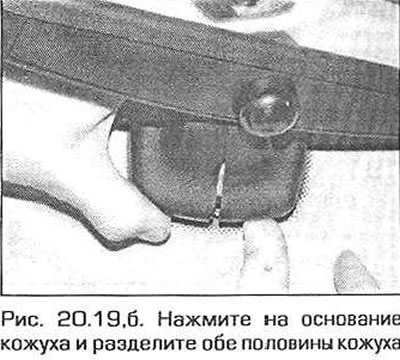
20. Rotate the right corner of the mirror up and forward. Rotate the left half of the housing to the left and disconnect it from the lever.
21. Turn the left corner of the mirror up and forward. Turn the right half of the housing to the right and disconnect it from the lever.
22. Disconnect the mirror wiring connector.
23. Strike the bottom of the mirror (forward) with your fist and disengage the mirror arm from the support.
Caution: Do not turn the lever to remove the mirror as this will break the mirror mount, and do not pull the lever backwards as this will damage the windshield.
Mirrors of all types
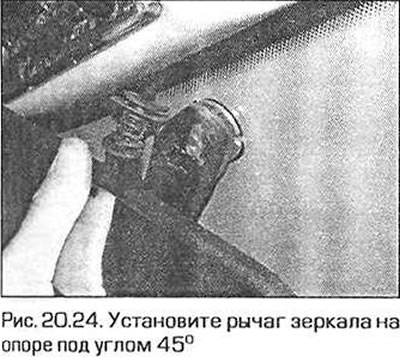
24. To install the mirror, tilt its lever at an angle of 45° towards the driver's seat. Push the mirror lever vertically and make sure that the lever engages with the support (fig. 20.24). Install the covers and connect the electrical connector (if it exists).
This article is available at russian, bulgarian, belarusian, ukrainian, serbian, croatian, romanian, polish, slovak, hungarian
Article verified: Ilyinsky Matvey
Share information:
Previous articles
БМВ E46: Interior
Next articles
Power Window Components — Removal and Installation
Central locking system components — removal and installation
Trunk Lid/Tailgate Lock Components — Removal and Installation
Trunk Lid/Tailgate and Support Pillars — Removal and Installation
Door glass, window lifters and rear vent window (coupe model) —…
Central locking system components — removal and installation
Trunk Lid/Tailgate Lock Components — Removal and Installation
Trunk Lid/Tailgate and Support Pillars — Removal and Installation
Door glass, window lifters and rear vent window (coupe model) —…
Similar articles on other types of BMW cars:
Removal and installation the oil pan BMW 5 Series E12 (1972-1981)
Cylinder Head Cover — Removal and Installation BMW 7 Series E32 (1986-1994)
Pistons — removal and installation BMW X3 E83 (2003-2010)
Removal and installation the engine BMW X5 E53 (1999-2006)
Removal and installation the oil pan BMW 5 Series E12 (1972-1981)
Cylinder Head Cover — Removal and Installation BMW 7 Series E32 (1986-1994)
Pistons — removal and installation BMW X3 E83 (2003-2010)
Removal and installation the engine BMW X5 E53 (1999-2006)
Link in different formats to this page
Visitor comments
No comments yet
- General information
- Manual
- Maintenance
- Power unit
- Engine repair
- Cooling system
- Power system (gasoline)
- Injection system (gasoline)
- Fuel system (diesel)
- Exhaust system
- Ignition system
- Charge and launch systems
- Transmission
- Car gearbox
- Clutch and drive shafts
- Chassis
- Brake system
- Suspension front and rear
- Steering
- Body
- Body care and repair
- Exterior
- Interior
- Electrical equipment
- Troubleshooting
- Lighting and signaling
- Equipment and devices
- Heater and air conditioner
- Electrical circuits
- General information
- Manual
- Repair on the road
- Weekly checks
- Maintenance
- Troubleshooting
- Power unit
- 4 cylinder engines
- 6 cylinder engines
- Engine overhaul
- Cooling and heating
- Fuel and exhaust system
- Starting and charging system
- Ignition system
- Transmission
- Clutch
- Mechanical gearbox
- Automatic gearbox
- Cardan and drive shafts
- Chassis
- Brake system
- Wheel suspension
- Steering
- Body
- Exterior
- Interior
- Electrical equipment
- Equipment and devices
- Electrical circuits
- General information
- Maintenance
- Power unit
- Engine repair
- Cooling system
- Ignition system
- Supply system
- Fuel injection system
- Exhaust system
- Transmission
- Clutch
- Car gearbox
- Front and rear axle
- Chassis
- Steering
- Brake system
- Body
- Exterior
- Interior
- Electrical equipment
- Heating system
- Equipment and devices
- Power devices
- Electrical circuits
- Power unit
- M10/M20 engine
- M40 engine
- Ignition system
- Lubrication system
- Cooling system
- Supply system
- Fuel injection
- Exhaust system
- Transmission
- Clutch
- Manual gearbox
- Front axle
- Rear axle
- Chassis
- Steering
- Brake system
- Body
- Exterior
- Interior
- Electrical equipment
- Heating system
- Equipment and devices
- Electrical circuits
- General information
- Specifications
- Operation and maintenance
- 4-cylinder engine
- Engine repair
- Cooling and lubrication system
- Supply system
- Ignition system
- 6-cylinder engine
- Engine repair
- Cooling and lubrication system
- Supply system
- Fuel injection system
- Ignition system
- Transmission
- Clutch
- 4-speed manual gearbox
- 5-speed manual gearbox
- Automatic gearbox
- Cardan and rear axle
- Chassis
- Steering
- Front suspension
- Rear suspension
- Brake system
- Electrical equipment
- Equipment and devices
- Electrical circuits