
- Home
- BMW 3 Series
- E46
- Body
- Interior
- Removal and installation the electric motor of the sliding roof panel drive
Removal and installation the electric motor of the sliding roof panel drive (BMW 3 Series E46)
Removal
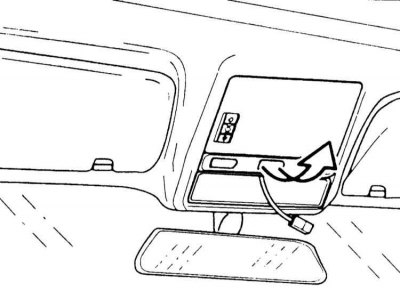
1. Remove the visor with a screwdriver. Disconnect the drive switch connector by opening the lock by squeezing.
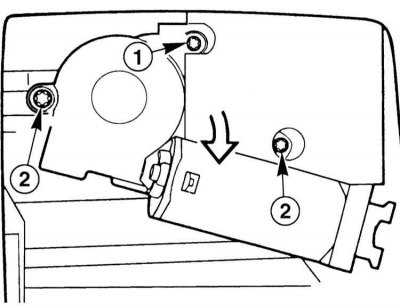
2. Unscrew the mounting screws with a Torx T25 key.
3. Remove the electric motor-reducer unit and disconnect the connector.
Installation
4. Install the electric motor-reducer unit in place and connect it. Secure it lightly with a torque of 3 Nm using two short screws "2" and one long one "1". Be sure to install new screws. If this is not possible, lubricate the screws in advance with a thread locking agent, such as Loctite 270.
5. Connect the drive switch connector, install the cover.
Initializing the sliding panel
6. Set the sliding panel to the up position and then press the sliding panel switch further in the "Up position" direction.
7. Keep the switch in the lifting position for 5 seconds after:
- each power interruption or
- roof adjustments.
8. Keep the switch in the lifting position for 20 seconds after:
- malfunctions in operation
- disconnecting the drive or
- work with cable traction.
9. Initialisation is complete when the sliding panel is briefly pressed again in the direction of "Lift position" (click).
This article is available at russian, bulgarian, belarusian, ukrainian, serbian, croatian, romanian, polish, slovak, hungarian
Article verified: Sevastyanov Nikolay
Share information:
Previous articles
БМВ E46: Interior
Next articles
Similar articles on other types of BMW cars:
Removal and installation the electric motor of the sliding roof panel… BMW 5 Series E39 (1995-2003)
Removal and installation the wheel drive shaft BMW 5 Series E12 (1972-1981)
Removal and installation the sunroof drive motor BMW 7 Series E32 (1986-1994)
Removal and installation accessory drive belts BMW 7 Series E38 (1994-2001)
Pistons — removal and installation BMW X3 E83 (2003-2010)
Removal and installation the front door window lift with electric… BMW X5 E53 (1999-2006)
Link in different formats to this page
Visitor comments
No comments yet
- General information
- Manual
- Maintenance
- Power unit
- Engine repair
- Cooling system
- Power system (gasoline)
- Injection system (gasoline)
- Fuel system (diesel)
- Exhaust system
- Ignition system
- Charge and launch systems
- Transmission
- Car gearbox
- Clutch and drive shafts
- Chassis
- Brake system
- Suspension front and rear
- Steering
- Body
- Body care and repair
- Exterior
- Interior
- Electrical equipment
- Troubleshooting
- Lighting and signaling
- Equipment and devices
- Heater and air conditioner
- Electrical circuits
- General information
- Manual
- Repair on the road
- Weekly checks
- Maintenance
- Troubleshooting
- Power unit
- 4 cylinder engines
- 6 cylinder engines
- Engine overhaul
- Cooling and heating
- Fuel and exhaust system
- Starting and charging system
- Ignition system
- Transmission
- Clutch
- Mechanical gearbox
- Automatic gearbox
- Cardan and drive shafts
- Chassis
- Brake system
- Wheel suspension
- Steering
- Body
- Exterior
- Interior
- Electrical equipment
- Equipment and devices
- Electrical circuits
- General information
- Maintenance
- Power unit
- Engine repair
- Cooling system
- Ignition system
- Supply system
- Fuel injection system
- Exhaust system
- Transmission
- Clutch
- Car gearbox
- Front and rear axle
- Chassis
- Steering
- Brake system
- Body
- Exterior
- Interior
- Electrical equipment
- Heating system
- Equipment and devices
- Power devices
- Electrical circuits
- Power unit
- M10/M20 engine
- M40 engine
- Ignition system
- Lubrication system
- Cooling system
- Supply system
- Fuel injection
- Exhaust system
- Transmission
- Clutch
- Manual gearbox
- Front axle
- Rear axle
- Chassis
- Steering
- Brake system
- Body
- Exterior
- Interior
- Electrical equipment
- Heating system
- Equipment and devices
- Electrical circuits
- General information
- Specifications
- Operation and maintenance
- 4-cylinder engine
- Engine repair
- Cooling and lubrication system
- Supply system
- Ignition system
- 6-cylinder engine
- Engine repair
- Cooling and lubrication system
- Supply system
- Fuel injection system
- Ignition system
- Transmission
- Clutch
- 4-speed manual gearbox
- 5-speed manual gearbox
- Automatic gearbox
- Cardan and rear axle
- Chassis
- Steering
- Front suspension
- Rear suspension
- Brake system
- Electrical equipment
- Equipment and devices
- Electrical circuits