
Table of contents: Job ↓ Examination ↓
- Home
- BMW 3 Series
- E46
- Body
- Interior
- Auto-dimming interior mirror
Auto-dimming interior mirror (BMW 3 Series E46)
The auto-dimming interior mirror smoothly dims at a certain light flow. It consists of a mirror element and an electronic device with two photo sensors.
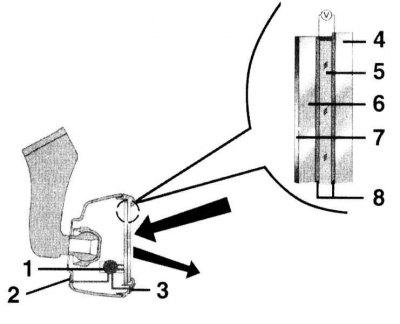
The electronic control unit "1" registers the light falling on the mirror from the front and from behind via photo sensors (2/3). If the light flow from behind is stronger than from the front, voltage is applied to the conductive coating "8". The coating is located between the glasses (4/6) of the mirror.
The applied voltage changes the color of the electrolytic layer "5". The higher the voltage, the more the mirror darkens. As a result, the reflection of the incident light flux decreases. 7 - silver-reflecting layer.
When reverse gear is engaged, the dimming effect is switched off. This allows you to exit a dark garage using the interior mirror.
1. Turn on the ignition.
2. Cover or tape the photo sensor on the front side of the mirror.
3. Shine a flashlight on the photo sensor on the back of the mirror. After a short time, the mirror should darken. The photo sensor is located at the top center behind the mirror.
This article is based on data from the website «www.bmwman.ru»
Job
The electronic control unit "1" registers the light falling on the mirror from the front and from behind via photo sensors (2/3). If the light flow from behind is stronger than from the front, voltage is applied to the conductive coating "8". The coating is located between the glasses (4/6) of the mirror.
The applied voltage changes the color of the electrolytic layer "5". The higher the voltage, the more the mirror darkens. As a result, the reflection of the incident light flux decreases. 7 - silver-reflecting layer.
When reverse gear is engaged, the dimming effect is switched off. This allows you to exit a dark garage using the interior mirror.
Examination
1. Turn on the ignition.
You should not engage reverse gear.
2. Cover or tape the photo sensor on the front side of the mirror.
3. Shine a flashlight on the photo sensor on the back of the mirror. After a short time, the mirror should darken. The photo sensor is located at the top center behind the mirror.
This article is based on data from the website «www.bmwman.ru»
This article is available at russian, bulgarian, belarusian, ukrainian, serbian, croatian, romanian, polish, slovak, hungarian
Article verified: Sevastyanov Nikolay
Share information:
Previous articles
БМВ E46: Interior
Next articles
Similar articles on other types of BMW cars:
K-bus power supply, auto-dimming interior rearview mirror BMW 5 Series E39 (1995-2003)
Interior heating and air conditioning BMW 5 Series E12 (1972-1981)
Interior rear view mirror BMW 7 Series E38 (1994-2001)
Removal and installation rear view mirror glass BMW 7 Series E32 (1986-1994)
Interior rearview mirror BMW X3 E83 (2003-2010)
Removal and installation the interior rearview mirror BMW X5 E53 (1999-2006)
Link in different formats to this page
Visitor comments
No comments yet
- General information
- Manual
- Maintenance
- Power unit
- Engine repair
- Cooling system
- Power system (gasoline)
- Injection system (gasoline)
- Fuel system (diesel)
- Exhaust system
- Ignition system
- Charge and launch systems
- Transmission
- Car gearbox
- Clutch and drive shafts
- Chassis
- Brake system
- Suspension front and rear
- Steering
- Body
- Body care and repair
- Exterior
- Interior
- Electrical equipment
- Troubleshooting
- Lighting and signaling
- Equipment and devices
- Heater and air conditioner
- Electrical circuits
- General information
- Manual
- Repair on the road
- Weekly checks
- Maintenance
- Troubleshooting
- Power unit
- 4 cylinder engines
- 6 cylinder engines
- Engine overhaul
- Cooling and heating
- Fuel and exhaust system
- Starting and charging system
- Ignition system
- Transmission
- Clutch
- Mechanical gearbox
- Automatic gearbox
- Cardan and drive shafts
- Chassis
- Brake system
- Wheel suspension
- Steering
- Body
- Exterior
- Interior
- Electrical equipment
- Equipment and devices
- Electrical circuits
- General information
- Maintenance
- Power unit
- Engine repair
- Cooling system
- Ignition system
- Supply system
- Fuel injection system
- Exhaust system
- Transmission
- Clutch
- Car gearbox
- Front and rear axle
- Chassis
- Steering
- Brake system
- Body
- Exterior
- Interior
- Electrical equipment
- Heating system
- Equipment and devices
- Power devices
- Electrical circuits
- Power unit
- M10/M20 engine
- M40 engine
- Ignition system
- Lubrication system
- Cooling system
- Supply system
- Fuel injection
- Exhaust system
- Transmission
- Clutch
- Manual gearbox
- Front axle
- Rear axle
- Chassis
- Steering
- Brake system
- Body
- Exterior
- Interior
- Electrical equipment
- Heating system
- Equipment and devices
- Electrical circuits
- General information
- Specifications
- Operation and maintenance
- 4-cylinder engine
- Engine repair
- Cooling and lubrication system
- Supply system
- Ignition system
- 6-cylinder engine
- Engine repair
- Cooling and lubrication system
- Supply system
- Fuel injection system
- Ignition system
- Transmission
- Clutch
- 4-speed manual gearbox
- 5-speed manual gearbox
- Automatic gearbox
- Cardan and rear axle
- Chassis
- Steering
- Front suspension
- Rear suspension
- Brake system
- Electrical equipment
- Equipment and devices
- Electrical circuits