
- Home
- BMW 3 Series
- E46
- Chassis
- Brake system
- Anti-lock Brake System (ABS) Components — Removal and Installation
Anti-lock Brake System (ABS) Components — Removal and Installation (BMW 3 Series E46)
Hydraulic block
1. Removal and installation of the hydraulic unit in a garage is impossible, since this requires special diagnostic equipment, and BMW equipment is required to bleed the system. In this regard, we recommend that you transfer this work to a specialized service station.
Battery (models with ASC+T system)
2. For the reasons stated in point 1 of this paragraph, we recommend that you entrust this work to service station specialists.
Electronic control unit (ECU)
3. To remove this unit, you must first remove the hydraulic unit, since the ECU is attached to the wall of the hydraulic unit. In this regard, we recommend that you entrust this work to service station specialists.
Front wheel sensors
Removal
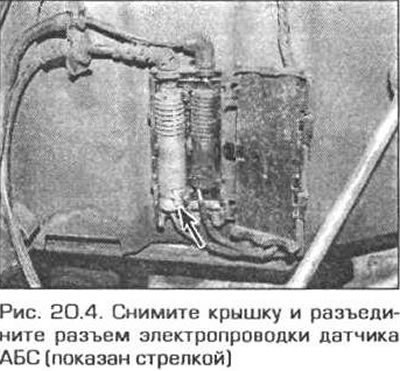
4. Place chocks under the rear wheels and apply the parking brake. Raise the front of the vehicle and support it on jack stands (see "Raising and Supporting the Vehicle"). Remove the appropriate front wheel. Locate the sensor wiring connector (the connector is located in a plastic protective casing). Remove the cover, take out the connector, and disconnect it (Fig. 20.4).
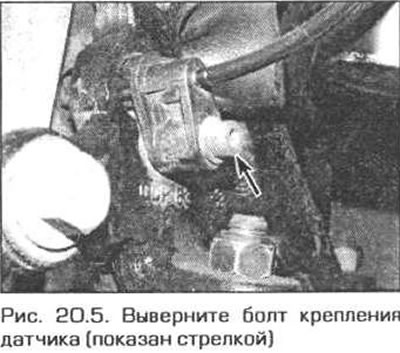
5. Unscrew the bolt securing the sensor to the steering knuckle and remove the sensor together with the electrical wiring from the vehicle (Fig. 20.5). Note: On some models, the left and right wheel sensors are marked L and R, respectively. In addition, the right sensor has two green marks between the sensor and the gasket.
Installation
6. Apply a small amount of universal grease to the sensor before installation (bMW recommends Staborax NBU 12/k grease).
7. Make sure the mating surfaces of the steering knuckle and sensor are clean, then install the sensor. Make sure the sensor is installed on the correct side of the vehicle (where necessary, see paragraph 5). Screw in the mounting bolt and tighten it to the required torque.
8. Make sure the sensor wiring is routed correctly and secured. Connect the wiring connector. Place the connector in the housing and secure the cover.
9. Install the wheel, lower the vehicle to the ground and tighten the wheel mounting bolts to the specified torque.
Rear wheel sensors
Removal
10. Place chocks under the front wheels. Raise the rear of the vehicle and support it (see "Raising and Supporting the Vehicle"). Remove the appropriate rear wheel.
11. Remove the sensor (see points 4 and 5).
Installation
12. Install the sensor as described in paragraphs 6-9.
Front wheel sensor rotors
13. The rotors are mounted on the back of the hubs. Inspect the rotors for damage and chipped teeth. If a rotor needs to be replaced, disassemble the hub assembly and replace the bearings (see chapter 10).
Rear wheel sensor rotors
14. The rotors are mounted on external constant velocity joints. Inspect the rotors for damage and chipped teeth. If a rotor needs to be replaced, replace the drive shaft assembly (see chapter 8).
This article is available at russian, bulgarian, belarusian, ukrainian, serbian, croatian, romanian, polish, slovak, hungarian
Article verified: Ilyinsky Matvey
Share information:
Previous articles
БМВ E46: Brake system
Next articles
Similar articles on other types of BMW cars:
Removal and installation of brake columns of the parking brake system BMW 5 Series E39 (1995-2003)
Description, removal and installation of the brake system vacuum… BMW 5 Series E28 (1981-1988)
Anti-lock brake system (2000) BMW 7 Series E38 (1994-2001)
Exhaust system components — removal and installation BMW 7 Series E32 (1986-1994)
Removal and installation the airbag system module in the left or… BMW X3 E83 (2003-2010)
Removal and installation the upper luggage door lock BMW X5 E53 (1999-2006)
Link in different formats to this page
Visitor comments
No comments yet
- General information
- Manual
- Maintenance
- Power unit
- Engine repair
- Cooling system
- Power system (gasoline)
- Injection system (gasoline)
- Fuel system (diesel)
- Exhaust system
- Ignition system
- Charge and launch systems
- Transmission
- Car gearbox
- Clutch and drive shafts
- Chassis
- Brake system
- Suspension front and rear
- Steering
- Body
- Body care and repair
- Exterior
- Interior
- Electrical equipment
- Troubleshooting
- Lighting and signaling
- Equipment and devices
- Heater and air conditioner
- Electrical circuits
- General information
- Manual
- Repair on the road
- Weekly checks
- Maintenance
- Troubleshooting
- Power unit
- 4 cylinder engines
- 6 cylinder engines
- Engine overhaul
- Cooling and heating
- Fuel and exhaust system
- Starting and charging system
- Ignition system
- Transmission
- Clutch
- Mechanical gearbox
- Automatic gearbox
- Cardan and drive shafts
- Chassis
- Brake system
- Wheel suspension
- Steering
- Body
- Exterior
- Interior
- Electrical equipment
- Equipment and devices
- Electrical circuits
- General information
- Maintenance
- Power unit
- Engine repair
- Cooling system
- Ignition system
- Supply system
- Fuel injection system
- Exhaust system
- Transmission
- Clutch
- Car gearbox
- Front and rear axle
- Chassis
- Steering
- Brake system
- Body
- Exterior
- Interior
- Electrical equipment
- Heating system
- Equipment and devices
- Power devices
- Electrical circuits
- Power unit
- M10/M20 engine
- M40 engine
- Ignition system
- Lubrication system
- Cooling system
- Supply system
- Fuel injection
- Exhaust system
- Transmission
- Clutch
- Manual gearbox
- Front axle
- Rear axle
- Chassis
- Steering
- Brake system
- Body
- Exterior
- Interior
- Electrical equipment
- Heating system
- Equipment and devices
- Electrical circuits
- General information
- Specifications
- Operation and maintenance
- 4-cylinder engine
- Engine repair
- Cooling and lubrication system
- Supply system
- Ignition system
- 6-cylinder engine
- Engine repair
- Cooling and lubrication system
- Supply system
- Fuel injection system
- Ignition system
- Transmission
- Clutch
- 4-speed manual gearbox
- 5-speed manual gearbox
- Automatic gearbox
- Cardan and rear axle
- Chassis
- Steering
- Front suspension
- Rear suspension
- Brake system
- Electrical equipment
- Equipment and devices
- Electrical circuits