
- Home
- BMW 3 Series
- E46
- Chassis
- Wheel suspension
- Lower arm rear suspension — removal, repair and installation
Lower arm rear suspension — removal, repair and installation (BMW 3 Series E46)
Note: When installing you will need a new bolt and nut to secure the upper arm to the subframe.
Removal
1. Place chocks under the front wheels. Raise the rear of the vehicle and support it on jack stands (see "Raising and Supporting the Vehicle"). Remove the appropriate rear wheel.
2. Use a marker to mark the position of the eccentric washer that attaches the lower arm to the trailing arm. This is necessary to maintain the camber angle of the rear wheels during assembly.
3. Support the trailing arm with a jack, then loosen the nut and remove the washer of the lower arm bolt. Remove the bolt.
4. Support the final drive unit with a jack (see chapter 8). Remove the main gear mounting bolts. Alternatively, remove the drive shaft (see chapter 8).
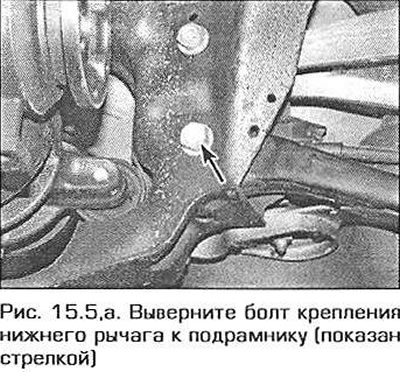
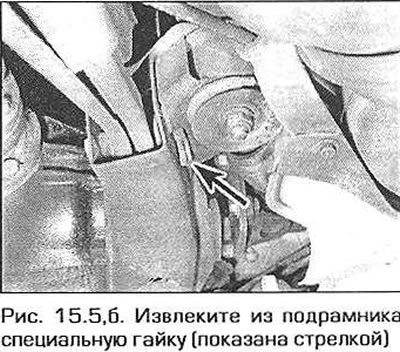
5. Unscrew the nut of the axle bolt connecting the wishbone to the subframe. Remove the bolt, move the main gear assembly back a little (if necessary) and remove the wishbone from the car. Remove the special nut from the subframe (fig. 15.5, a, b).
Note: Please note that on some models it may be necessary to disconnect the driveshaft from the final drive. If you remove the control arm indefinitely, replace and tighten the final drive mounting bolts securely.
Repair
6. See paragraph 14, items 5 and 6.
Installation
7. Insert the special nut into the subframe cutout and install the lever in place (so that the weld is on top). Insert the new axle bolt and tighten it lightly.
8. Install the main gear in place and tighten its mounting bolts to the required torque. Connect the cardan shaft to the main gear (if it was disconnected).
9. Insert the bolt securing the lower arm to the trailing arm, put on the eccentric washer and screw on the nut. Align the marks on the washer and the trailing arm made before removal and slightly tighten the nut.
10. Install the wheel and lower the car to the ground.
11. Rock the vehicle to settle the suspension components into position. Make sure the eccentric washer does not turn, then tighten both axle bolts to the specified torque. Tighten the wheel mounting bolts to the specified torque:
Note: After completing the work, check and, if necessary, adjust the rear wheel alignment angles.
[The article was copied from an online resource «BMWman»]
This article is available at russian, bulgarian, belarusian, ukrainian, serbian, croatian, romanian, polish, slovak, hungarian
Article verified: Ilyinsky Matvey
Share information:
Previous articles
БМВ E46: Wheel suspension
Next articles
Similar articles on other types of BMW cars:
Removal and installation the rear suspension crossmember BMW 5 Series E12 (1972-1981)
Removal and installation, inspection of the rear shock absorber BMW 5 Series E34 (1988-1996)
Rear suspension assembly — removal and installation BMW 7 Series E32 (1986-1994)
Removal and installation the rear suspension beam assembly BMW 7 Series E38 (1994-2001)
Removal and installation the rear door BMW X3 E83 (2003-2010)
Rear disc — removal and installation BMW X5 E53 (1999-2006)
Link in different formats to this page
Visitor comments
No comments yet
- General information
- Manual
- Maintenance
- Power unit
- Engine repair
- Cooling system
- Power system (gasoline)
- Injection system (gasoline)
- Fuel system (diesel)
- Exhaust system
- Ignition system
- Charge and launch systems
- Transmission
- Car gearbox
- Clutch and drive shafts
- Chassis
- Brake system
- Suspension front and rear
- Steering
- Body
- Body care and repair
- Exterior
- Interior
- Electrical equipment
- Troubleshooting
- Lighting and signaling
- Equipment and devices
- Heater and air conditioner
- Electrical circuits
- General information
- Manual
- Repair on the road
- Weekly checks
- Maintenance
- Troubleshooting
- Power unit
- 4 cylinder engines
- 6 cylinder engines
- Engine overhaul
- Cooling and heating
- Fuel and exhaust system
- Starting and charging system
- Ignition system
- Transmission
- Clutch
- Mechanical gearbox
- Automatic gearbox
- Cardan and drive shafts
- Chassis
- Brake system
- Wheel suspension
- Steering
- Body
- Exterior
- Interior
- Electrical equipment
- Equipment and devices
- Electrical circuits
- General information
- Maintenance
- Power unit
- Engine repair
- Cooling system
- Ignition system
- Supply system
- Fuel injection system
- Exhaust system
- Transmission
- Clutch
- Car gearbox
- Front and rear axle
- Chassis
- Steering
- Brake system
- Body
- Exterior
- Interior
- Electrical equipment
- Heating system
- Equipment and devices
- Power devices
- Electrical circuits
- Power unit
- M10/M20 engine
- M40 engine
- Ignition system
- Lubrication system
- Cooling system
- Supply system
- Fuel injection
- Exhaust system
- Transmission
- Clutch
- Manual gearbox
- Front axle
- Rear axle
- Chassis
- Steering
- Brake system
- Body
- Exterior
- Interior
- Electrical equipment
- Heating system
- Equipment and devices
- Electrical circuits
- General information
- Specifications
- Operation and maintenance
- 4-cylinder engine
- Engine repair
- Cooling and lubrication system
- Supply system
- Ignition system
- 6-cylinder engine
- Engine repair
- Cooling and lubrication system
- Supply system
- Fuel injection system
- Ignition system
- Transmission
- Clutch
- 4-speed manual gearbox
- 5-speed manual gearbox
- Automatic gearbox
- Cardan and rear axle
- Chassis
- Steering
- Front suspension
- Rear suspension
- Brake system
- Electrical equipment
- Equipment and devices
- Electrical circuits