
Table of contents: Removal ↓ Installation ↓
- Home
- BMW 5 Series
- E28
- Electrical equipment
- Equipment and devices
- Removal and installation instrument panel components
Removal and installation instrument panel components (BMW 5 Series E28)
The instrument cluster and its components are very susceptible to static electricity. Make sure you are grounded and free of static electricity (touch the metal water pipe) before touching instrument panel components.
If your car radio is equipped with an anti-theft system, make sure you have entered the correct code before disconnecting the battery cable. Refer to Section Anti-theft audio system and instrument cluster language before disconnecting the wire.
If after connecting the wire, the inscriptions on your instrument panel appear in a language other than the one you need, refer to Section Anti-theft audio system and instrument cluster language, which describes the procedure for installing the required language.
Removal
1. Disconnect the negative battery cable.
2. If necessary, remove the steering column covers and lower trim panel (see chapter Body).
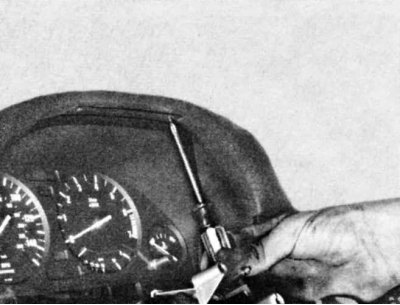
3. Remove the screws holding the dashboard panel. Note the position of the lower screws so that you can put them in the same place when installing.
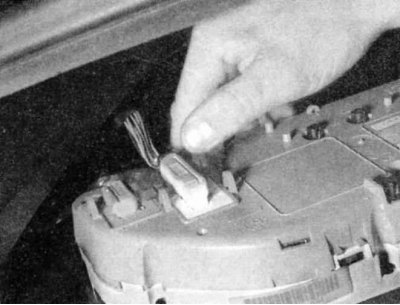
4. Tilt the top of the dashboard forward and disconnect the electrical connectors behind it by pressing the levers, then pull the dashboard out of the instrument panel.
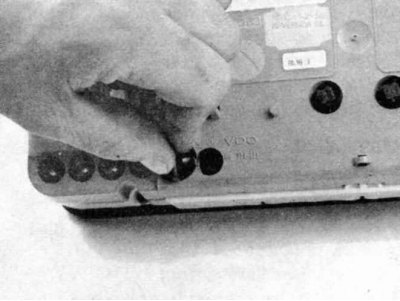
5. To access the components of the shield, release the fasteners or remove the screws and separate the two halves.
Installation
Install in reverse order.
This article is available at russian, bulgarian, belarusian, ukrainian, serbian, croatian, romanian, polish, slovak, hungarian
Article verified: Zhuravleva Isolda
Share information:
Previous articles
БМВ E28: Equipment and devices
Next articles
Similar articles on other types of BMW cars:
Removal and installation incandescent lamps in the instrument panel BMW 3 Series E30 (1982-1994)
Removal and installation the instrument panel BMW 3 Series E36 (1990-2000)
Removal and installation instrument panel trim BMW 7 Series E38 (1994-2001)
Exhaust system components — removal and installation BMW 7 Series E32 (1986-1994)
Removal and installation the instrument cluster BMW X3 E83 (2003-2010)
Controls and instrument panel BMW X5 E53 (1999-2006)
Link in different formats to this page
Visitor comments
No comments yet
- General information
- Governing bodies
- Manual
- Maintenance
- Power unit
- Engine repair
- Lubrication system
- Cooling system
- Ignition system
- Supply system
- Injection system (gasoline)
- Injection system (diesel)
- Exhaust system
- Transmission
- Clutch
- Car gearbox
- Front axle
- Rear axle
- Chassis
- Steering
- Brake system
- Wheels and tires
- Body
- Interior
- Exterior
- Heating system
- Electrical equipment
- Equipment and devices
- Power devices
- Windscreen wipers
- Electrical circuits
- General information
- Manual
- Maintenance
- Power unit
- Engine repair
- Ignition system
- Engine lubrication system
- Cooling system
- Fuel system (gasoline)
- Fuel system (diesel)
- Exhaust system
- Transmission
- Clutch
- Car gearbox
- Chassis
- Front and rear suspension
- Steering
- Brake system
- Body
- Exterior
- Interior
- Electrical equipment
- Heating system
- Equipment and devices
- Power devices
- Electrical circuits
- General information
- Manual
- Maintenance
- Power unit
- Engine in a car
- Engine overhaul
- Cooling system
- Supply system
- Ignition system
- Control system
- Transmission
- Clutch
- Manual gearbox
- Automatic gearbox
- Transmission line
- Chassis
- Steering
- Front suspension
- Rear suspension
- Brake system
- Body
- Body elements
- Car care and painting
- Electrical equipment
- Heater and air conditioner
- Equipment and devices
- Starter and generator
- Electrical circuits
- General information
- Operation and maintenance
- Specifications
- Power unit
- Engine repair
- Cooling and lubrication system
- Supply system
- Ecotronic power supply system
- Fuel injection system
- Ignition system
- Transmission
- Clutch
- Gearbox BMW 242/4
- Gearbox Getrag 262/8
- Gearbox Getrag 265/6
- Automatic gearbox
- Cardan gear
- Rear axle
- Chassis
- Steering
- Front suspension
- Rear suspension
- Brake system
- Electrical equipment
- Equipment and devices
- Electrical circuits