
Table of contents: Removal ↓ Installation ↓
- Home
- BMW 5 Series
- E34
- Electrical equipment
- Heating system
- Removal and installation the heater cable
Removal and installation the heater cable (BMW 5 Series E34)
Removal
Disconnect the ground wire from the battery.
Remove the glove compartment.
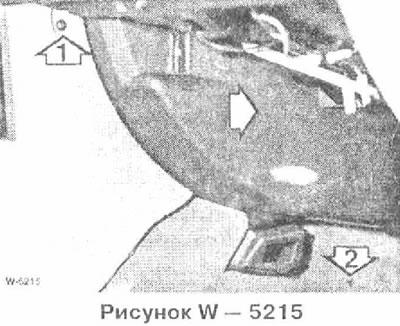
Remove the side covers. To do this, unscrew bolts 1 and 2. Remove the bottom cover, then move it forward in the direction of the arrow and remove the top cover.
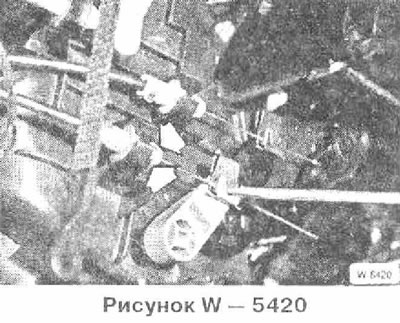
Use a narrow screwdriver to pry the cable out of the clamp on the corresponding air damper. Then squeeze the clamp on the "arrow" support and pull out the cable.
Remove the heater control panel. Do not disconnect the connectors.
Disconnect and remove the corresponding cable.
Installation
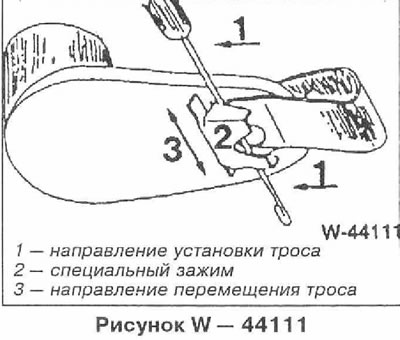
Connect the new cable to the heater control panel and press the cable with a narrow screwdriver into the air damper lever until it clicks into place. Secure the support.
Note: The cables are colour coded and must be connected accordingly.
Install the heater control panel.
The cables are adjusted themselves using special clamps. To do this, move all control levers first to the right until they stop, and then to the left until they stop.
Install the covers.
Install the glove box.
Connect the ground wire to the battery.
Connect the cable to the air damper lever and press the cable casing against the holder so that it is at the level of stop 2. In this position, press the clamp.
Connect the cable to the slide control and set the control to the extreme left position (closed).
Close the air damper by pressing the air damper lever against the stop.
Attention: When installing the mixing temperature flap cable, turn the knurled nut to set the mixing flap to the extreme "cold" or "warm" position and at the same time set the temperature setting handle to the extreme "cold" or "warm" position.
Rotate the sleeve on the free end of the cable until it fits into the slot in the holder.
Secure the bushing and thus the cable with clamp 1 (Figure W - 5206).
Press the heater control panel and secure it with the two lower bolts.
Place the connectors on the switches and insert the switches and plugs into the switch strip.
Install a radio receiver.
Install the middle console.
Place the trim under the dashboard and secure it with five clamps.
Connect the ground wire to the battery.
[This article is based on information from the website: bmwman]
This article is available at russian, bulgarian, belarusian, ukrainian, serbian, croatian, romanian, polish, slovak, hungarian
Article verified: Polikarpov Saveliy
Share information:
Previous articles
БМВ E34: Heating system
Next articles
Similar articles on other types of BMW cars:
Removal and installation the heater cable BMW 3 Series E30 (1982-1994)
Removal and installation the heater cable BMW 3 Series E36 (1990-2000)
Heater Temperature Sensor — Removal and Installation BMW 7 Series E32 (1986-1994)
Removal and installation the heater BMW 7 Series E38 (1994-2001)
Removal and installation the heater BMW X3 E83 (2003-2010)
Removal and installation the engine BMW X5 E53 (1999-2006)
Link in different formats to this page
Visitor comments
No comments yet
- General information
- Governing bodies
- Manual
- Maintenance
- Power unit
- Engine repair
- Lubrication system
- Cooling system
- Ignition system
- Supply system
- Injection system (gasoline)
- Injection system (diesel)
- Exhaust system
- Transmission
- Clutch
- Car gearbox
- Front axle
- Rear axle
- Chassis
- Steering
- Brake system
- Wheels and tires
- Body
- Interior
- Exterior
- Heating system
- Electrical equipment
- Equipment and devices
- Power devices
- Windscreen wipers
- Electrical circuits
- General information
- Manual
- Maintenance
- Power unit
- Engine repair
- Ignition system
- Engine lubrication system
- Cooling system
- Fuel system (gasoline)
- Fuel system (diesel)
- Exhaust system
- Transmission
- Clutch
- Car gearbox
- Chassis
- Front and rear suspension
- Steering
- Brake system
- Body
- Exterior
- Interior
- Electrical equipment
- Heating system
- Equipment and devices
- Power devices
- Electrical circuits
- General information
- Manual
- Maintenance
- Power unit
- Engine in a car
- Engine overhaul
- Cooling system
- Supply system
- Ignition system
- Control system
- Transmission
- Clutch
- Manual gearbox
- Automatic gearbox
- Transmission line
- Chassis
- Steering
- Front suspension
- Rear suspension
- Brake system
- Body
- Body elements
- Car care and painting
- Electrical equipment
- Heater and air conditioner
- Equipment and devices
- Starter and generator
- Electrical circuits
- General information
- Operation and maintenance
- Specifications
- Power unit
- Engine repair
- Cooling and lubrication system
- Supply system
- Ecotronic power supply system
- Fuel injection system
- Ignition system
- Transmission
- Clutch
- Gearbox BMW 242/4
- Gearbox Getrag 262/8
- Gearbox Getrag 265/6
- Automatic gearbox
- Cardan gear
- Rear axle
- Chassis
- Steering
- Front suspension
- Rear suspension
- Brake system
- Electrical equipment
- Equipment and devices
- Electrical circuits