
- Home
- BMW 5 Series
- E39
- Electrical equipment
- Equipment and devices
- Measurement technique
Measurement technique (BMW 5 Series E39)
Voltage measurement
You can verify the presence of voltage using a simple test lamp or voltage tester. This way, first of all, you find out whether there is voltage at all. In order to measure the value of the existing voltage, you need to connect a voltmeter (voltage measuring device).
Then, the voltmeter must be set to the measurement range in which the voltage to be measured is presumably located. Voltages in a car do not exceed, as a rule, approximately 14 volts. The exception is the ignition system: here, the ignition voltage can be up to 30,000 volts. This high voltage is measured only with a special measuring device or oscilloscope.
If, when using measuring devices designed specifically for cars, you only need to turn on the voltmeter on the control panel, then when using a universal device, you must first make a number of decisions. First of all, the constant voltage area (DCV instead of ACV - the area corresponding to alternating voltage) is set on the control panel. Then the measurement range is selected. Since in a car, except for the ignition system, there is no voltage higher than 14 volts, the upper value of the measurement range to be set should be somewhat higher (approximately 15 to 20 volts). If it is known for certain that the measured voltage is significantly lower, for example, about two volts, the upper value of the set measurement range can be reduced to achieve higher measurement accuracy. If the measured voltage exceeds the upper value of the device measurement range, the device may fail.
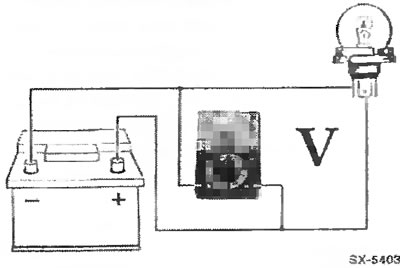
Connect the measuring device wires as shown in the figure, parallel to the power consumer. In this case, the red wire of the device is connected to the conductor going to the positive (+) pole of the battery, and the black wire is connected to the ground wire or to the vehicle ground, for example, the engine cylinder block.
Measurement example: when the engine starts with difficulty because the starter rotates too slowly, it is advisable to check the battery voltage with the starter running. To do this, connect the red wire (+) of the voltmeter to the positive pole of the battery and the black wire to the vehicle ground (-). Then ask an assistant to turn on the starter and read the voltage value. If the voltage is below about 10 volts (at a battery temperature of +20°C), the battery must be checked and, if possible, charged before the next attempt to start the engine.
Measuring current
In cars, it is relatively rare to need to measure current. For example, see chapter "Spontaneous discharge of the battery". This requires an ammeter built into a universal measuring instrument.
Before measuring the current, the device is set to the measurement range in which the value of the measured current is presumably located. If the current is not known in advance, the device is set to the maximum measurement range. If the device does not show any value, sequentially switch the device to smaller measurement ranges.
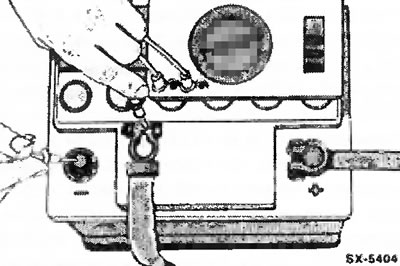
To measure current, the electrical circuit must be disconnected and the measuring device (ammeter) must be connected across the circuit. For this, for example, the plug is disconnected and the red wire (+) of the ammeter is connected to the current-carrying conductor. The black wire (-) is connected to the contact to which the conductor is normally connected. The ground contacts between the power consumer and the plug must be connected with a jumper.
Caution: Never use a regular ammeter to measure the current in the starter wire (approximately 150 A) or to the glow plugs of a diesel engine (up to 60 A). The high currents that arise in this case can damage the measuring device. In the workshop, an ammeter with a DC clamp is used for such measurements. In this case, the clamp is connected via an insulated wire, and the current value is measured via induction.
Measuring resistance
Before checking the resistance, it is necessary to make sure that no voltage is supplied to the part to which the ohmmeter is connected. That is, you should always disconnect the plug, turn off the ignition, remove the conductor or unit, or disconnect the battery. Otherwise, the device may fail.

The ohmmeter is connected to two consumer connectors or to two ends of an electrical conductor. It does not matter which wire (+/-) of the measuring device is connected to which contact. Resistance measurement in a car can be one of two types:
1. Checking the resistance or part included in the electrical circuit.
2. Checking the conductivity of an electrical conductor, switch or heating element. This checks whether there is a break in the electrical conductor in the car, which means that the connected electrical device cannot function. To measure, an ohmmeter is connected to both ends of the corresponding conductor. If the conductor conducts electric current, the measuring device will show a resistance value of 0Ω. This means that the conductor is OK. If the conductor is broken, the device will show a resistance value of ∞ Ω.
This article is available at russian, bulgarian, belarusian, ukrainian, serbian, croatian, romanian, polish, slovak, hungarian
Article verified: Ilyinsky Matvey
Share information:
Previous articles
БМВ E39: Equipment and devices
Next articles
Similar articles on other types of BMW cars:
Measurement technique BMW 7 Series E32 (1986-1994)
Checking the wheel alignment angles on the KDS with ground clearance… BMW X3 E83 (2003-2010)
Analysis of engine operation and measurement results BMW X5 E53 (1999-2006)
Measurement technique BMW 7 Series E32 (1986-1994)
Checking the wheel alignment angles on the KDS with ground clearance… BMW X3 E83 (2003-2010)
Analysis of engine operation and measurement results BMW X5 E53 (1999-2006)
Link in different formats to this page
Visitor comments
No comments yet
- General information
- Governing bodies
- Manual
- Maintenance
- Power unit
- Engine repair
- Lubrication system
- Cooling system
- Ignition system
- Supply system
- Injection system (gasoline)
- Injection system (diesel)
- Exhaust system
- Transmission
- Clutch
- Car gearbox
- Front axle
- Rear axle
- Chassis
- Steering
- Brake system
- Wheels and tires
- Body
- Interior
- Exterior
- Heating system
- Electrical equipment
- Equipment and devices
- Power devices
- Windscreen wipers
- Electrical circuits
- General information
- Manual
- Maintenance
- Power unit
- Engine repair
- Ignition system
- Engine lubrication system
- Cooling system
- Fuel system (gasoline)
- Fuel system (diesel)
- Exhaust system
- Transmission
- Clutch
- Car gearbox
- Chassis
- Front and rear suspension
- Steering
- Brake system
- Body
- Exterior
- Interior
- Electrical equipment
- Heating system
- Equipment and devices
- Power devices
- Electrical circuits
- General information
- Manual
- Maintenance
- Power unit
- Engine in a car
- Engine overhaul
- Cooling system
- Supply system
- Ignition system
- Control system
- Transmission
- Clutch
- Manual gearbox
- Automatic gearbox
- Transmission line
- Chassis
- Steering
- Front suspension
- Rear suspension
- Brake system
- Body
- Body elements
- Car care and painting
- Electrical equipment
- Heater and air conditioner
- Equipment and devices
- Starter and generator
- Electrical circuits
- General information
- Operation and maintenance
- Specifications
- Power unit
- Engine repair
- Cooling and lubrication system
- Supply system
- Ecotronic power supply system
- Fuel injection system
- Ignition system
- Transmission
- Clutch
- Gearbox BMW 242/4
- Gearbox Getrag 262/8
- Gearbox Getrag 265/6
- Automatic gearbox
- Cardan gear
- Rear axle
- Chassis
- Steering
- Front suspension
- Rear suspension
- Brake system
- Electrical equipment
- Equipment and devices
- Electrical circuits