
Table of contents: Single coil winch ↓ Double spool winch ↓
- Home
- BMW X3
- E83
- Body
- Doors and windows
- Removal window glass using the Roll Out 2000 system
Removal window glass using the Roll Out 2000 system (BMW X3 E83)
Single coil winch
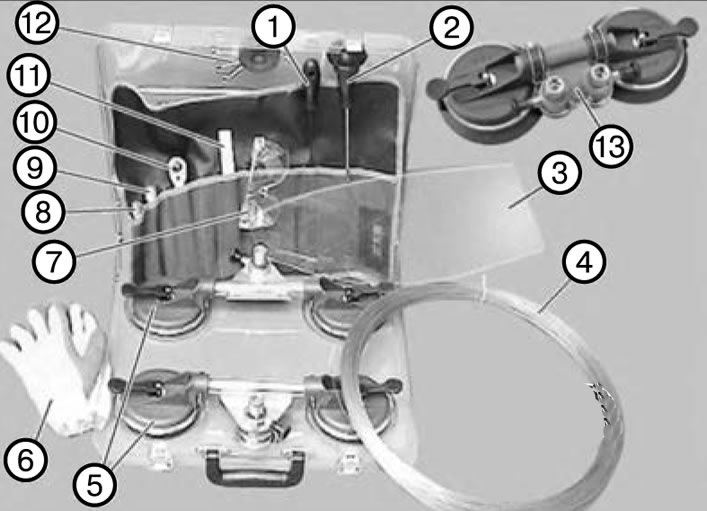
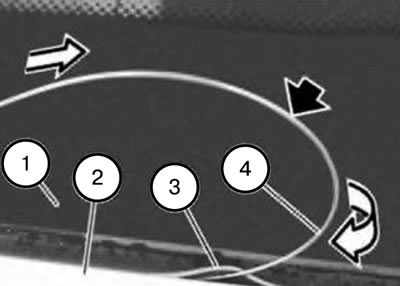
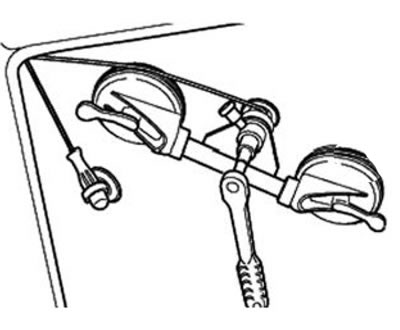
1. Wire fixture. 2. Chisel. 3. Polymer glass. 4. A skein of cutting wire. 5. Gates. 6. Protective gloves. 7. Protective glasses. 8. Extension (short). 9. Extension (long). 10. Ratchet. 11. Plastic wedge. 12. Guide rods. 13. Gate with two coils.
Note: When using the system "Roll Out 2000" the risk of damage to paintwork, as well as damage to health and property, is reduced to a minimum.
Attention. Observe the "Safety rules when working on vehicles equipped with the NPB system (risk of injury)".
Caution: Use caution when working with sharp-edged tools and cutting wires (risk of damage to the head airbag).
Attention:
- For optimal adhesion of the suction cups to the windshield, the suction cups and windshield must be clean and dry.
- If the clicking sound of the lock becomes too loud, lubricate the spool.
- For personal safety, always wear safety glasses and gloves.
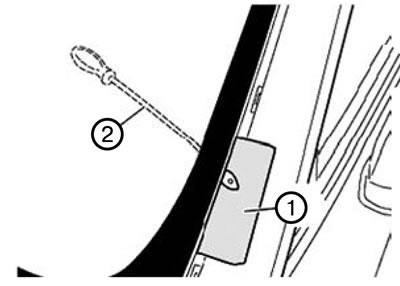
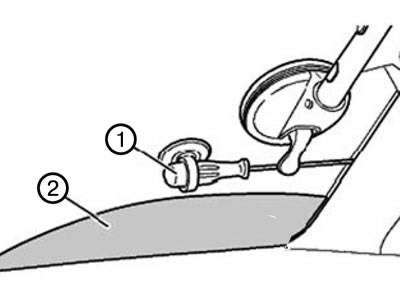
1. To avoid damaging the paintwork, cover the area where the wire device (2) comes out with textile adhesive tape (1).
2. Cut a piece of the required length from the skein of cutting wire (A).
(A) = glass diagonal x 4.
3. Check whether the wire can catch on the rivets or clamps; if necessary, insert guide rods into the glue joint and guide the wire along them.
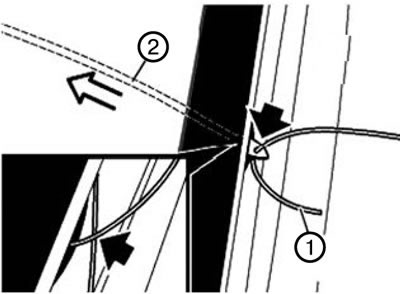
4. Pierce the adhesive strip from the interior side at a suitable place using a wire tool (2).
5. Insert the end (1) of the wire into the hole of the wire device (2) and bend it.
6. Insert two pieces of wire crosswise, one after the other.
Note: When crossing the pieces of wire, the glue strip will be cut.
7. Place the resulting wire loop around the glass, counterclockwise, starting from the entry points. 8. Pull the excess length of wire out of the cabin.
Caution: Make sure that the cutting wire is positioned under the glass in all four corners.
9. Check that the cutting wire is not caught on the clamps or the body flange.
10. Fix the glass from the outside with adhesive tape to prevent slipping.
Note:
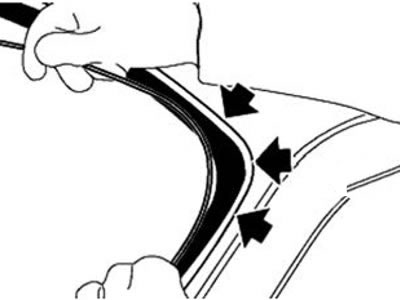
- For glass (1) with installed seals (3) or edging with a spray coating:
- Wet the cutting wire (4) and seals (3) on the glass (1) with water.
- Make a loop from the cutting wire (4) (without kinks) and insert between the glass (1) and the body opening (2).
Attention:
- To avoid possible damage and contamination, cover the front pillars, roof and instrument panel with a chisel (1) or polymer glass (2).
- During dismantling, move the chisel (1) so that the cutting wire does not get caught on it.
- The polymer glass (2) must always be placed between the cutting wire and the lining.
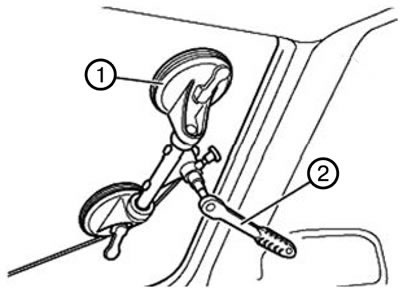
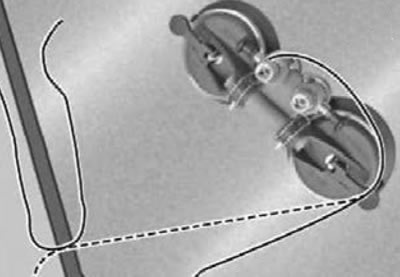
11. Secure the collar (1) to the glass using a suction cup.
12. Insert the end of the wire into the winch coil (1).
Note:
- The reel rotates in one direction only.
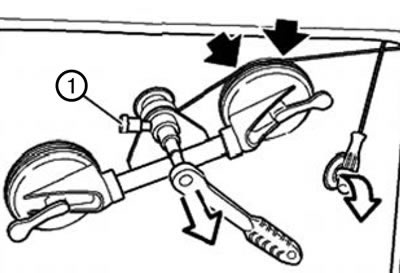
- Make sure that the wire is always positioned in the guide groove of the gate (1).
13. Install the ratchet (2) on the spool and pull the wire tight.
14. Start cutting from the bottom side.
15. Clamp the second end of the wire in fixture 513270.
Note: Before moving the gate, remove the ratchet, chisel and extension.
16. Peel off the gate suction cup.
17. Pull out the black lock button (1) and hold.
18. Turn the collar and move it together with the suction cup.
19. Install the ratchet, chisel and, if necessary, extension in place.
Note: When cutting in corners, ensure that the wire is positioned in the guide groove of the gate, as this will make the cutting process easier.
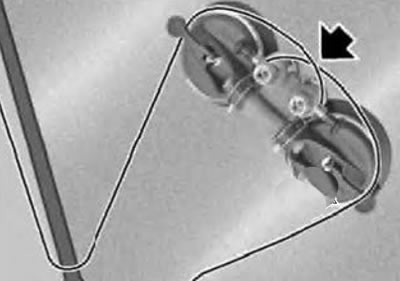
20. Attach the second gate to the glass using a suction cup.
21. Insert the second end of the wire into the gate coil.
22. Cut the left side and the upper left corner as described above.
23. Complete the dismantling process.
24. Dismantle the system "Roll Out 2000".
Double spool winch
Note: The double coil winder is used for small glass panes.
1. Attach the gate to the glass using a suction cup so that both coils are turned away from the starting point of the wire.
2. Insert either the upper end of the wire into the lower coil, or the lower end of the wire into the upper coil.
3. Place the ratchet on the spool and pull the wire tight.
4. Cut approx. 10 cm glue seam.
5. Insert the other end of the wire into the free coil so that the pieces of wire cross.
6. Cut the glue line to the end, using the spools one by one.
7. When the dismantling is complete, both pieces of wire converge in front of the coils.
8. Dismantle the system "Roll Out 2000".
This article is based on information from the website BMWman.ru
This article is available at russian, bulgarian, belarusian, ukrainian, serbian, croatian, romanian, polish, slovak, hungarian
Article verified: Polikarpov Saveliy
Share information:
Previous articles
БМВ E83: Doors and windows
Next articles
Similar articles on other types of BMW cars:
Removal and installation the window lift mechanism / adjusting the… BMW 3 Series E30 (1982-1994)
Removal and installation door window glass: 4-door limousine BMW 3 Series E36 (1990-2000)
Window glass washing system device BMW 5 Series E39 (1995-2003)
Removal and installation the window lifting mechanism / Adjusting the… BMW 5 Series E34 (1988-1996)
Removal and installation of the exhaust system BMW 7 Series E38 (1994-2001)
Removal air from the fuel system BMW 7 Series E32 (1986-1994)
Window glass and window lifters BMW X5 E53 (1999-2006)
Link in different formats to this page
Visitor comments
No comments yet
- General information
- Introduction to manual
- Troubleshooting
- User manual
- Maintenance
- Power unit
- Diesel engine M47 T2
- Diesel engine N47
- Diesel engine M57 T2/TU
- Petrol engine N46
- Petrol engine N52
- Petrol engine M54
- Cooling system
- Lubrication system
- Fuel system
- Engine management
- Intake and exhaust system
- Engine electrical equipment
- Transmission
- Clutch
- Gearbox and transfer case
- Drive shafts and axles
- Chassis
- Front suspension
- Rear suspension
- Brake system
- Steering system
- Body
- Exterior
- Doors and windows
- Safety system
- Air conditioner
- Electrical equipment
- Equipment and devices
- Lighting and signaling
- Electrical circuits