
- Home
- BMW 7 Series
- E38
- Power unit
- Exhaust system
- Removal and installation of the exhaust system
Removal and installation of the exhaust system (BMW 7 Series E38)
Models with M51 engine
1. Remove the engine crankcase protection panel and support the exhaust system assembly.

2. Remove the catalytic converter holder fastener.
3. Loosen the nuts and disconnect the exhaust pipe from the turbocharger.
When installing, replace the nuts and lubricate the threads with CRC copper paste.
4. Loosen the hex nuts and unscrew the hex bolts, remove the exhaust pipe mounting clamp.
When installing, adjust the exhaust pipe clamp after the exhaust system is completely installed so that the system components are not under tension.

5. Loosen the nuts and remove the exhaust system as a whole.
6. Installation is carried out in reverse order.
Models with engines M52, M60, M62
1. If necessary, remove the rear engine sump guard panel and the heat shield on the front axle beam.
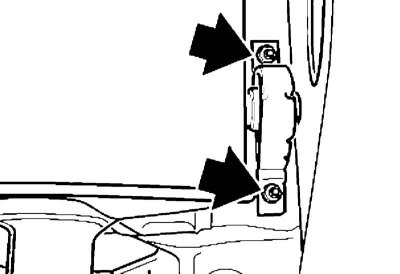
2. Disconnect the rear catalytic converter mounting elements from the body (see illustration).
3. Support the exhaust system.
4. On models with engines M60 and M62 disconnect the connectors of the left and right lambda probes (see section Removal and installation lambda probes). Release the electrical wiring from the clamps.
5. On models with engines M60 and M62 disconnect the exhaust system from the exhaust manifolds.
Replace the sealing ring when installing.
6. On models with an engine M52 unscrew the bolts and nuts securing the flange.
When installing, check and replace the gaskets if necessary. Replace the nuts and lubricate the threads with CRC copper paste.
7. On models with engines M60 and M62 remove the nuts of the rubber-metal hinges of the additional muffler (for the main) on the rear axle beam.
8. On models with engine M52 remove the nuts of the rubber-metal hinges of the additional muffler (for the main) on the rear axle beam.
9. On models with engine M60 remove the nuts of the clamps for fastening the additional muffler (for the main) on the left and right sides. Remove the exhaust system as a whole.
10. On models with engine M52 loosen the nuts of the rubber-metal hinges on the additional muffler (for the main) on the left and right side. Remove the exhaust system as a whole.
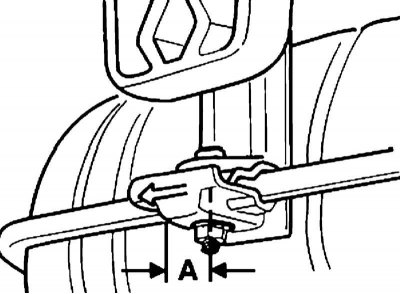
11. Installation is carried out in the reverse order. On models with engines M60 and M62 pre-shift the rubber-metal hinge in the direction of vehicle movement by a distance A = 15 mm.
Models with M52TU engine

1. Loosen the nuts on the flanges and disconnect the pipes. Check the condition of the gaskets and replace them if necessary.
When installing, replace the nuts and lubricate the threads with CRC copper-containing paste.
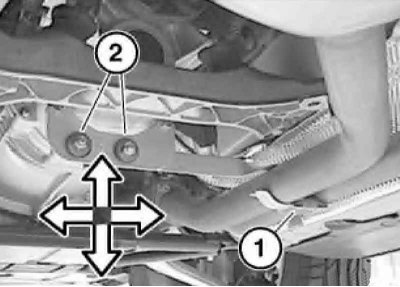
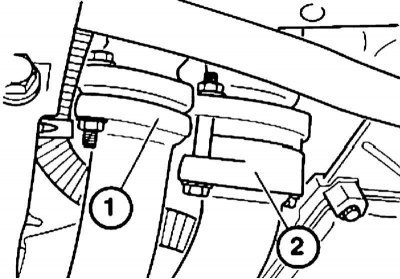
2. Unscrew the bolt (1) and remove the intake pipe mount.
When installing, align the exhaust pipe clamp in the center without tension after the exhaust system is completely installed. To do this, loosen the bolts (2).
3. Support the exhaust system and prevent it from falling.
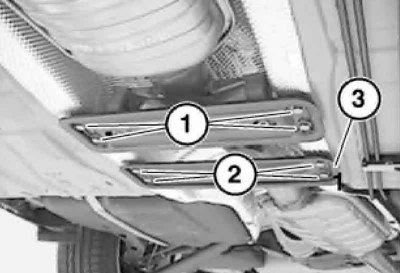
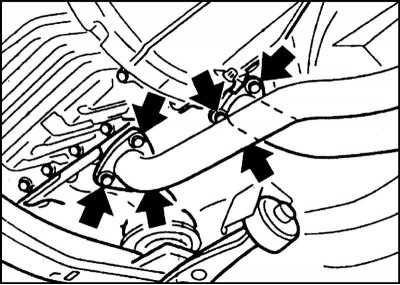
4. Unscrew the hexagon-head bolts (1 and 2) and remove the intermediate insert (3). The front intermediate insert is connected to the exhaust system via a rubber-metal joint.
5. Loosen the nuts of the front hinge on the rear additional muffler.
6. Loosen the rear hinge nuts on the rear additional muffler and remove the exhaust system as a whole.
7. Installation is carried out in reverse order.
Models with M57 engine
1. Support the exhaust system and prevent it from falling.

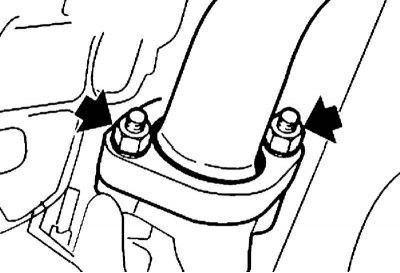
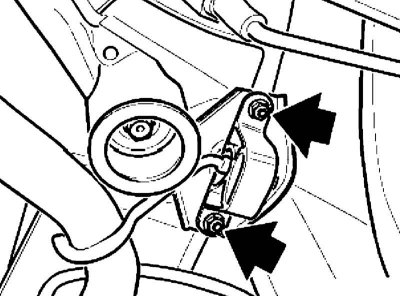
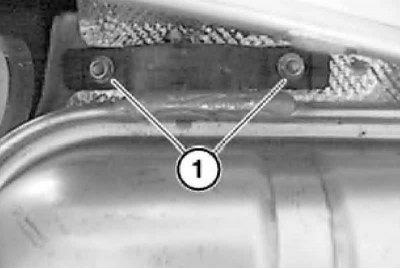
2. Loosen the nuts (1) and remove the exhaust pipe (2) moving it backwards.
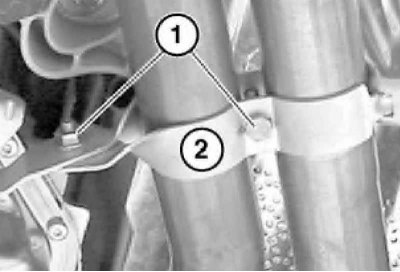
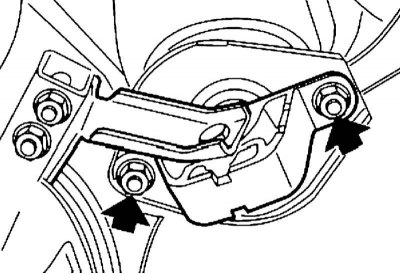
3. Unscrew the bolts (1) and remove the bracket (2).
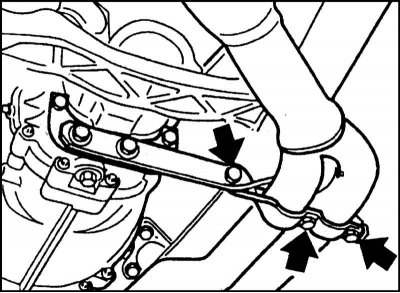
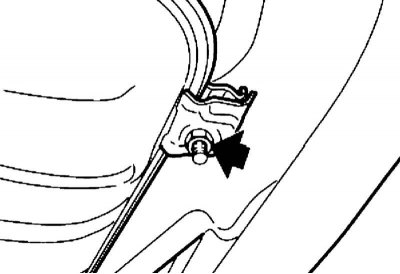
4. Loosen the retaining plate fastener (see illustration).

5. Remove the rubber rings on both additional mufflers and remove the exhaust system.
6. Installation is carried out in reverse order.
Models with M57 and M67 engines
1. Support the exhaust system and prevent it from falling.
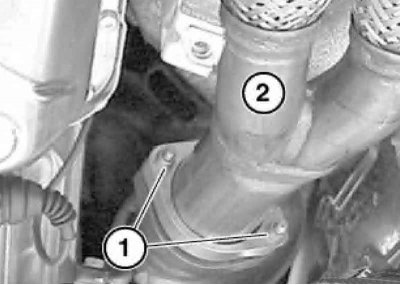
2. On models with an engine M57 loosen the nuts (1) and remove the exhaust pipe (2) moving it backwards.

3. On models with an engine M57 unscrew the bolts (1) and remove the bracket (2).

4. On models with an engine M67 unscrew the bolts (1 and 2) and remove the retaining bracket.
5. Loosen the retaining plate fastener (see illustration).
6. Remove the rubber hangers on both additional mufflers and remove the exhaust system.
7. Installation is carried out in reverse order.
Models with M73 engine
1. On models until 09.1998. (without electronic catalytic converter) disconnect the left and right lambda probe connectors and release their wiring. Go to paragraph 6.
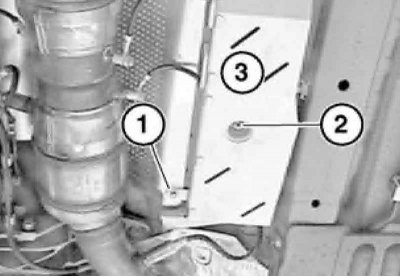
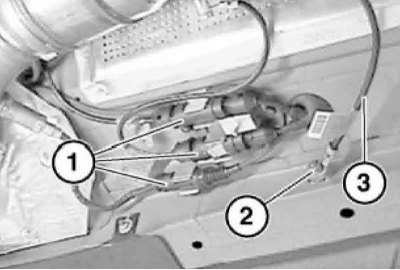
2. On models since 09.1998 issue. (with electronic catalytic converter) unscrew the bolt (1), remove the nut (2) and remove the cover (3).
Paragraphs with 3 by 5 apply to models produced since 09.1998.
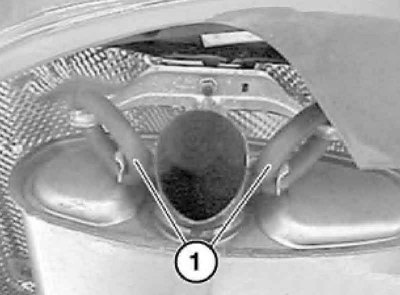
3. Unclamp the holder and release the connector (1). Disconnect the connectors of the right lambda probe wiring and the positive wires of the electronic catalytic converter. Remove the cover of the left lambda probe wiring connector and disconnect the connector. Loosen the nut (2) securing the negative wire (3) to the body.

4. Remove the nut (1) securing the negative wire to the electronic catalytic converter.
The positive and negative wire tips are cone-shaped, use a special puller (tool No.18 0 050) to remove them. Use new nuts when installing.
5. Due to the risk of damage to the ceramic insulation, the positive lead from the electronic catalytic converter should only be disconnected in exceptional cases, such as if the electrical wiring is damaged.
Do not touch the positive wire at the connection points.
6. Disconnect the rear underbody protection panel and heat shield from the front axle beam.
7. Disconnect the rear catalytic converter mounting elements from the body (see illustration).
8. Support the exhaust system and prevent it from falling.
9. Disconnect the exhaust system from the inlet pipes (see illustration).
10. Disconnect the left and right rubber-metal hinges securing the rear additional muffler to the rear axle beam (see illustration).
11. Loosen the nuts of the clamps securing the rear additional muffler on the left and right sides (see illustration).
12. Remove the exhaust system assembly.
13. Installation is carried out in the reverse order. First, move the rubber-metal hinge in the direction of the vehicle's movement by a distance A = 15 mm (cm. illustration).
14. On models produced since 09.1998. (with electronic catalytic converter) after installation, the electronic catalytic converter should be activated using a diagnostic tool and checked.
This article is available at russian, bulgarian, belarusian, ukrainian, serbian, croatian, romanian, polish, slovak, hungarian
Article verified: Polikarpov Saveliy
Share information:
Previous articles
БМВ E38: Exhaust system
Next articles
Similar articles on other types of BMW cars:
Removal and installation of the exhaust system BMW 3 Series E30 (1982-1994)
Removal and installation of the exhaust system BMW 3 Series E36 (1990-2000)
Removal and installation of the exhaust system BMW 5 Series E34 (1988-1996)
Removal and installation of the exhaust system BMW 5 Series E39 (1995-2003)
Removal and installation the airbag system module in the left or… BMW X3 E83 (2003-2010)
Removal and installation the engine BMW X5 E53 (1999-2006)
Link in different formats to this page
Visitor comments
No comments yet
- General information
- Introduction to guide
- Manual
- Maintenance
- Power unit
- Engine M60/1, M60/2 (petrol)
- M62 engine (petrol)
- M57 engine (diesel)
- M67 engine (diesel)
- Cooling system
- Fuel system (petrol)
- Fuel system (diesel)
- Exhaust system
- Ignition and control systems
- Charge and launch systems
- Transmission
- Clutch
- Mechanical gearbox
- Automatic gearbox
- Cardan and drive shafts
- Chassis
- Brake system
- Front suspension
- Rear suspension
- Steering
- Body
- Exterior
- Interior
- Electrical equipment
- Equipment and devices
- Lighting
- Heating and air conditioning
- Electrical circuits
- General information
- Care and maintenance
- Power unit
- Minor engine repair
- Engine overhaul
- Lubrication system
- Cooling system
- Ignition system
- Supply system
- Injection system (petrol)
- Injection system (diesel)
- Exhaust system
- Transmission
- Clutch
- Manual gearbox
- Automatic gearbox
- Cardan gear
- Rear axle and shafts
- Chassis
- Front suspension
- Rear suspension
- Steering
- Wheels and tires
- Brake system
- Body
- Body elements
- Electrical equipment
- Equipment and devices
- Electrical circuits