
- Home
- BMW 3 Series
- E30
- Power unit
- Lubrication system
- Maintenance work on the engine lubrication system
Maintenance work on the engine lubrication system (BMW 3 Series E30)
Engine oil change
The oil is changed according to the service interval indicator on the dashboard or every 10,000 km once a year. With a small annual mileage, the engine oil should be changed once a year. At the same time, the oil filter cartridge is replaced.
Under severe operating conditions (such as short distance travel, frequent cold starts and driving on dusty roads) oil changes should be made more frequently.
Motor oil can be pumped out using a special probe.
Using different grades of oil indiscriminately is not advisable. It is advisable not to mix motor oils of different grades, even of the same type. Motor oils of the same type and grade, but with different viscosity can be mixed if necessary in the spring and autumn periods.
Attention: Old oil is handed over to special waste collection points. The address of the nearest point can be found in the city or village administration. Under no circumstances should old oil be poured out or thrown away with household waste. This causes irreparable harm to the environment (for example, pollution of water bodies).
Draining oil from the engine
Warm up the engine to operating temperature (coolant temperature 60-80°C).
Note: Oil can also be sucked out with a suitable pump through the dipstick tube.
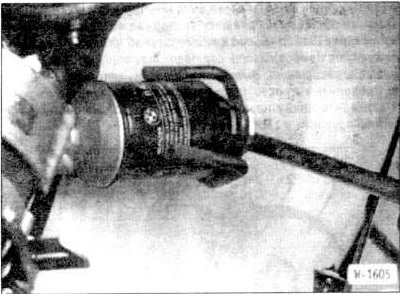
Unscrew the oil filter. There is a special tool for this, for example, from HAZET 2169. You can also insert a sharp screwdriver into the side of the oil filter. If oil leaks out when unscrewing, place a container underneath.
Models 316i produced from September 1988 and 318i produced from September 1987.
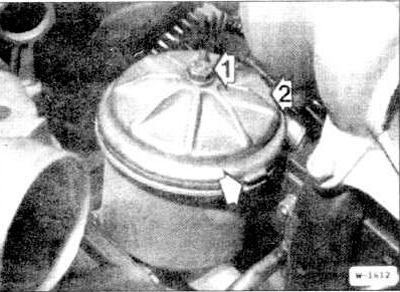
Unscrew the central bolt "1", after which the oil can drain from the filter housing with the open check valve into the oil sump.
Remove filter cover "2" with sealing ring.
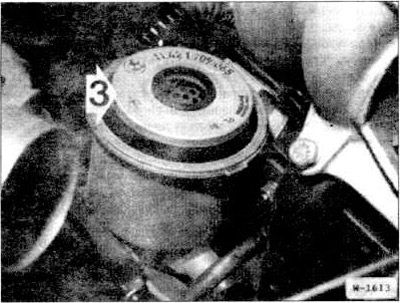
Remove filter element "3". Wipe off the dripping oil with a rag.
Raise the vehicle to a horizontal position.
Place a container under the oil pan to collect the used oil.
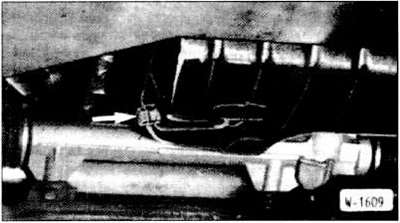
Unscrew the oil drain plug (arrow) on the side of the oil pan and completely drain the used oil from the engine.
Attention: If a significant amount of metal shavings or friction products are found in the drained oil, it should be borne in mind that there is damage to the engine, for example, crankshaft bearings or connecting rod bearings. To prevent consequences after the repair, it is necessary to clean the oil channels and oil hoses. Additionally, if an oil radiator is installed, it must be replaced.
Filling the engine with oil
Screw on the oil drain plug with a new gasket and tighten it. But do not apply much force. Tightening torque of the plug for a 17 mm spanner: 30 Nm; under 19 mm key: 60 Nm.
Clean the oil filter flange with fuel.
Lightly lubricate the rubber sealing ring of the oil filter with engine oil.
Caution: Observe the instructions on the fuel filter housing.
Tighten the new oil filter by hand.
Models 316i produced from September 1988 and 318i produced from September 1987.
Insert the new filter element into the oil filter housing.
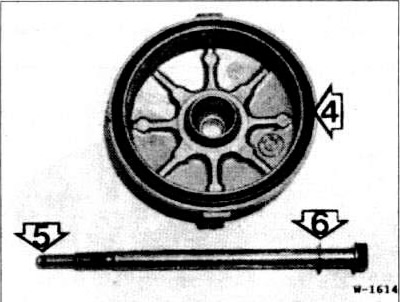
Clean the oil filter cover, check the integrity of the rubber sealing ring "4" and insert it into the groove.
Check the condition of the sealing ring "5" and copper gasket "6" of the central bolt and, if necessary, replace.
Place the filter cover so that the protrusion on the cover matches the protrusion on the body (see arrow in figure W 1612).
Insert the central bolt with the sealing ring, tighten and tighten to 30 Nm.
Fill with new oil through the oil filler neck on the cylinder head cover.
Start the engine and let it run at high speed (about 2500 rpm) until the lubrication system indicator light on the instrument panel goes out (about 5 seconds).
Finally, check the oil level with a dipstick.
Filling tanks
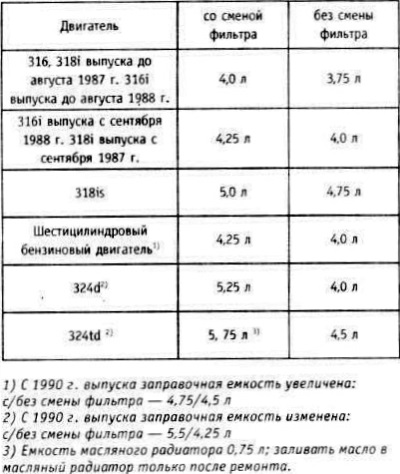
The difference between the marks on the oil dipstick is 1 l.
After the test drive, check the tightness of the oil drain plug and oil filter and, if necessary, carefully tighten.
Stop the warmed-up engine and after 2 minutes check the oil level again, adjusting if necessary.
If you need to reset the service interval indicator, you usually need a special tool that can be purchased from BMW. You can also reset the indicator free of charge at a BMW service station. On cars produced up to about December 1985, you can reset the indicator yourself.
To control the engine operation, the oil must be replaced with oil of the same type and preferably the same brand. Therefore, it is advisable to attach a plate to the engine indicating the brand and viscosity of the oil poured in.
This article is available at russian, bulgarian, belarusian, ukrainian, serbian, croatian, romanian, polish, slovak, hungarian
Article verified: Polikarpov Saveliy
Share information:
Previous articles
БМВ E30: Lubrication system
Next articles
Similar articles on other types of BMW cars:
Engine lubrication system. General information BMW 5 Series E34 (1988-1996)
Engine cooling system parts BMW 5 Series E12 (1972-1981)
Diagnostics of lubrication system faults BMW 7 Series E32 (1986-1994)
Replacing the sensors of the engine management system BMW 7 Series E38 (1994-2001)
Maintenance system BMW X3 E83 (2003-2010)
Electrical diagram of the engine lubrication system BMW X5 E53 (1999-2006)
Engine lubrication system. General information BMW 5 Series E34 (1988-1996)
Engine cooling system parts BMW 5 Series E12 (1972-1981)
Diagnostics of lubrication system faults BMW 7 Series E32 (1986-1994)
Replacing the sensors of the engine management system BMW 7 Series E38 (1994-2001)
Maintenance system BMW X3 E83 (2003-2010)
Electrical diagram of the engine lubrication system BMW X5 E53 (1999-2006)
Link in different formats to this page
Visitor comments
No comments yet
- General information
- Manual
- Maintenance
- Power unit
- Engine repair
- Cooling system
- Power system (gasoline)
- Injection system (gasoline)
- Fuel system (diesel)
- Exhaust system
- Ignition system
- Charge and launch systems
- Transmission
- Car gearbox
- Clutch and drive shafts
- Chassis
- Brake system
- Suspension front and rear
- Steering
- Body
- Body care and repair
- Exterior
- Interior
- Electrical equipment
- Troubleshooting
- Lighting and signaling
- Equipment and devices
- Heater and air conditioner
- Electrical circuits
- General information
- Manual
- Repair on the road
- Weekly checks
- Maintenance
- Troubleshooting
- Power unit
- 4 cylinder engines
- 6 cylinder engines
- Engine overhaul
- Cooling and heating
- Fuel and exhaust system
- Starting and charging system
- Ignition system
- Transmission
- Clutch
- Mechanical gearbox
- Automatic gearbox
- Cardan and drive shafts
- Chassis
- Brake system
- Wheel suspension
- Steering
- Body
- Exterior
- Interior
- Electrical equipment
- Equipment and devices
- Electrical circuits
- General information
- Maintenance
- Power unit
- Engine repair
- Cooling system
- Ignition system
- Supply system
- Fuel injection system
- Exhaust system
- Transmission
- Clutch
- Car gearbox
- Front and rear axle
- Chassis
- Steering
- Brake system
- Body
- Exterior
- Interior
- Electrical equipment
- Heating system
- Equipment and devices
- Power devices
- Electrical circuits
- Power unit
- M10/M20 engine
- M40 engine
- Ignition system
- Lubrication system
- Cooling system
- Supply system
- Fuel injection
- Exhaust system
- Transmission
- Clutch
- Manual gearbox
- Front axle
- Rear axle
- Chassis
- Steering
- Brake system
- Body
- Exterior
- Interior
- Electrical equipment
- Heating system
- Equipment and devices
- Electrical circuits
- General information
- Specifications
- Operation and maintenance
- 4-cylinder engine
- Engine repair
- Cooling and lubrication system
- Supply system
- Ignition system
- 6-cylinder engine
- Engine repair
- Cooling and lubrication system
- Supply system
- Fuel injection system
- Ignition system
- Transmission
- Clutch
- 4-speed manual gearbox
- 5-speed manual gearbox
- Automatic gearbox
- Cardan and rear axle
- Chassis
- Steering
- Front suspension
- Rear suspension
- Brake system
- Electrical equipment
- Equipment and devices
- Electrical circuits