
- Home
- BMW 3 Series
- E46
- Chassis
- Suspension front and rear
- Removal and installation the rear shock absorber
Removal and installation the rear shock absorber (BMW 3 Series E46)
Shock absorber, suspension spring and shock absorber support
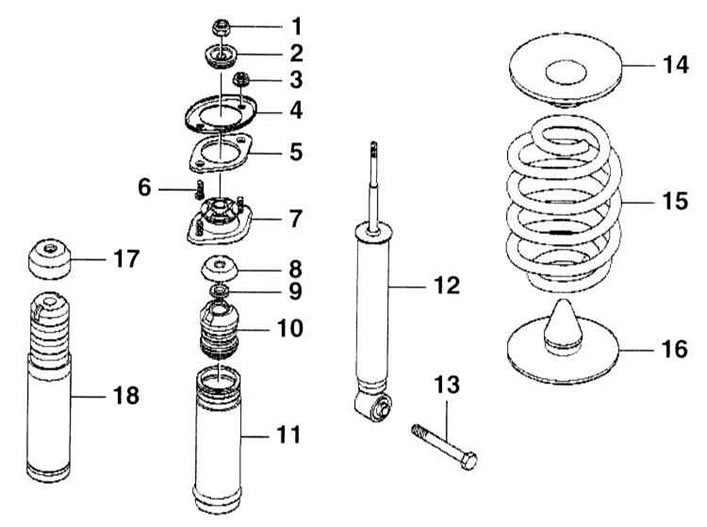
1 - Nut, 15 Nm. Self-locking, must be replaced
2 - plate
3 — flange nut, 25 Nm. Self-locking, must be replaced
4 — reinforcing plate. Only for the left side of the car
5 - sealing plate
6 — bolt
7 — shock absorber support
8 - plate
9 - spacer washer
10 - plastic damper
11 - protective pipe
12 — rear shock absorber
13 — bolt M12, 100 Nm
14 — upper spring cup
15 — suspension spring
16 — lower spring cup
17 — adapter
18 - plastic buffer
Removal
1. Remove the luggage compartment trim in the area where the shock absorber is mounted.
The operation of lifting and installing the vehicle on stands is associated with danger! Therefore, before carrying out the operation, read the Section Jacking and towing
2. Raise and support the rear of the vehicle on stands.
3. Support the lower control arm "4" with a garage lift, placing a wooden block underneath.
If this condition is not met, the suspension beam will fall down after the shock absorber is disconnected. The drive shaft may be damaged.
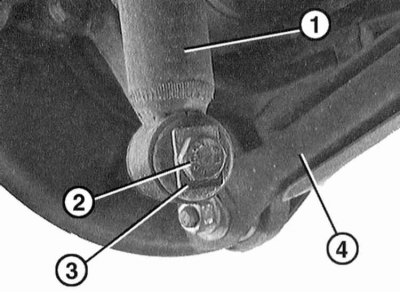
4. Disconnect the shock absorber "1" at the suspension beam. Mark the position of both washers for subsequent assembly. The thrust washer "3" of the rubber support points towards the head of the bolt "2".
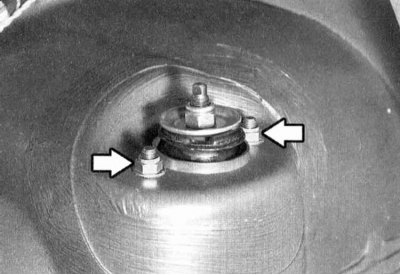
5. Unscrew the two nuts securing the centering cup.
6. Remove the reinforcement plate, if present, on the left side of the vehicle.
7. Remove the shock absorber downwards.
Keep the shock absorber vertically only. Otherwise, increased noise may occur while the car is moving. Then it is necessary to pull out the rod and put the shock absorber for 24 hours at room temperature (+20°C).
Installation
8. Check the shock absorber, refer to Section Removal and installation the rear shock absorber.
9. Be sure to replace the gasket between the shock absorber and the body with a new one.
10. Insert the shock absorber.
11. Insert the reinforcement plate if it was removed.
12. Secure the shock absorber at the top with two new self-locking nuts and tighten them to 25 Nm.
13. Secure the shock absorber at the bottom, without tightening the mounting nuts yet. Don't forget to put washers on both sides of the shock absorber mount. The rubber support thrust washer should point towards the bolt head.
14. Move the garage lift back and lower the vehicle onto its wheels.
15. When tightening the lower shock absorber support nut, the vehicle must not be loaded. For this, the following conditions must be met:
- the car is fully fueled;
- tire pressure to match the established;
- the car has the following loading scheme: 2x68 kg in front, 1x68 kg in the back, 1x21 kg in the center of the trunk;
- the car's suspension is compressed.
16. Tighten the lower mounting bolt to 100 Nm.
17. Close the trunk lid.
This article is available at russian, bulgarian, belarusian, ukrainian, serbian, croatian, romanian, polish, slovak, hungarian
Article verified: Sevastyanov Nikolay
Share information:
Previous articles
БМВ E46: Suspension front and rear
Next articles
Similar articles on other types of BMW cars:
Removal and installation, inspection of the rear shock absorber BMW 5 Series E34 (1988-1996)
Removal and installation the rear shock absorber strut BMW 5 Series E39 (1995-2003)
Rear shock absorber strut — removal and installation BMW 7 Series E32 (1986-1994)
Removal and installation the rear axle gearbox BMW 7 Series E38 (1994-2001)
Removal and installation the rear door BMW X3 E83 (2003-2010)
Rear disc — removal and installation BMW X5 E53 (1999-2006)
Link in different formats to this page
Visitor comments
No comments yet
- General information
- Manual
- Maintenance
- Power unit
- Engine repair
- Cooling system
- Power system (gasoline)
- Injection system (gasoline)
- Fuel system (diesel)
- Exhaust system
- Ignition system
- Charge and launch systems
- Transmission
- Car gearbox
- Clutch and drive shafts
- Chassis
- Brake system
- Suspension front and rear
- Steering
- Body
- Body care and repair
- Exterior
- Interior
- Electrical equipment
- Troubleshooting
- Lighting and signaling
- Equipment and devices
- Heater and air conditioner
- Electrical circuits
- General information
- Manual
- Repair on the road
- Weekly checks
- Maintenance
- Troubleshooting
- Power unit
- 4 cylinder engines
- 6 cylinder engines
- Engine overhaul
- Cooling and heating
- Fuel and exhaust system
- Starting and charging system
- Ignition system
- Transmission
- Clutch
- Mechanical gearbox
- Automatic gearbox
- Cardan and drive shafts
- Chassis
- Brake system
- Wheel suspension
- Steering
- Body
- Exterior
- Interior
- Electrical equipment
- Equipment and devices
- Electrical circuits
- General information
- Maintenance
- Power unit
- Engine repair
- Cooling system
- Ignition system
- Supply system
- Fuel injection system
- Exhaust system
- Transmission
- Clutch
- Car gearbox
- Front and rear axle
- Chassis
- Steering
- Brake system
- Body
- Exterior
- Interior
- Electrical equipment
- Heating system
- Equipment and devices
- Power devices
- Electrical circuits
- Power unit
- M10/M20 engine
- M40 engine
- Ignition system
- Lubrication system
- Cooling system
- Supply system
- Fuel injection
- Exhaust system
- Transmission
- Clutch
- Manual gearbox
- Front axle
- Rear axle
- Chassis
- Steering
- Brake system
- Body
- Exterior
- Interior
- Electrical equipment
- Heating system
- Equipment and devices
- Electrical circuits
- General information
- Specifications
- Operation and maintenance
- 4-cylinder engine
- Engine repair
- Cooling and lubrication system
- Supply system
- Ignition system
- 6-cylinder engine
- Engine repair
- Cooling and lubrication system
- Supply system
- Fuel injection system
- Ignition system
- Transmission
- Clutch
- 4-speed manual gearbox
- 5-speed manual gearbox
- Automatic gearbox
- Cardan and rear axle
- Chassis
- Steering
- Front suspension
- Rear suspension
- Brake system
- Electrical equipment
- Equipment and devices
- Electrical circuits