
Table of contents: Early model cars ↓ Cars of later years of production ↓
- Home
- BMW 7 Series
- E32
- Chassis
- Rear suspension
- Rear shock absorber strut — removal and installation
Rear shock absorber strut — removal and installation (BMW 7 Series E32)
Early model cars
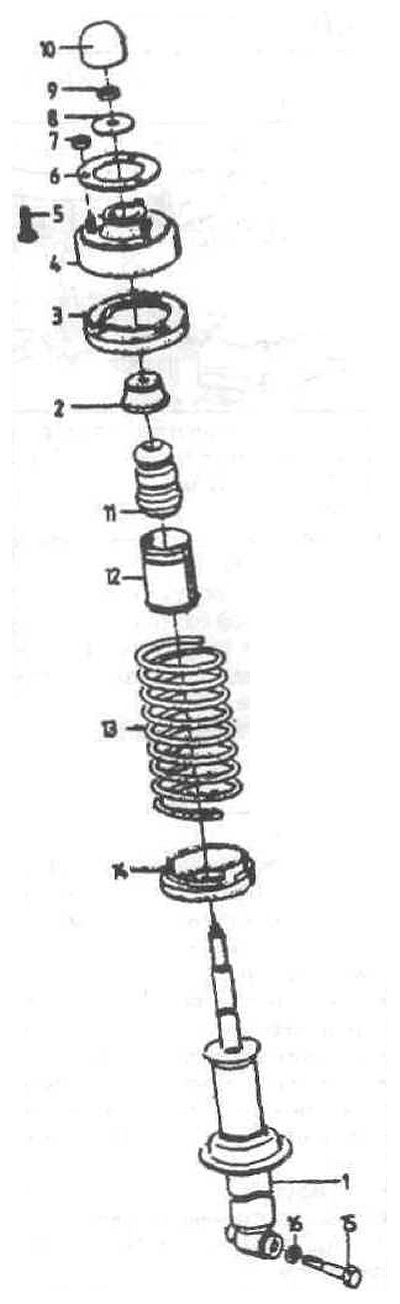
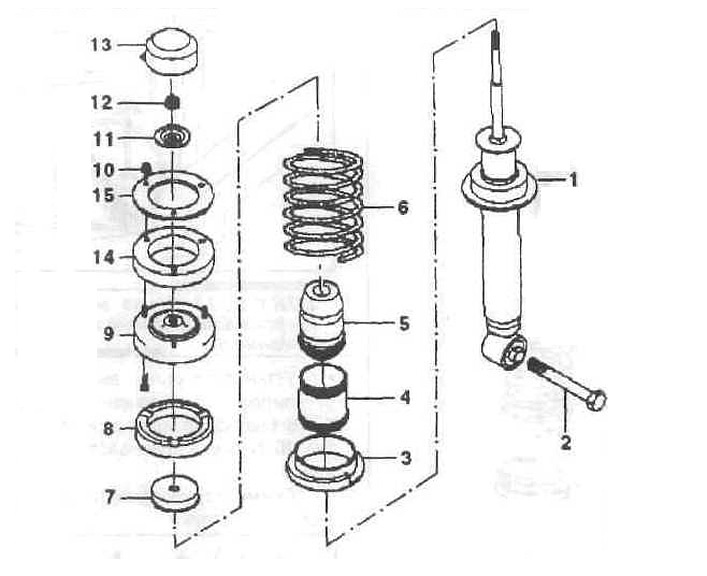
Rear shock absorber strut components
1 - shock absorber;
2 - thrust washer;
3 - top cup;
4 - thrust bearing;
5 - finger;
6 - sealing washer;
7 - flange nut (M8);
8 - plate;
9 - Hexagonal nut M10;
10 — cap;
11 — damper;
12 - protective pipe;
13 — spring;
14 - lower cup;
15 - Hex bolt (M14x1.5x85);
16 - washer.
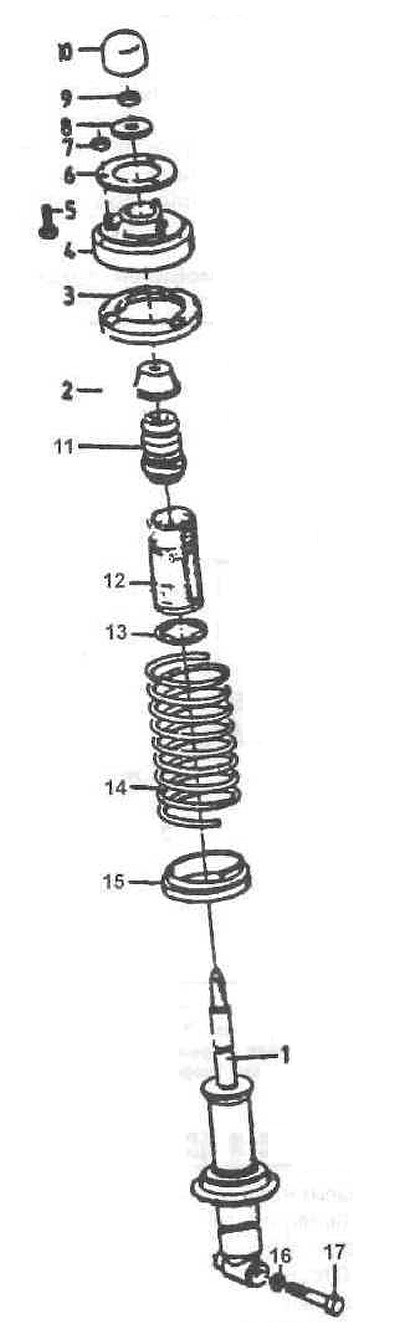
Elements of shock absorber clearance adjustment
1 - shock absorber;
2 - thrust washer;
3 - top cup;
4 - thrust bearing;
5 - finger;
6 - sealing washer;
7 - flange nut (M8);
8 - plate;
9 - Hexagonal nut M10;
10 — cap;
11 — damper;
12 — casing;
13 - fastening ring;
14 — spring;
15 - lower cup;
16 - washer;
17 - Hex bolt (M14x1.5x85).
Removal
Remove the rear seat and backrest.
Raise the vehicle and support the trailing arms.
Disconnect the shock absorber strut from the trailing arm.
Note: The shock absorber strut has an additional function of a travel limiter tape.
Ride height adjustment:
- Disconnect the cable connection from the low pressure switch and short it.
- Turn on the ignition.
- Remove the adjusting rod. Unscrew the nut, holding the collar with an 8 mm wrench.
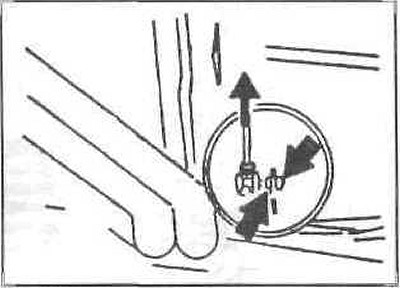
Caution: Due to possible damage, do not separate the ball joint.
Set the adjustment switch lever to the "lower" position. This will release the pressure in the system after 20 seconds.
Remove the pipe from the shock absorber strut.
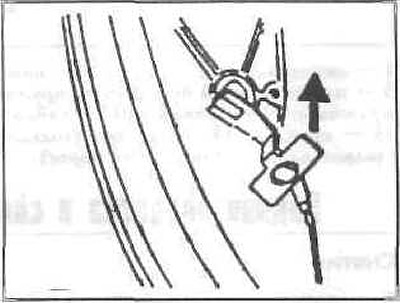
Remove the shock absorber strut from the trailing arm.
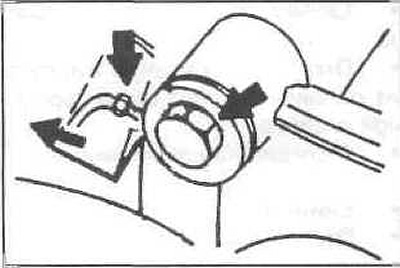
Unscrew the centering cup from the top of the wheel well.
Remove the shock absorber strut.
Installation
Installation is carried out in the reverse order of removal.
Replacing the rear shock absorber
When replacing shock absorbers, always install shock absorbers with the same designation. Shock absorbers are always replaced in pairs.
Remove the rear shock absorber.
Remove the protective cap from above.
Remove the spring with the tool.
Unscrew the nut (2). Remove the hinge cup.
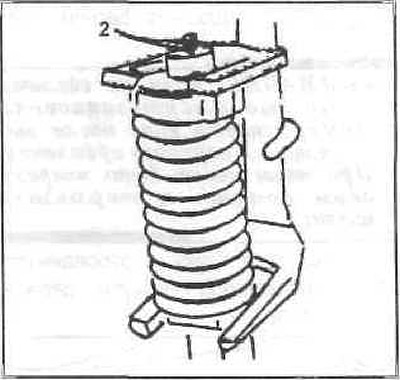
Release the spring.
Remove the spring centering cup and additional spring.
Assembly is carried out in the reverse order of removal.
Cars of later years of production
Caution: On vehicles with air suspension, remove fuse #6 of the air supply system. This prevents accidental adjustment of the system.
Removal
Remove the shelf under the rear window.
Loosen the two speaker mounting screws, disconnect the plug and remove the speaker.
Mark the position of the rear wheels on the hubs so that you can later install the balanced wheels in their original positions. Loosen the wheel bolts with the car on the ground. Support the car from behind and remove the rear wheels.
Remove the wheel arch trim.
Lift the carpet next to the automatic seat belt tensioner. Pull the rubber cover off the top of the shock absorber and remove the three nuts.
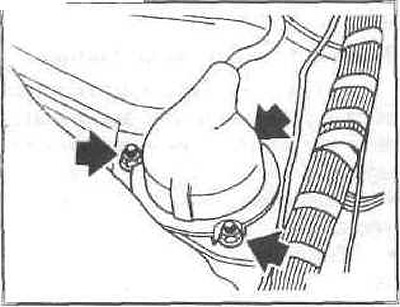
For vehicles with EDC (electronic suspension control) disconnect the plug.
Support the wheel holder with a jack, placing a wooden block underneath.
Caution: If you do not do this, the shock absorber will fall down after unscrewing the upper mount. This may damage the axle shaft and brake hose.
Loosen the nut and disconnect the shock absorber strut from the wheel holder.
Lower the wheel holder slightly and remove the stand.
Caution: The brake hose must not be stretched.
Note: The shock absorber must be stored vertically only, otherwise rattling sounds may occur later when driving. To eliminate the problem, pull out the piston rod and keep the shock absorber in a standing position for 24 hours at room temperature (+20°C).
Installation
Check the shock absorber. Insert the shock absorber strut and screw a new self-locking nut on top, without tightening it.
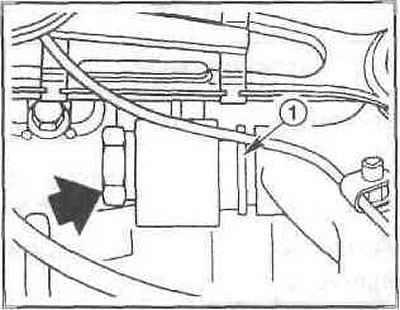
Insert the bushing (1) of the lower shock absorber mount into the wheel mount. Screw in the bolt without tightening it yet.
Tighten the upper nut of the shock absorber strut to a torque of 20 Nm.
Remove the jack and lower the vehicle.
Install the wheel arch trim.
Install the rear wheels according to the marks made earlier. Do not lubricate the wheel bolts. Lower the car. Tighten the wheel bolts crosswise to 100 Nm.
Place the vehicle in the working position, i.e. the vehicle must stand on its wheels and be loaded as described earlier.
Tighten the lower mounting bolt to 125 Nm. For vehicles with the EDC system, connect the plug.
Put on the rubber cap.
Install the speaker, put on the plug and secure the speaker with screws.
Install a shelf under the rear window.
Elements of the rear shock absorber strut of cars of later years of production
1 - shock absorber;
2 - bolt;
3 - lower spring support;
4 - protective pipe;
5 - plastic buffer;
6 - spring;
7 — support disk;
8 — upper spring support;
9 — support;
10 - nut;
11 - hinge plate;
12 - nut;
13 — lid;
14 — adapter (only option for bad roads);
15 — ring (only option for bad roads).
The article text was copied from an online resource: bmwman.ru
This article is available at russian, bulgarian, belarusian, ukrainian, serbian, croatian, romanian, polish, slovak, hungarian
Article verified: Sevastyanov Nikolay
Share information:
Previous articles
БМВ E32: Rear suspension
Next articles
Similar articles on other types of BMW cars:
Removal and installation the rear shock absorber BMW 3 Series E46 (1998-2006)
Removal and installation the shock absorber strut BMW 3 Series E30 (1982-1994)
Removal and installation the rear shock absorber strut BMW 5 Series E39 (1995-2003)
Removal and installation, inspection of the rear shock absorber BMW 5 Series E34 (1988-1996)
Removal and installation the rear door BMW X3 E83 (2003-2010)
Rear disc — removal and installation BMW X5 E53 (1999-2006)
Link in different formats to this page
Visitor comments
No comments yet
- General information
- Introduction to guide
- Manual
- Maintenance
- Power unit
- Engine M60/1, M60/2 (petrol)
- M62 engine (petrol)
- M57 engine (diesel)
- M67 engine (diesel)
- Cooling system
- Fuel system (petrol)
- Fuel system (diesel)
- Exhaust system
- Ignition and control systems
- Charge and launch systems
- Transmission
- Clutch
- Mechanical gearbox
- Automatic gearbox
- Cardan and drive shafts
- Chassis
- Brake system
- Front suspension
- Rear suspension
- Steering
- Body
- Exterior
- Interior
- Electrical equipment
- Equipment and devices
- Lighting
- Heating and air conditioning
- Electrical circuits
- General information
- Care and maintenance
- Power unit
- Minor engine repair
- Engine overhaul
- Lubrication system
- Cooling system
- Ignition system
- Supply system
- Injection system (petrol)
- Injection system (diesel)
- Exhaust system
- Transmission
- Clutch
- Manual gearbox
- Automatic gearbox
- Cardan gear
- Rear axle and shafts
- Chassis
- Front suspension
- Rear suspension
- Steering
- Wheels and tires
- Brake system
- Body
- Body elements
- Electrical equipment
- Equipment and devices
- Electrical circuits