
Attention: Instructions for removing the shock absorber and coil spring are given at the end of the chapter.
Attention: For a car with air suspension, you must remove the fuse No. 6 of the compressor power supply circuit to supply air. This prevents unwanted regulatory action of the system.
Withdrawal
Remove the rear shelf, see p. 145.
Unscrew the 2 loudspeaker fastening screws, disconnect the plug and remove the loudspeaker.
Mark the position of the rear wheels in relation to the hubs with paint. This will allow the balanced wheel to return to its original position. When loosening the wheel bolts, the vehicle must be on its wheels. Raise the car from behind and remove the rear wheels.
Remove wheel arch trim.
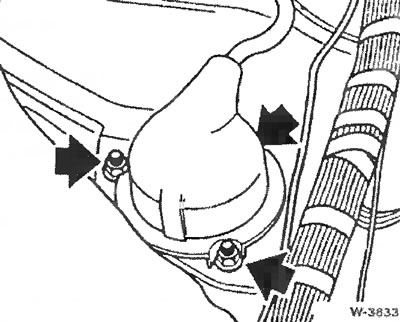
Raise the insulating mat next to the seat belt reel mechanism. Remove the rubber cover from the top of the suspension strut and remove the 3 nuts.
For a car with EOS (shock absorber control system) disconnect the plug.
Support the wheel hub bracket through the wooden lining with a garage jack.
Attention: If this is not done, then after releasing the upper mount, the suspension strut falls down. If dropped, the propeller shaft and brake hose may be damaged.
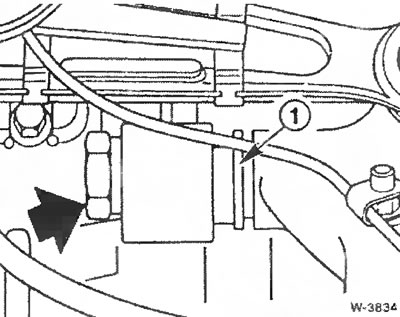
Unbolt suspension strut to wheel hub bracket.
Lower the wheel hub bracket slightly and remove the suspension strut.
Attention: The brake hose must not be stretched.
Caution: Store the shock absorber only in a vertical position, otherwise it may cause rumbling noises during operation. Troubleshooting: Before installing the shock absorber with the piston rod extended and in a vertical position, it is necessary to stand for 24 hours at room temperature (+20°C).
Installation
Check shock absorber.
Insert the suspension strut and screw it at the top with new self-locking nuts, without tightening the fastener too much.
Insert the bushing -1- into the wheel hub bracket to secure the suspension strut. Screw in the hexagon head bolt, but do not tighten.
Tighten the strut attachment at the top to 20 Nm.
Remove garage jack.
Tighten the rear wheel bolts. Do not grease wheel bolts. Attach the wheels so that the marks applied before removal coincide. Lower the vehicle and tighten the wheel bolts crosswise to 100 Nm.
Bring the car to the normal position, that is, it must be on all wheels and must be loaded in in accordance with the instructions.
Tighten the suspension strut lower bolt to 125 Nm.
On vehicles with EDC, connect the plug connector.
Install the rubber cover on the top of the shock absorber.
Attach the loudspeaker, connect the plug and fasten the loudspeaker with screws.
Install rear shelf.
Shock absorber assembly
Attention. The shock absorber and coil spring are removed and installed in the same way as for front axle.
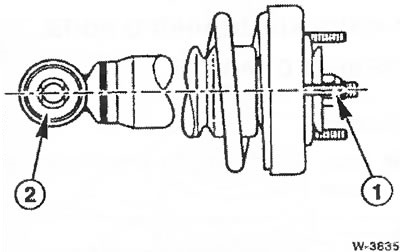
When assembling the shock-absorbing strut of the rear axle, it is necessary to ensure that the pin -1- of the thrust bearing housing is located in the same plane with the axis of the rubber support hole -2-, which must be opposite the bushing in the wheel hub bracket.
Tighten the thrust bearing nut on the piston rod to 25 Nm.