
Table of contents: Removal ↓ Installation ↓
- Home
- BMW 5 Series
- E39
- Transmission
- Rear axle
- Removal and installation the propeller shaft / rear axle main gear
Removal and installation the propeller shaft / rear axle main gear (BMW 5 Series E39)
Removal
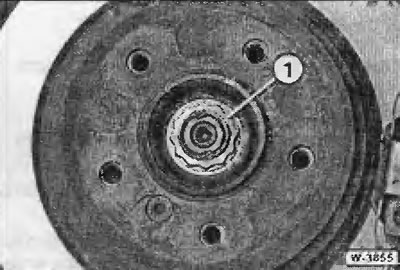
Unscrew nut "1" securing the driveshaft end to the wheel hub.
Note: The nut is quite firmly seated. Therefore, for safety reasons, the nut should be unscrewed when the car is standing on all 4 wheels.
Mark the position of the rear wheels relative to the hubs with paint. This will allow the balanced wheel to be installed in its original position. When unscrewing the wheel bolts, the car must stand on its wheels. Raise the car from behind and remove the rear wheels.
Disconnect from the main gear cardan shaft, transmitting torque from the power unit.
Remove the rear stabilizer. To do this, unscrew the stabilizer attachment to the pressure rods on the left and right. Unscrew the rubber mounts to the rear axle beam and remove them together with the stabilizer.
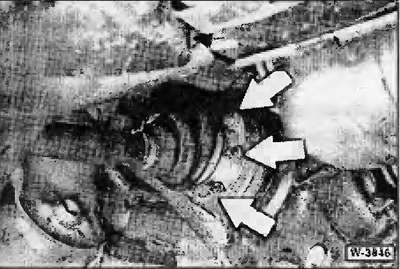
Loosen the fastening of both cardan shafts at the "arrow" differential and tie the cardan shafts with wire to the bottom of the body.
Caution: The cardan shafts must not hang down, as this will subject the outer cardan joints to increased loads.
Support the final drive with a wooden block using a garage jack.
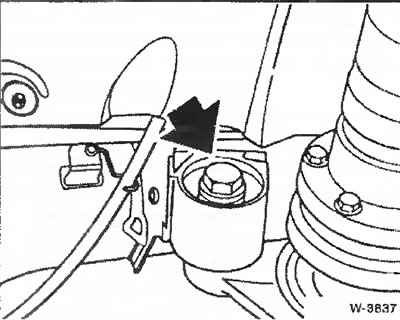
Unscrew the nut.
Remove the subsequent muffler exhaust systems.
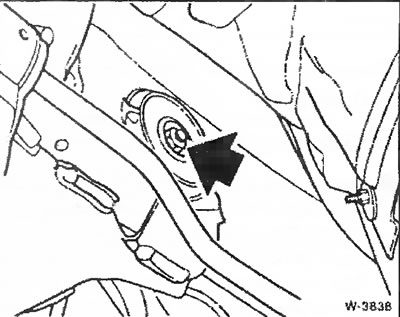
Unscrew the nuts on the left and right.
Lower the main gear and disconnect it from the flange of the cardan shaft coming from the power unit.
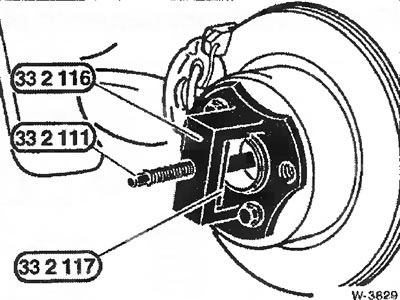
Press the driveshaft shaft out of the wheel hub. This requires an appropriate device, such as KLAIS1IS1 KL-041 or BMW, see figure. Fasten the bracket 332116 to the hub with two wheel bolts and screw the lead screw 332111 through the threaded hole in the element 332117 until it squeezes the shank out of the hub.
Remove the cardan shaft.
Installation
Attach the cardan shafts and hang them on the wire.
Insert the driveshaft tailpiece into the hub using a device such as bracket 332116 and lead screw 332119 with threaded sleeve 332115. To do this, first screw the lead screw onto the driveshaft tailpiece. Screw the threaded sleeve onto the other end of the lead screw and tighten it, resting the sleeve on the bracket. In this case, the driveshaft tailpiece is pulled into the hub. Make sure that the splines on the tailpiece and hub are positioned correctly before pulling in the tailpiece.
Lightly lubricate the new flanged nut for attaching the tailpiece to the hub on the contact surface side with oil and screw it in without tightening.
Attach the final drive and secure with new self-locking nuts.
Tightening torques for fasteners:
- main gear to rear axle beam front (tightening through bolts) - 180 Nm;
- main gear to the rear axle beam at the rear - 105 Nm.
Install a post-singing muffler.
Install on final drive cardan shaft, coming from the power unit.
Place the cardan shafts on the differential flanges and tighten the fasteners using a torque wrench. Before tightening the bolts, do not forget to install the locking plates. The tightening torque is determined by the thread diameter of the bolts and their design.
- Cap screws (internal splines) M10 - 85 Nm. Bolts with cylindrical head M10 and locking teeth (bolts and washers are replaced with new ones) - 95 Nm.
M12 cylindrical head bolts - 110 Nm.
Slotted head bolts M10 - 85 Nm:
- with ribbing for locking M8 - 85 Nm;
- with ribbing for locking M10 -100 Nm;
- with fins for locking M12 -180 Nm.
Remove the wire used to hang the drive shafts.
Tighten the stabilizer mount. Tighten the push rod mounting nuts to 40 Nm.
Tighten the rear wheel mounting bolts. Do not lubricate the wheel bolts. Position the wheels so that the marks made before removal match. Lower the vehicle.
The flange nuts are easy to lubricate and tighten to 300 Nm.
To prevent them from loosening themselves, crush the collars of the nuts. To do this, drive the collars with a pin into the grooves on the shanks of the cardan shafts.
Tighten the wheel bolts crosswise to a torque of 100 Nm.
Check and top up if necessary final drive oil level.
This article is available at russian, bulgarian, belarusian, ukrainian, serbian, croatian, romanian, polish, slovak, hungarian
Article verified: Ilyinsky Matvey
Share information:
Previous articles
БМВ E39: Rear axle
Next articles
Similar articles on other types of BMW cars:
Removal and installation the rear axle BMW 3 Series E21 (1975-1983)
Removal and installation the propeller shaft BMW 3 Series E30 (1982-1994)
Changing the oil in the main gear (rear axle) BMW 7 Series E32 (1986-1994)
Removal and installation the rear axle gearbox BMW 7 Series E38 (1994-2001)
Pressing out and pressing in the axle shaft into the flange (the axle… BMW X3 E83 (2003-2010)
Removal and installation the front axle drive shaft BMW X5 E53 (1999-2006)
Link in different formats to this page
Visitor comments
No comments yet
- General information
- Governing bodies
- Manual
- Maintenance
- Power unit
- Engine repair
- Lubrication system
- Cooling system
- Ignition system
- Supply system
- Injection system (gasoline)
- Injection system (diesel)
- Exhaust system
- Transmission
- Clutch
- Car gearbox
- Front axle
- Rear axle
- Chassis
- Steering
- Brake system
- Wheels and tires
- Body
- Interior
- Exterior
- Heating system
- Electrical equipment
- Equipment and devices
- Power devices
- Windscreen wipers
- Electrical circuits
- General information
- Manual
- Maintenance
- Power unit
- Engine repair
- Ignition system
- Engine lubrication system
- Cooling system
- Fuel system (gasoline)
- Fuel system (diesel)
- Exhaust system
- Transmission
- Clutch
- Car gearbox
- Chassis
- Front and rear suspension
- Steering
- Brake system
- Body
- Exterior
- Interior
- Electrical equipment
- Heating system
- Equipment and devices
- Power devices
- Electrical circuits
- General information
- Manual
- Maintenance
- Power unit
- Engine in a car
- Engine overhaul
- Cooling system
- Supply system
- Ignition system
- Control system
- Transmission
- Clutch
- Manual gearbox
- Automatic gearbox
- Transmission line
- Chassis
- Steering
- Front suspension
- Rear suspension
- Brake system
- Body
- Body elements
- Car care and painting
- Electrical equipment
- Heater and air conditioner
- Equipment and devices
- Starter and generator
- Electrical circuits
- General information
- Operation and maintenance
- Specifications
- Power unit
- Engine repair
- Cooling and lubrication system
- Supply system
- Ecotronic power supply system
- Fuel injection system
- Ignition system
- Transmission
- Clutch
- Gearbox BMW 242/4
- Gearbox Getrag 262/8
- Gearbox Getrag 265/6
- Automatic gearbox
- Cardan gear
- Rear axle
- Chassis
- Steering
- Front suspension
- Rear suspension
- Brake system
- Electrical equipment
- Equipment and devices
- Electrical circuits