
Table of contents: Removal ↓ Installation ↓
- Home
- BMW 5 Series
- E39
- Transmission
- Car gearbox
- Removal and installation the propeller shaft
Removal and installation the propeller shaft (BMW 5 Series E39)
Cardan shafts of various designs are installed on cars. In most cases, a cardan shaft with a front disc joint is installed. Cardan shafts are also installed that have an additional constant velocity cardan joint instead of a disc joint. It is necessary to pay attention to the differences during dismantling.
Raise the car.
Remove the exhaust system as a complete unit.
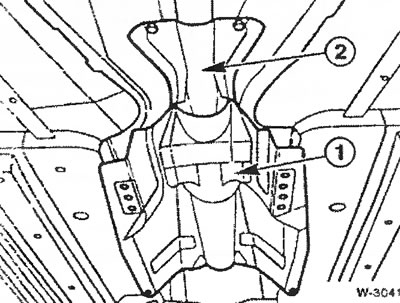
Remove heat shields "1" and "2" from the bottom of the vehicle.
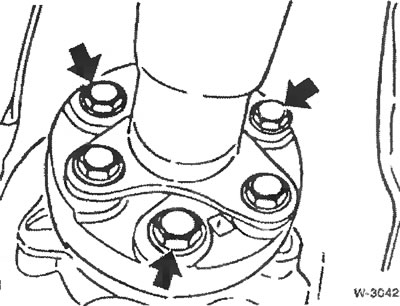
Loosen the disc joint mount on the gearbox. To prevent the cardan shaft from turning, hold it with a tension strap wrench.
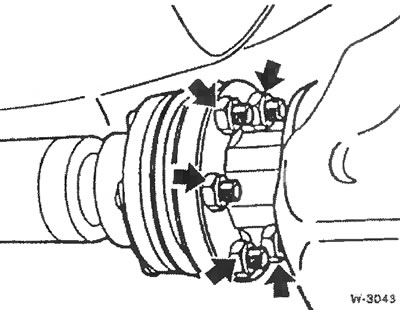
Loosen the nuts securing the cardan shaft to the main gear.
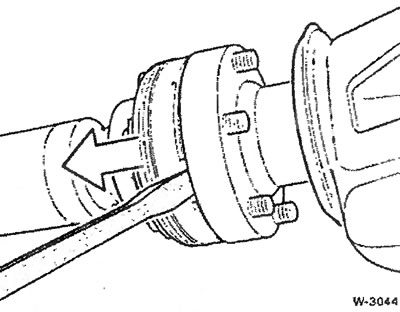
In the groove area, use a screwdriver to press the constant velocity cardan joint away from the flange.
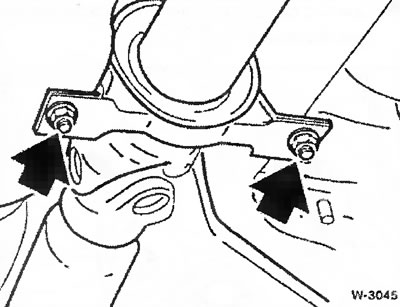
While holding the intermediate bearing, unscrew the mounting nuts.
Pull the cardan shaft down at the intermediate bearing and remove it from the centering journal at the gearbox.
If there are vibrations and noise coming from the cardan shaft, you can check its balance in the workshop. In addition, you should make sure that the joints are in good condition.
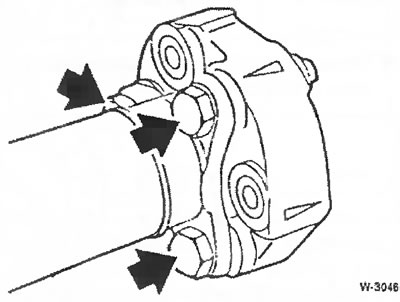
If the disc joint is worn out, it must be replaced, for which it is necessary to loosen the bolts "arrows". Install the new disc joint so that the arrows applied along the perimeter are facing the corresponding flange lugs.
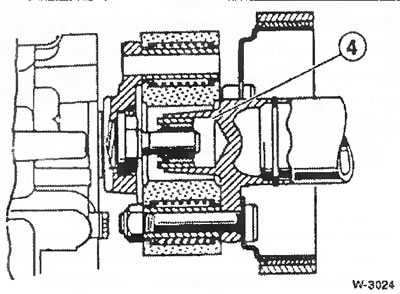
Before installation, check the alignment of the cardan shaft "4" at the disc joint. If necessary, treat the centering parts with Molykote Longtherm 2 grease. Replace damaged centering parts.
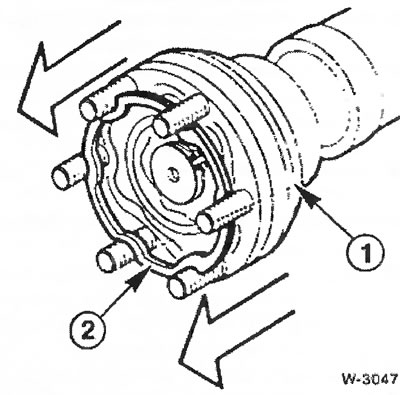
Extend the constant velocity joint "1" as far as it will go. If the grease has worn off, refill the joint with the grease specified by BMW.
Replace sealing gasket "2". First, clean the sealing surfaces of the constant velocity joint and flange from grease with a rag soaked in alcohol.
Place the cardan shaft with the constant velocity cardan joint extended from it onto the flange at the final drive.
Screw the disc joint to the gearbox flange. Tightening torques for the mounting bolts: M8 - 45 Nm; M10 - 70 Nm; M12 - 80 Nm.
Tighten the intermediate bearing mount to a torque of 22 Nm.
Screw on the exhaust system heat shields
Install the exhaust system.
Lower the car.
[The original article is posted on the resource BMWMan.ru]
Removal
Raise the car.
Remove the exhaust system as a complete unit.
Remove heat shields "1" and "2" from the bottom of the vehicle.
Loosen the disc joint mount on the gearbox. To prevent the cardan shaft from turning, hold it with a tension strap wrench.
Loosen the nuts securing the cardan shaft to the main gear.
In the groove area, use a screwdriver to press the constant velocity cardan joint away from the flange.
Caution: Do not allow the cardan shaft to fall onto the joints. This will cause the rubber seal to be compressed, especially at the constant velocity cardan joint.
While holding the intermediate bearing, unscrew the mounting nuts.
Pull the cardan shaft down at the intermediate bearing and remove it from the centering journal at the gearbox.
Note: Protect the constant velocity joint from dirt with a transport cover or a plastic bag.
Installation
If there are vibrations and noise coming from the cardan shaft, you can check its balance in the workshop. In addition, you should make sure that the joints are in good condition.
Note: Cardan shafts are balanced as a set, so they can only be replaced as a set. Worn cardan shafts must be replaced.
If the disc joint is worn out, it must be replaced, for which it is necessary to loosen the bolts "arrows". Install the new disc joint so that the arrows applied along the perimeter are facing the corresponding flange lugs.
Before installation, check the alignment of the cardan shaft "4" at the disc joint. If necessary, treat the centering parts with Molykote Longtherm 2 grease. Replace damaged centering parts.
Extend the constant velocity joint "1" as far as it will go. If the grease has worn off, refill the joint with the grease specified by BMW.
Replace sealing gasket "2". First, clean the sealing surfaces of the constant velocity joint and flange from grease with a rag soaked in alcohol.
Place the cardan shaft with the constant velocity cardan joint extended from it onto the flange at the final drive.
Attention: When installing, the cardan joint should not be pushed onto the cardan shaft, since this may cause the grease to squeeze out the sealing gasket, resulting in the joint not being sealed. By pressing on the cardan joint from all sides along the perimeter, evenly pull the cardan shaft to the main gear flange. Use new self-locking nuts, tighten the fastening to a torque of 70 Nm.
Screw the disc joint to the gearbox flange. Tightening torques for the mounting bolts: M8 - 45 Nm; M10 - 70 Nm; M12 - 80 Nm.
Tighten the intermediate bearing mount to a torque of 22 Nm.
Screw on the exhaust system heat shields
Install the exhaust system.
Lower the car.
[The original article is posted on the resource BMWMan.ru]
This article is available at russian, bulgarian, belarusian, ukrainian, serbian, croatian, romanian, polish, slovak, hungarian
Article verified: Ilyinsky Matvey
Share information:
Previous articles
БМВ E39: Car gearbox
Next articles
Similar articles on other types of BMW cars:
Removal and installation the propeller shaft BMW 3 Series E21 (1975-1983)
Removal and installation the propeller shaft BMW 3 Series E30 (1982-1994)
Removal and installation the cardan shaft and elastic coupling BMW 7 Series E38 (1994-2001)
Cylinder Head Cover — Removal and Installation BMW 7 Series E32 (1986-1994)
Half shaft — removal and installation of the left or right half shaft BMW X3 E83 (2003-2010)
Removal and installation the front axle drive shaft BMW X5 E53 (1999-2006)
Removal and installation the propeller shaft BMW 3 Series E21 (1975-1983)
Removal and installation the propeller shaft BMW 3 Series E30 (1982-1994)
Removal and installation the cardan shaft and elastic coupling BMW 7 Series E38 (1994-2001)
Cylinder Head Cover — Removal and Installation BMW 7 Series E32 (1986-1994)
Half shaft — removal and installation of the left or right half shaft BMW X3 E83 (2003-2010)
Removal and installation the front axle drive shaft BMW X5 E53 (1999-2006)
Link in different formats to this page
Visitor comments
No comments yet
- General information
- Governing bodies
- Manual
- Maintenance
- Power unit
- Engine repair
- Lubrication system
- Cooling system
- Ignition system
- Supply system
- Injection system (gasoline)
- Injection system (diesel)
- Exhaust system
- Transmission
- Clutch
- Car gearbox
- Front axle
- Rear axle
- Chassis
- Steering
- Brake system
- Wheels and tires
- Body
- Interior
- Exterior
- Heating system
- Electrical equipment
- Equipment and devices
- Power devices
- Windscreen wipers
- Electrical circuits
- General information
- Manual
- Maintenance
- Power unit
- Engine repair
- Ignition system
- Engine lubrication system
- Cooling system
- Fuel system (gasoline)
- Fuel system (diesel)
- Exhaust system
- Transmission
- Clutch
- Car gearbox
- Chassis
- Front and rear suspension
- Steering
- Brake system
- Body
- Exterior
- Interior
- Electrical equipment
- Heating system
- Equipment and devices
- Power devices
- Electrical circuits
- General information
- Manual
- Maintenance
- Power unit
- Engine in a car
- Engine overhaul
- Cooling system
- Supply system
- Ignition system
- Control system
- Transmission
- Clutch
- Manual gearbox
- Automatic gearbox
- Transmission line
- Chassis
- Steering
- Front suspension
- Rear suspension
- Brake system
- Body
- Body elements
- Car care and painting
- Electrical equipment
- Heater and air conditioner
- Equipment and devices
- Starter and generator
- Electrical circuits
- General information
- Operation and maintenance
- Specifications
- Power unit
- Engine repair
- Cooling and lubrication system
- Supply system
- Ecotronic power supply system
- Fuel injection system
- Ignition system
- Transmission
- Clutch
- Gearbox BMW 242/4
- Gearbox Getrag 262/8
- Gearbox Getrag 265/6
- Automatic gearbox
- Cardan gear
- Rear axle
- Chassis
- Steering
- Front suspension
- Rear suspension
- Brake system
- Electrical equipment
- Equipment and devices
- Electrical circuits