
Cars Mazda Cars Mitsubishi Cars Toyota Cars Chevrolet Cars AvtoVAZ Cars Kia Cars Nissan
English Русский
Български
Беларускі
Український
Српски
Hrvatski
Română
Polski
Slovenský
Magyar
| Articles | Contacts | Sitemap |   
BMWman.ru


3 series   5 series   7 series   BMW X3   BMW X5   BMW X6

E38 (1994-2001) E32 (1986-1994)
  • Home
  • BMW 7 Series
  • E38
  • Transmission
  • Cardan and drive shafts
  • Removal and installation the cardan shaft and elastic coupling

Removal and installation the cardan shaft and elastic coupling (BMW 7 Series E38)

            0

1. Remove the exhaust system assembly and its heat shields (see chapter Fuel and exhaust systems).

2. Give away the bolts and nuts.
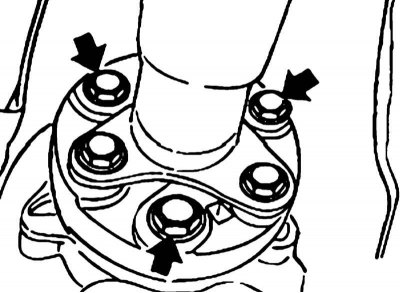
2. Give away the bolts and nuts.


Bolts for fastening the propeller shaft to the transmission output shaft flange
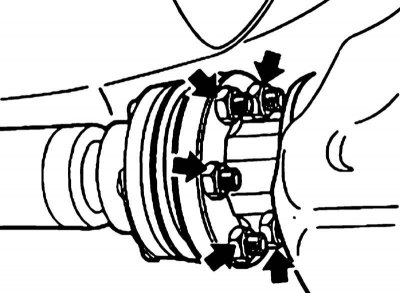
Bolts for fastening the propeller shaft to the transmission output shaft flange


Nuts securing the differential to the transmission output shaft flange

When installing, use new self-locking nuts; tighten threaded connections with nuts, not bolts.

When installing, use new self-locking nuts; tighten threaded connections with nuts, not bolts.


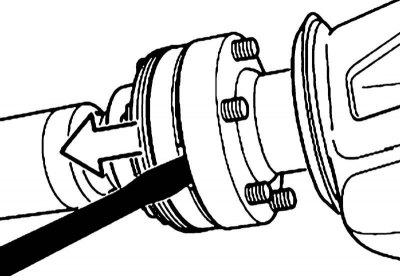
3. Insert a screwdriver into the CV joint groove, press and disconnect the joint from the output shaft flange.


3. Insert a screwdriver into the CV joint groove, press and disconnect the joint from the output…


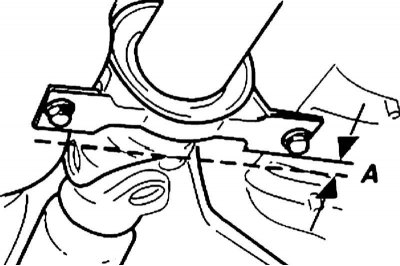
4. Remove the intermediate support.

The intermediate support should be installed with a preliminary tension in the direction of vehicle movement by a size (A) of 2÷4 mm.


Do not allow the cardan shaft to fall, otherwise the joints and the rubber cuff of the CV joint may be damaged.
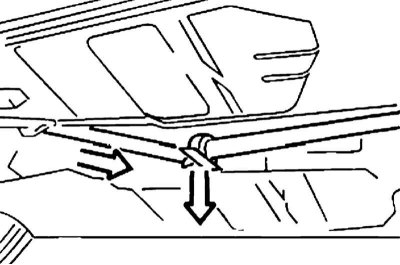

Do not allow the cardan shaft to fall, otherwise the joints and the rubber cuff of the CV joint may…


5. Press on the intermediate support so that the cardan shaft bends downwards. Disconnect the CV joint from the rear axle gearbox and remove the cardan shaft from the transmission output shaft flange.

To avoid contamination of the CV joint, it should be covered.
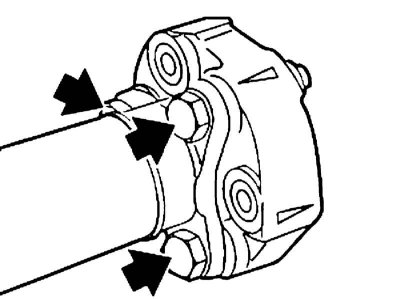

To avoid contamination of the CV joint, it should be covered.


6. If necessary, loosen the fasteners and remove the elastic coupling.


When installing the coupling, the arrows on its body must point towards the flange cheek.
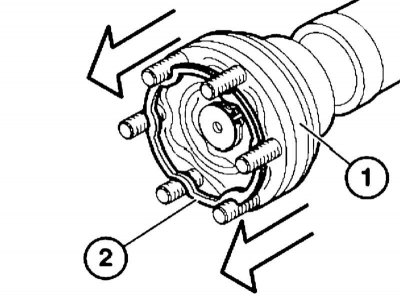

When installing the coupling, the arrows on its body must point towards the flange cheek.


7. Add grease to the joint. Extend the CV joint (1) as far as it will go and degrease the mating surfaces of the CV joint and the flange of the main gear pinion. Replace the gasket (2). Mount the propeller shaft with the extended CV joint on the flange of the main gear pinion. Alternately tightening any two opposite nuts, evenly insert the CV joint into the flange of the main gear pinion. Then tighten the remaining nuts.

Use new nuts. Do not push the CV joint back during assembly, as the grease may push out the sealing ring and compromise the seal.
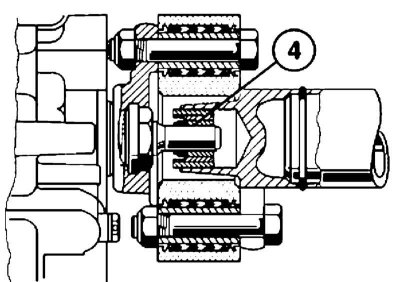

Use new nuts. Do not push the CV joint back during assembly, as the grease may push out the sealing…


8. Check and lubricate the centering element (4), replace the damaged centering element.

The article text was copied from an online resource BMWman.ru

This article is available at russian, bulgarian, belarusian, ukrainian, serbian, croatian, romanian, polish, slovak, hungarian
Article verified: Polikarpov Saveliy

Share information:
Previous articles
БМВ E38: Cardan and drive shafts
Next articles

General information about cardan and drive shafts
Cardan and Drive Shaft Specifications
Replacing the CV joint of the propeller shaft
Replacing the intermediate support of the propeller shaft
Removal and installation the rear axle gearbox
Removal and installation drive shafts
Replacing drive shaft dust boots


Similar articles on other types of BMW cars:
Cardan shaft — removal and installation BMW 3 Series E46 (1998-2006, petrol)
Removal and installation the intermediate shaft BMW 3 Series E21 (1975-1983)
Removal and installation the cardan transmission BMW 5 Series E12 (1972-1981)
Removal and installation the propeller shaft BMW 5 Series E34 (1988-1996)
Half shaft — removal and installation of the left or right half shaft BMW X3 E83 (2003-2010)
Replacing the flexible coupling of the cardan shaft BMW X5 E53 (1999-2006)
Link in different formats to this page


Visitor comments

No comments yet


How much 44 + 25 =


BMW E38 (1994-2001) 
  • General information
  • Introduction to guide
  • Manual
  • Maintenance
  • Power unit
  • Engine M60/1, M60/2 (petrol)
  • M62 engine (petrol)
  • M57 engine (diesel)
  • M67 engine (diesel)
  • Cooling system
  • Fuel system (petrol)
  • Fuel system (diesel)
  • Exhaust system
  • Ignition and control systems
  • Charge and launch systems
  • Transmission
  • Clutch
  • Mechanical gearbox
  • Automatic gearbox
  • Cardan and drive shafts
  • Chassis
  • Brake system
  • Front suspension
  • Rear suspension
  • Steering
  • Body
  • Exterior
  • Interior
  • Electrical equipment
  • Equipment and devices
  • Lighting
  • Heating and air conditioning
  • Electrical circuits
BMW E32 (1986-1994) 
  • General information
  • Care and maintenance
  • Power unit
  • Minor engine repair
  • Engine overhaul
  • Lubrication system
  • Cooling system
  • Ignition system
  • Supply system
  • Injection system (petrol)
  • Injection system (diesel)
  • Exhaust system
  • Transmission
  • Clutch
  • Manual gearbox
  • Automatic gearbox
  • Cardan gear
  • Rear axle and shafts
  • Chassis
  • Front suspension
  • Rear suspension
  • Steering
  • Wheels and tires
  • Brake system
  • Body
  • Body elements
  • Electrical equipment
  • Equipment and devices
  • Electrical circuits
BMWman.ru © 2017-2026 · Mobile version · News and articles · Sitemap: EN BG BY UA RS HR RO PL SK HU · Feedback · Site search
3er E21 · 3er E30 · 3er E36 · 3er E46 [petrol] · 3er E46 · 5er E12 · 5er E28 · 5er E34 · 5er E39 · 7er E32 · 7er E38 · X3 E83 · X5 E53 ·
This site uses cookies 🍪, without them some features simply would not work.