
Note. When installing, you will need new nuts securing the front and rear joints of the driveshaft.
Withdrawal
1. Chock the front wheels. Raise the rear of the car and place it on stands (cm. "Lifting and placing the car on supports").
2. Remove the exhaust system and heat shields (see chapter 4A). If necessary (for easier access to the cardan shaft) remove the exhaust brackets.
3. On models where the cardan shaft is rigidly attached to the gearbox flange, mark the position of the cardan shaft relative to the flange, then unscrew the fastening nuts. Discard the nuts as you will need new ones during installation.
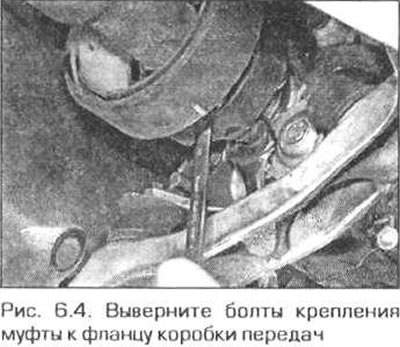
4. If the cardan shaft is connected to the gearbox flange through a rubber coupling, mark the relative position of the flange, cardan shaft and rubber coupling. Loosen the nuts and bolts securing the clutch to the gearbox (fig 6.4). Discard the nuts as you will need new ones during installation.
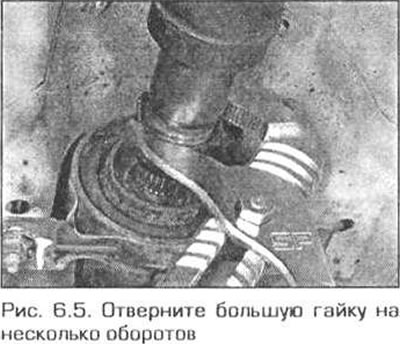
5. Using a large open-end wrench or adjustable wrench, loosen the threaded ring next to the intermediate bearing a few turns (pic. 6.5).
6. Mark with a felt-tip pen the position of the cardan shaft relative to the final drive flange. Loosen the driveshaft to final drive nuts and discard as you will need new ones during installation.
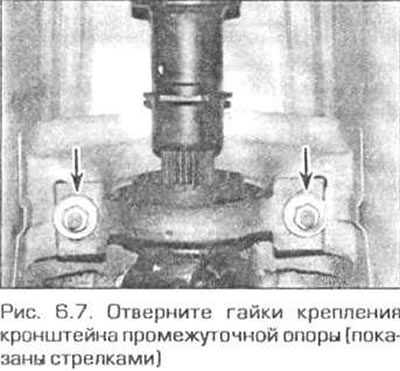
7. With the help of an assistant, support the cardan shaft and unscrew the nuts securing the intermediate support bracket (pic. 6.7). Slide both parts of the propeller shaft towards each other, then lower the central part of the propeller shaft and disconnect it from the gearbox and from the final drive. Remove the propeller shaft from under the vehicle.
Note. Do not separate parts of the cardan from each other without marking their relative position. If the driveshaft is not assembled correctly, it may become unbalanced, resulting in vibration when the vehicle is moving.
8. Inspect the rubber sleeve (if it exists), intermediate support and cardan joints (see paragraphs 7, 8 and 9). Inspect the gearbox flange pin and driveshaft bushing for damage or wear. Replace defective parts if necessary.
Installation
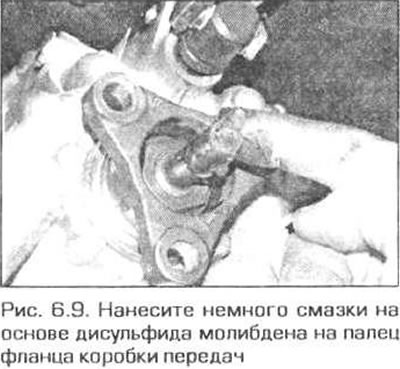
9. Apply some lubricant containing molybdenum disulphide (BMW recommends Molykote Longterm 2 grease) on the gearbox flange pin and on the propeller shaft bushing and install the propeller shaft in place (pic. 6.9).
10. Align the marks made before removal and connect the cardan shaft to the gearbox and final drive flanges. Install the intermediate support bracket nuts and lightly tighten them.
11. Insert new bolts into the rear connection of the cardan shaft and tighten them to the required torque.
12. On models where the cardan shaft is rigidly attached to the gearbox flange, screw in new nuts and tighten them to the required torque.
13. On rubber coupled models, install bolts and new nuts. Tighten them to the required torque. Remember that you can only rotate the nut / bolt from the flange side so as not to damage the rubber sleeve.
14. Securely tighten the propshaft intermediate bearing bushing nut.
15. Loosen the nuts securing the intermediate support bracket. Slide the bracket all the way forward to take up the play, then load the bearing by moving the bracket forward another 4-6mm. While holding the bracket in this position, tighten the nuts to the correct torque.
16. Install exhaust system components (see chapter 4A).