
Table of contents: Input shaft seal ↓ Output shaft seals ↓
- Home
- BMW 3 Series
- E46
- Transmission
- Cardan and drive shafts
- Main Gear Seals — Replacement
Main Gear Seals — Replacement (BMW 3 Series E46)
Input shaft seal
Note: You will need a new flange nut retaining cap during installation.
1. Drain the oil from the final drive (see paragraph 10).
2. Remove the main gear unit (see paragraph 2) and clamp the knot in a vice.
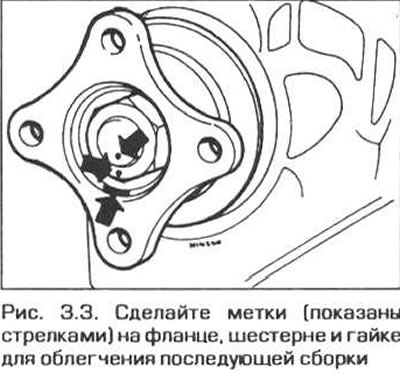
3. Remove the locking cap and mark the relative positions of the nut, flange and input shaft of the main gear (Fig. 3.3). Discard the cap, as you will need a new one during installation.
4. Screw a steel strip to the flange to prevent the flange from turning. Unscrew the flange fastening nut, counting the number of turns to remove the nut.
5. Using a suitable puller, remove the flange from the shaft, then remove the boot. If the boot shows signs of wear, replace it.
6. Use a screwdriver to pry up the input shaft seal. Clean the seating surface under the seal.
7. Lubricate the lip of the new seal, then press it flush with the outer surface of the housing. Use a piece of pipe of the appropriate diameter for pressing.
8. Put on the boot, then install the flange, aligning the marks made before removing it. Screw the nut the number of turns counted earlier and align the marks on the nut and flange.
Caution! Do not overtighten the flange mounting nut. If you overtighten the nut, the spacer washer located behind the flange may become deformed. In this case, the washer will have to be replaced. This will require disassembling the main gear (see paragraph 1).
9. Secure the nut with a new lock cap.
10. Install the main gear in place (see paragraph 2), then put oil in it (see paragraph 10).
Output shaft seals
Note: When installing, you will need new bolts for fastening the drive shafts to the final drive flanges, as well as spring rings for fastening the final drive flanges.
11. Drain the oil from the final drive (see paragraph 10).
12. Remove the bolts securing the input shaft to the final drive flange. Secure the end of the input shaft with wire. Note: Do not allow the input shaft to hang under its own weight as this will damage the constant velocity joint.
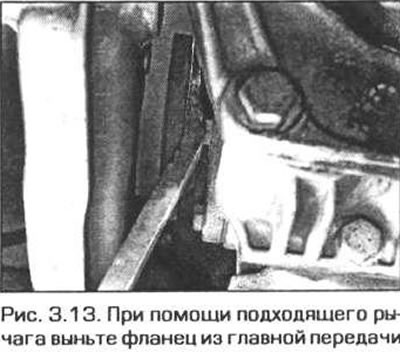
13. Using a suitable lever, remove the flange from the final drive. Be careful not to damage the boot or the final drive housing (Fig. 3.13). Remove the flange, then remove the boot. If the boot shows signs of wear, replace it.
14. Carefully remove the cuff from the main gear housing. Clean the seating surface under the cuff.
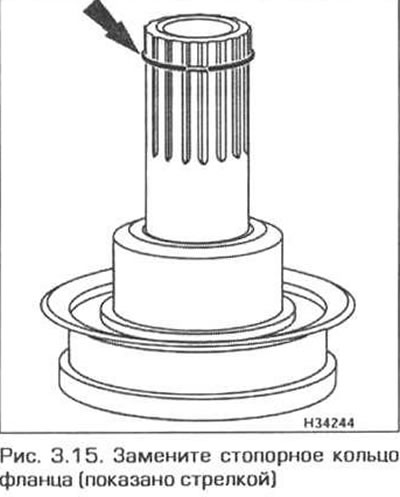
15. Remove the flange retaining ring from the splined shaft (Fig. 3.15).
16. Install a new snap ring. Make sure the ring fits into the groove of the shaft.
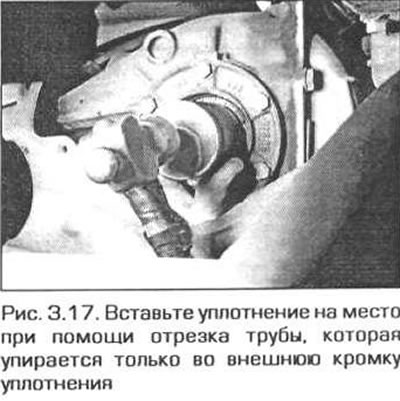
17. Apply a little oil to the edge of the new seal and press it into the main gear housing until it stops. If necessary, use a piece of pipe of a suitable diameter (Fig. 3.17).
18. Put on the boot, then insert the flange. Make sure that the flange retaining ring is in place.
19. Align the drive shaft with the final drive flange, insert new flange mounting bolts and tighten them to the specified torque.
20. Fill the final drive with oil (see paragraph 10).
This article is available at russian, bulgarian, belarusian, ukrainian, serbian, croatian, romanian, polish, slovak, hungarian
Article verified: Ilyinsky Matvey
Share information:
Previous articles
БМВ E46: Cardan and drive shafts
Next articles
Similar articles on other types of BMW cars:
Adjusting the lateral clearance in the engagement of the main gear… BMW 5 Series E12 (1972-1981)
Removal and installation the propeller shaft / rear axle main gear BMW 5 Series E39 (1995-2003)
Changing the oil in the main gear (rear axle) BMW 7 Series E32 (1986-1994)
Main gear drive flange oil seal BMW X3 E83 (2003-2010)
Replacement of the distribution main BMW X5 E53 (1999-2006)
Link in different formats to this page
Visitor comments
No comments yet
- General information
- Manual
- Maintenance
- Power unit
- Engine repair
- Cooling system
- Power system (gasoline)
- Injection system (gasoline)
- Fuel system (diesel)
- Exhaust system
- Ignition system
- Charge and launch systems
- Transmission
- Car gearbox
- Clutch and drive shafts
- Chassis
- Brake system
- Suspension front and rear
- Steering
- Body
- Body care and repair
- Exterior
- Interior
- Electrical equipment
- Troubleshooting
- Lighting and signaling
- Equipment and devices
- Heater and air conditioner
- Electrical circuits
- General information
- Manual
- Repair on the road
- Weekly checks
- Maintenance
- Troubleshooting
- Power unit
- 4 cylinder engines
- 6 cylinder engines
- Engine overhaul
- Cooling and heating
- Fuel and exhaust system
- Starting and charging system
- Ignition system
- Transmission
- Clutch
- Mechanical gearbox
- Automatic gearbox
- Cardan and drive shafts
- Chassis
- Brake system
- Wheel suspension
- Steering
- Body
- Exterior
- Interior
- Electrical equipment
- Equipment and devices
- Electrical circuits
- General information
- Maintenance
- Power unit
- Engine repair
- Cooling system
- Ignition system
- Supply system
- Fuel injection system
- Exhaust system
- Transmission
- Clutch
- Car gearbox
- Front and rear axle
- Chassis
- Steering
- Brake system
- Body
- Exterior
- Interior
- Electrical equipment
- Heating system
- Equipment and devices
- Power devices
- Electrical circuits
- Power unit
- M10/M20 engine
- M40 engine
- Ignition system
- Lubrication system
- Cooling system
- Supply system
- Fuel injection
- Exhaust system
- Transmission
- Clutch
- Manual gearbox
- Front axle
- Rear axle
- Chassis
- Steering
- Brake system
- Body
- Exterior
- Interior
- Electrical equipment
- Heating system
- Equipment and devices
- Electrical circuits
- General information
- Specifications
- Operation and maintenance
- 4-cylinder engine
- Engine repair
- Cooling and lubrication system
- Supply system
- Ignition system
- 6-cylinder engine
- Engine repair
- Cooling and lubrication system
- Supply system
- Fuel injection system
- Ignition system
- Transmission
- Clutch
- 4-speed manual gearbox
- 5-speed manual gearbox
- Automatic gearbox
- Cardan and rear axle
- Chassis
- Steering
- Front suspension
- Rear suspension
- Brake system
- Electrical equipment
- Equipment and devices
- Electrical circuits