



- Home
- BMW 3 Series
- E46
- Transmission
- Cardan and drive shafts
- Drive shaft covers — replacement
Drive shaft covers — replacement (BMW 3 Series E46)
1. Remove the drive shaft (see paragraph 4).
2. Clean the drive shaft and clamp it in a vice.
3. On some models, the inner CV joint is mounted on a short shaft that can move inside the drive shaft. Remove the two clamps on the inner CV joint boot, then remove the boot from the joint.
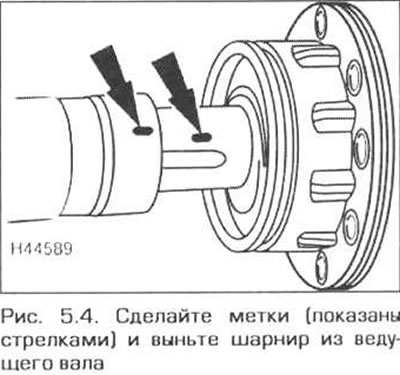
4. Mark the relative positions of the constant velocity joint shaft and the drive shaft, then remove the constant velocity joint shaft from the drive shaft (Fig. 5.4).
5. Remove the two outer joint boot clamps and remove both boots from the inner end of the drive shaft.
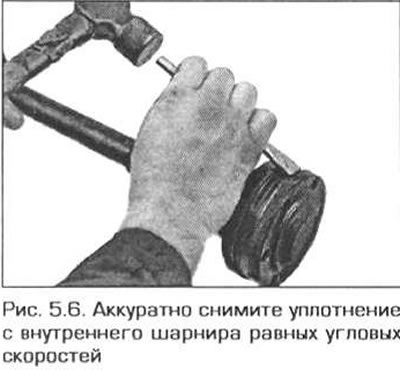
6. Remove the sealing cap from the inner constant velocity joint (Fig. 5.6).
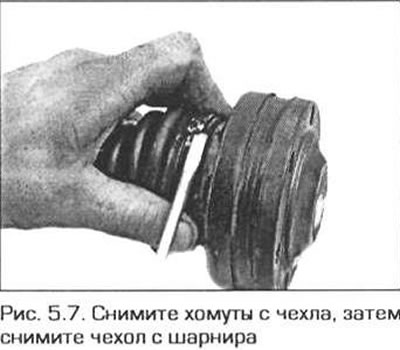
7. Remove the two clamps from the inner joint boot and slide the boot and dust cover from the joint onto the shaft (Fig. 5.7).
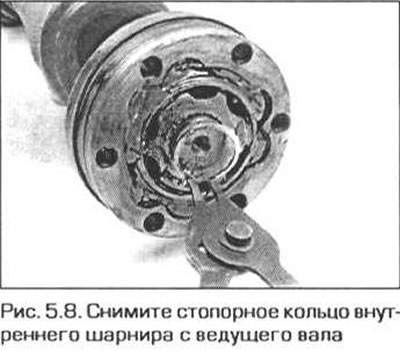
8. Remove the grease, then remove the inner joint retaining ring (Fig. 5.8).
9. Securely fasten the joint components, then remove it from the drive shaft (Fig. 5.9). If the joint does not come off, use a suitable puller. Do not disassemble the joint.
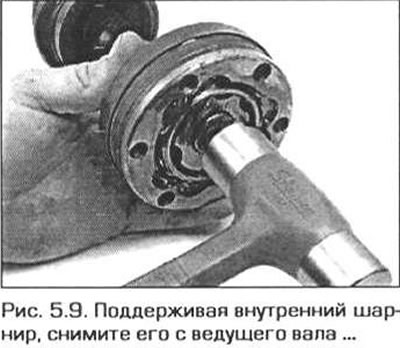
10. After removing the joint, remove the boot and dust cover from the drive shaft (Fig. 5.10).
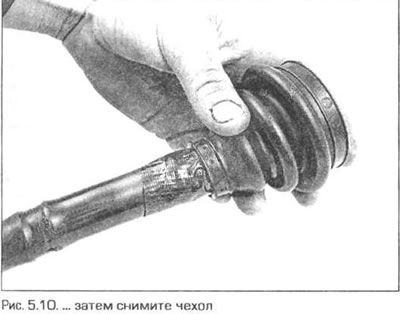
11. Remove the clamps from the outer joint boot, then remove the boot from the inner end of the drive shaft.
12. Wash the joints thoroughly in kerosene or other suitable solvent and dry them. Inspect the joints as follows.
13. Rock the inner joint link and observe the balls. There should be no signs of wear or damage on the balls.
14. Inspect the ball tracks. The tracks should not show signs of wear. Inspect the separator windows. The windows should not be damaged or worn.
15. If any of the components are worn or damaged, they must be replaced. The inner joint can be replaced separately, but if the outer joint is faulty, the drive shaft assembly must be replaced. If the joints are in good condition, purchase a repair kit that contains boots, clamps, an inner joint retaining ring, and the required amount of grease.
16. Place the new boots on the inner end of the drive shaft. Note that the outer joint boot is 55 mm long and the inner joint boot is 65 mm long.
17. Fill both joints with the grease provided in the repair kit.
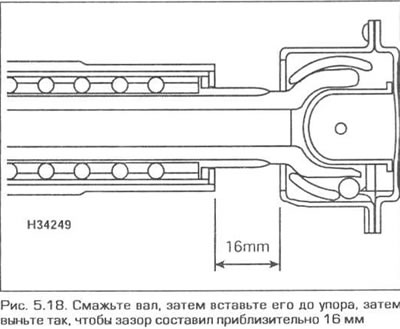
18. Lubricate the splines of the inner joint shaft. Align the marks made earlier, insert the inner joint shaft into the drive shaft until it stops, then pull it out so that the end of the joint is at a certain distance from the drive shaft (Fig. 5.18).
19. Place the boots on the hinges so that their edges are in the correct position on the shaft and hinges. Lift the outer edges of the boots to equalize the air pressure inside the boots.
20. Place the clamps on the inner hinge boot so that their locks are located on the same line as the rivet on the flange. Tighten the clamps.
21. Place the clamps on the outer hinge boot so that their locks are turned 180° relative to the locks on the inner hinge boot.
22. Wrap the tape around the splines of the drive shaft.
23. Place the new outer joint boot onto the drive shaft.
24. Fill the outer hinge with grease from the repair kit. While doing this, rock the hinge to get the grease inside. Place the remaining grease inside the boot.
25. Put the cover on and make sure that its edges are in the right places. Lift the outer edge of the cover to equalize the air pressure inside the cover.
26. Place a large metal clamp on the cover, tighten it, then bend it back and cut off the excess. Tighten the clamp of a smaller diameter in the same way.
27. Place the inner joint boot over the boot, then place them on the drive shaft.
28. Remove the tape from the splines of the drive shaft and put on the inner joint. Place the joint on the drive shaft until it stops and secure it with a retaining ring.
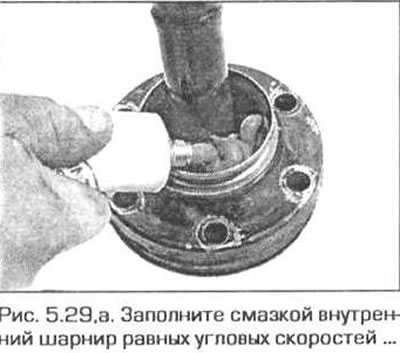
29. Fill the inner hinge and boot completely with grease (fig. 5.29,a.b).
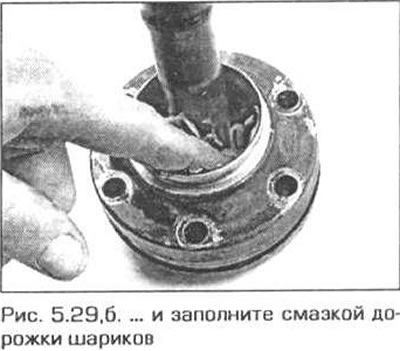
30. Put on the boot, then put the dust cover on the hinge. Make sure that the holes for the mounting bolts are aligned. Lift the outer edge of the boot to equalize the air pressure, then secure the boot with clamps (see item 26).
31. Apply a small amount of sealant and place the new sealing cap onto the inner hinge.
32. Make sure both joints turn smoothly and easily, then install the drive shaft onto the vehicle (see paragraph 4).
(The original source of the article is on the website: «BMWMAN.ru»)
2. Clean the drive shaft and clamp it in a vice.
Telescopic drive shaft
3. On some models, the inner CV joint is mounted on a short shaft that can move inside the drive shaft. Remove the two clamps on the inner CV joint boot, then remove the boot from the joint.
4. Mark the relative positions of the constant velocity joint shaft and the drive shaft, then remove the constant velocity joint shaft from the drive shaft (Fig. 5.4).
5. Remove the two outer joint boot clamps and remove both boots from the inner end of the drive shaft.
Other drive shafts
6. Remove the sealing cap from the inner constant velocity joint (Fig. 5.6).
7. Remove the two clamps from the inner joint boot and slide the boot and dust cover from the joint onto the shaft (Fig. 5.7).
8. Remove the grease, then remove the inner joint retaining ring (Fig. 5.8).
9. Securely fasten the joint components, then remove it from the drive shaft (Fig. 5.9). If the joint does not come off, use a suitable puller. Do not disassemble the joint.
10. After removing the joint, remove the boot and dust cover from the drive shaft (Fig. 5.10).
11. Remove the clamps from the outer joint boot, then remove the boot from the inner end of the drive shaft.
All drive shafts
12. Wash the joints thoroughly in kerosene or other suitable solvent and dry them. Inspect the joints as follows.
13. Rock the inner joint link and observe the balls. There should be no signs of wear or damage on the balls.
14. Inspect the ball tracks. The tracks should not show signs of wear. Inspect the separator windows. The windows should not be damaged or worn.
15. If any of the components are worn or damaged, they must be replaced. The inner joint can be replaced separately, but if the outer joint is faulty, the drive shaft assembly must be replaced. If the joints are in good condition, purchase a repair kit that contains boots, clamps, an inner joint retaining ring, and the required amount of grease.
Telescopic drive shaft
16. Place the new boots on the inner end of the drive shaft. Note that the outer joint boot is 55 mm long and the inner joint boot is 65 mm long.
17. Fill both joints with the grease provided in the repair kit.
18. Lubricate the splines of the inner joint shaft. Align the marks made earlier, insert the inner joint shaft into the drive shaft until it stops, then pull it out so that the end of the joint is at a certain distance from the drive shaft (Fig. 5.18).
19. Place the boots on the hinges so that their edges are in the correct position on the shaft and hinges. Lift the outer edges of the boots to equalize the air pressure inside the boots.
20. Place the clamps on the inner hinge boot so that their locks are located on the same line as the rivet on the flange. Tighten the clamps.
21. Place the clamps on the outer hinge boot so that their locks are turned 180° relative to the locks on the inner hinge boot.
Other drive shafts
22. Wrap the tape around the splines of the drive shaft.
23. Place the new outer joint boot onto the drive shaft.
24. Fill the outer hinge with grease from the repair kit. While doing this, rock the hinge to get the grease inside. Place the remaining grease inside the boot.
25. Put the cover on and make sure that its edges are in the right places. Lift the outer edge of the cover to equalize the air pressure inside the cover.
26. Place a large metal clamp on the cover, tighten it, then bend it back and cut off the excess. Tighten the clamp of a smaller diameter in the same way.
27. Place the inner joint boot over the boot, then place them on the drive shaft.
28. Remove the tape from the splines of the drive shaft and put on the inner joint. Place the joint on the drive shaft until it stops and secure it with a retaining ring.
29. Fill the inner hinge and boot completely with grease (fig. 5.29,a.b).
30. Put on the boot, then put the dust cover on the hinge. Make sure that the holes for the mounting bolts are aligned. Lift the outer edge of the boot to equalize the air pressure, then secure the boot with clamps (see item 26).
31. Apply a small amount of sealant and place the new sealing cap onto the inner hinge.
All drive shafts
32. Make sure both joints turn smoothly and easily, then install the drive shaft onto the vehicle (see paragraph 4).
(The original source of the article is on the website: «BMWMAN.ru»)
This article is available at russian, bulgarian, belarusian, ukrainian, serbian, croatian, romanian, polish, slovak, hungarian
Article verified: Ilyinsky Matvey
Share information:
Previous articles
БМВ E46: Cardan and drive shafts
Next articles
Similar articles on other types of BMW cars:
Removal and installation the wheel drive shaft BMW 5 Series E12 (1972-1981)
Checking the condition of the protective covers of the drive shafts BMW 5 Series E28 (1981-1988)
Drive shaft flange seals — replacement BMW 7 Series E32 (1986-1994)
Cardan and Drive Shaft Specifications BMW 7 Series E38 (1994-2001)
Timing mechanism — replacement of the drive chain BMW X3 E83 (2003-2010)
Replacing the drive shaft protective covers BMW X5 E53 (1999-2006)
Removal and installation the wheel drive shaft BMW 5 Series E12 (1972-1981)
Checking the condition of the protective covers of the drive shafts BMW 5 Series E28 (1981-1988)
Drive shaft flange seals — replacement BMW 7 Series E32 (1986-1994)
Cardan and Drive Shaft Specifications BMW 7 Series E38 (1994-2001)
Timing mechanism — replacement of the drive chain BMW X3 E83 (2003-2010)
Replacing the drive shaft protective covers BMW X5 E53 (1999-2006)
Link in different formats to this page
Visitor comments
No comments yet
- General information
- Manual
- Maintenance
- Power unit
- Engine repair
- Cooling system
- Power system (gasoline)
- Injection system (gasoline)
- Fuel system (diesel)
- Exhaust system
- Ignition system
- Charge and launch systems
- Transmission
- Car gearbox
- Clutch and drive shafts
- Chassis
- Brake system
- Suspension front and rear
- Steering
- Body
- Body care and repair
- Exterior
- Interior
- Electrical equipment
- Troubleshooting
- Lighting and signaling
- Equipment and devices
- Heater and air conditioner
- Electrical circuits
- General information
- Manual
- Repair on the road
- Weekly checks
- Maintenance
- Troubleshooting
- Power unit
- 4 cylinder engines
- 6 cylinder engines
- Engine overhaul
- Cooling and heating
- Fuel and exhaust system
- Starting and charging system
- Ignition system
- Transmission
- Clutch
- Mechanical gearbox
- Automatic gearbox
- Cardan and drive shafts
- Chassis
- Brake system
- Wheel suspension
- Steering
- Body
- Exterior
- Interior
- Electrical equipment
- Equipment and devices
- Electrical circuits
- General information
- Maintenance
- Power unit
- Engine repair
- Cooling system
- Ignition system
- Supply system
- Fuel injection system
- Exhaust system
- Transmission
- Clutch
- Car gearbox
- Front and rear axle
- Chassis
- Steering
- Brake system
- Body
- Exterior
- Interior
- Electrical equipment
- Heating system
- Equipment and devices
- Power devices
- Electrical circuits
- Power unit
- M10/M20 engine
- M40 engine
- Ignition system
- Lubrication system
- Cooling system
- Supply system
- Fuel injection
- Exhaust system
- Transmission
- Clutch
- Manual gearbox
- Front axle
- Rear axle
- Chassis
- Steering
- Brake system
- Body
- Exterior
- Interior
- Electrical equipment
- Heating system
- Equipment and devices
- Electrical circuits
- General information
- Specifications
- Operation and maintenance
- 4-cylinder engine
- Engine repair
- Cooling and lubrication system
- Supply system
- Ignition system
- 6-cylinder engine
- Engine repair
- Cooling and lubrication system
- Supply system
- Fuel injection system
- Ignition system
- Transmission
- Clutch
- 4-speed manual gearbox
- 5-speed manual gearbox
- Automatic gearbox
- Cardan and rear axle
- Chassis
- Steering
- Front suspension
- Rear suspension
- Brake system
- Electrical equipment
- Equipment and devices
- Electrical circuits