
Table of contents: Removal ↓ Installation ↓
- Home
- BMW 5 Series
- E39
- Transmission
- Car gearbox
- Removal and installation the gearbox
Removal and installation the gearbox (BMW 5 Series E39)
These instructions apply to manual transmission. Differences in automatic transmission removal are described separately.
Disconnect the negative (-) battery cable. The battery is located in the luggage compartment behind the right side trim.
Raise the vehicle and remove the exhaust system, see page 66.
Disconnect the reverse light switch wire from the gearbox.
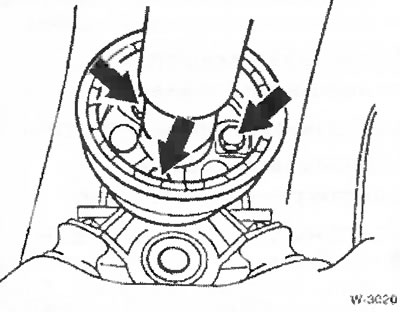
Loosen the disc joint mount on the gearbox. To avoid straining the disc joint, when releasing, only loosen the nuts, do not turn the bolts.
Move the cardan shaft to the side and remove it from the centering pins.
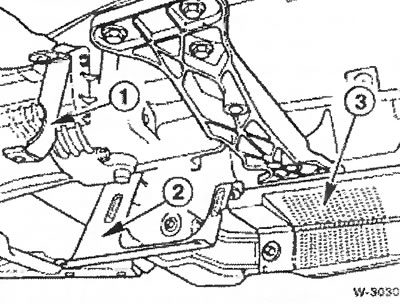
Unscrew the fastening of brackets "1" and "2" for the lower casing of the engine compartment, as well as the fastening of the heat shield "3".
Remove the clutch slave cylinder.
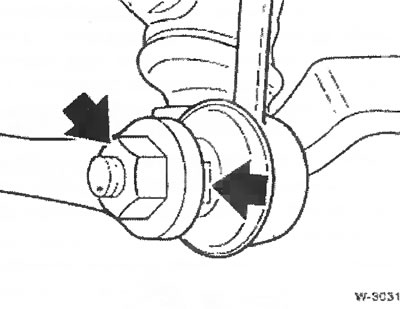
Unscrew the fastening of the pressure rods from both sides of the stabilizer. Hold the ball joint from turning by the flats with a wrench. Tilt the stabilizer upwards.
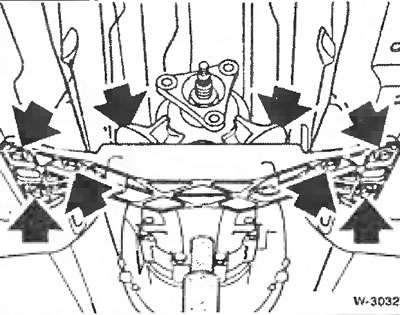
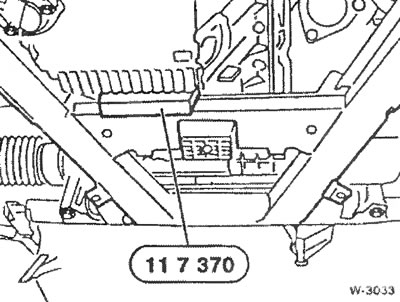
To avoid damaging the engine oil pan, clamp a suitable wooden spacer or BMW tool 117 370 between the pan and the front axle beam.
Using a garage jack, lower the gearbox.
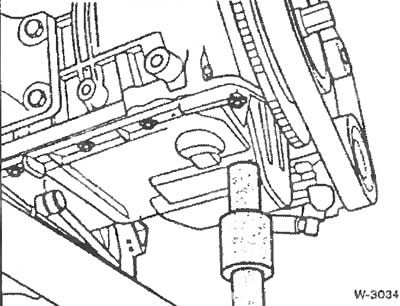
Support the engine at the front with a second garage jack, as it may tip forward after removing the gearbox.
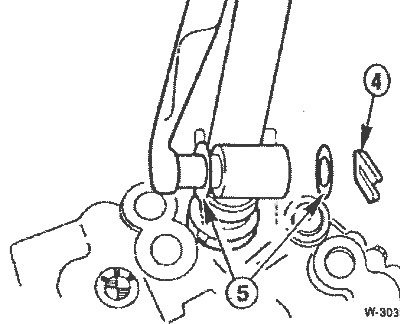
Remove the locking bracket "4" from the gear selection rod, remove the washers "5" from both sides of the rod and pull out the gear selection rod.
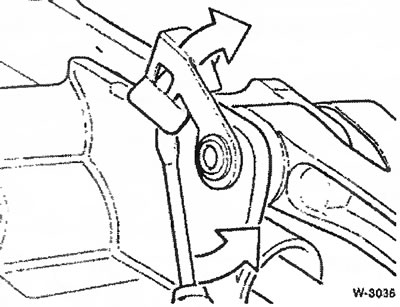
Using a screwdriver, tilt the gear selection rod axle forward by the fastening. Pull the axle out.
Remove from gearbox cable drive gear selection.
Press the wire clamp and disconnect the electrical connector from the gearbox.
Unscrew the transmission oil cooler pipe bracket from the engine sump.
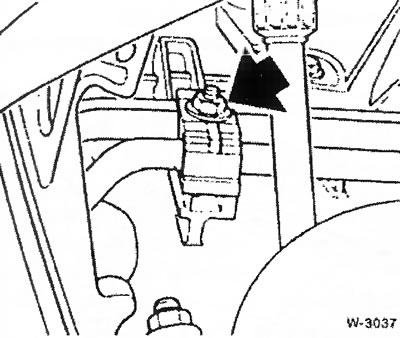
Loosen the oil cooler pipes at the gearbox. Remove the pipes.
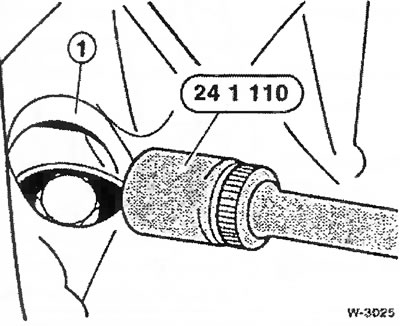
Remove the cover of the hole "1" from the side of the engine crankcase. Unscrew the 3 torque converter bolts one by one with a narrow socket wrench and make sure that the bolts do not fall into the crankcase. To ensure that the bolts are opposite the hole, turn the engine crankshaft by the hexagon of the belt pulley.
Support the gearbox from the underside of the vehicle using a garage jack and a suitable device. The gearbox may only be supported through the housing; it may not be supported through the oil pan.
Loosen the gearbox mount to the engine. The location of the mounting bolts is the same as for a manual gearbox.
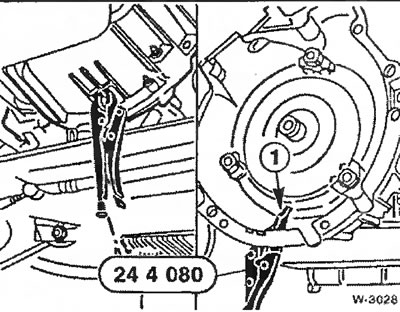
Take measures to prevent the torque converter from slipping out, for which purpose place the flat side "1" of the pliers against the converter at the gearbox housing and thus fix it. If the pliers cannot be inserted, when removing the gearbox, make sure that the converter does not slip out of the gearbox. Remove the gearbox from the engine.
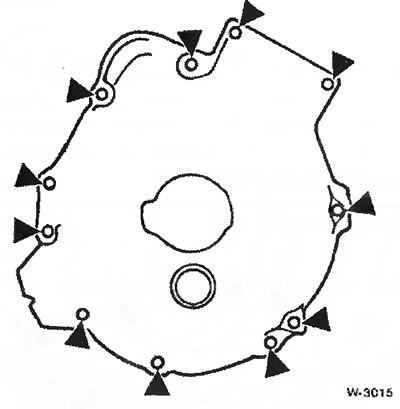
Loosen the gearbox mounting bolts using a slotted socket wrench (Torx key).
Disconnect the gearbox from the engine and, with the help of an assistant, remove it in a downward motion.
Check the clutch before installation.
Check the clutch release bearing for ease of movement. Bearing in sliding areas treat with grease Molykote Longtherm 2.
The splined grooves of the drive shaft can be easily lubricated with Microlube GL 261. Do not apply too much lubricant, as its excess is thrown onto the friction surfaces of the clutch, which leads to malfunctions in its operation. The required amount of lubricant does not exceed the size of a grain of rice.
Use the gear shift lever to engage the gear.
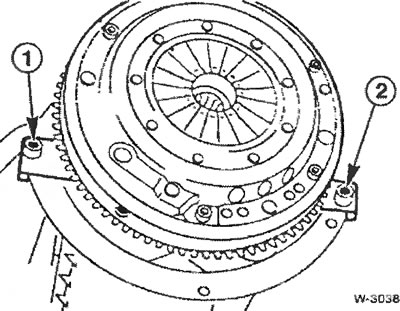
In all cases, place washers under the splined heads of the bolts for fastening the gearbox to the engine.
Tightening torques for slotted head bolts:
Tightening torques for hexagon head bolts:
Raise the gearbox and tighten the cross member mounting bolts to 25 Nm.
Install the clutch slave cylinder.
Treat the gear selection rod axle with Kliiber Polylub GLY B01 grease and insert. Tilt the mount downwards.
Insert the gear selector rod. Put the washers on the pin and secure the gear selector rod with the locking bracket.
Connect the reverse light switch wire.
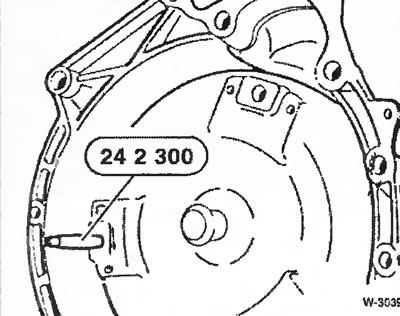
Turn the torque converter at the gearbox so that the holes in the linings are located in the center of the holes in the flywheel. Screw a special device (pin) into the lining.
When mating the engine and gearbox, three fastening pads on the torque converters coincided with three notches on the engine flywheel housing. Additional alignment is impossible and could lead to damage.
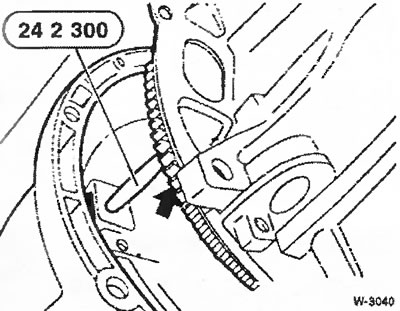
Place the automatic transmission and carefully insert the pin into the hole in the grip. After tightening the transmission mounting bolts, unscrew the pin from the lining in the forward direction.
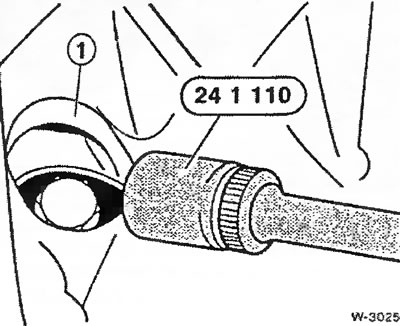
Remove the gearbox pliers from the housing and screw in the 3 torque converter bolts through the hole in the housing "1". Tighten the bolts to 45 Nm. When replacing, use only original bolts.
Remove the dirt-protecting plastic bags, insert the oil lines into the gearbox with new sealing gaskets, and secure the oil lines in the holder.
Screw the oil line holders to the engine oil pan.
Connect the electrical plug to the gearbox and secure it.
Install and adjust cable drive gear selection.
Fill the gearbox with oil.
Install the propeller shaft, see next chapter.
Tighten the cross member fastening to the body bottom and gearbox to a torque of 50 Nm. Remove the garage jack from under the gearbox.
Screw on the heat shield.
Install the exhaust system.
Screw the stabilizer to the pressure rods with new self-locking nuts and tighten them to a torque of 60 Nm.
Install the lower engine compartment cover.
Connect the negative (-) battery cable. Set the clock, tune the radio to transmitting stations.
[The original text of the article is available on the resource «BMWMan.ru»]
Removal
Disconnect the negative (-) battery cable. The battery is located in the luggage compartment behind the right side trim.
Caution: This will erase the contents of memory devices, such as the radio code memory device. Follow the instructions in Chapter "Removal and installation the battery".
Raise the vehicle and remove the exhaust system, see page 66.
Disconnect the reverse light switch wire from the gearbox.
Loosen the disc joint mount on the gearbox. To avoid straining the disc joint, when releasing, only loosen the nuts, do not turn the bolts.
Move the cardan shaft to the side and remove it from the centering pins.
Caution: Tie the cardan shaft to the bottom of the body with wire, do not allow it to fall.
Unscrew the fastening of brackets "1" and "2" for the lower casing of the engine compartment, as well as the fastening of the heat shield "3".
Remove the clutch slave cylinder.
Caution: Hydraulic system piping do not disconnect.
Unscrew the fastening of the pressure rods from both sides of the stabilizer. Hold the ball joint from turning by the flats with a wrench. Tilt the stabilizer upwards.
Note: Using a garage jack, lift the gearbox slightly and support it. Only then unscrew the crossbar and gearbox "arrows" fastening.
To avoid damaging the engine oil pan, clamp a suitable wooden spacer or BMW tool 117 370 between the pan and the front axle beam.
Using a garage jack, lower the gearbox.
Support the engine at the front with a second garage jack, as it may tip forward after removing the gearbox.
Remove the locking bracket "4" from the gear selection rod, remove the washers "5" from both sides of the rod and pull out the gear selection rod.
Using a screwdriver, tilt the gear selection rod axle forward by the fastening. Pull the axle out.
Automatic transmission
Remove from gearbox cable drive gear selection.
Press the wire clamp and disconnect the electrical connector from the gearbox.
Unscrew the transmission oil cooler pipe bracket from the engine sump.
Loosen the oil cooler pipes at the gearbox. Remove the pipes.
Note: Place a suitable container under the leaking oil. To prevent dirt from getting into the oil lines, cover their ends with plastic bags and tighten the bags with rubber rings.
Remove the cover of the hole "1" from the side of the engine crankcase. Unscrew the 3 torque converter bolts one by one with a narrow socket wrench and make sure that the bolts do not fall into the crankcase. To ensure that the bolts are opposite the hole, turn the engine crankshaft by the hexagon of the belt pulley.
Support the gearbox from the underside of the vehicle using a garage jack and a suitable device. The gearbox may only be supported through the housing; it may not be supported through the oil pan.
Loosen the gearbox mount to the engine. The location of the mounting bolts is the same as for a manual gearbox.
Take measures to prevent the torque converter from slipping out, for which purpose place the flat side "1" of the pliers against the converter at the gearbox housing and thus fix it. If the pliers cannot be inserted, when removing the gearbox, make sure that the converter does not slip out of the gearbox. Remove the gearbox from the engine.
Loosen the gearbox mounting bolts using a slotted socket wrench (Torx key).
Disconnect the gearbox from the engine and, with the help of an assistant, remove it in a downward motion.
Installation
Check the clutch before installation.
Check the clutch release bearing for ease of movement. Bearing in sliding areas treat with grease Molykote Longtherm 2.
The splined grooves of the drive shaft can be easily lubricated with Microlube GL 261. Do not apply too much lubricant, as its excess is thrown onto the friction surfaces of the clutch, which leads to malfunctions in its operation. The required amount of lubricant does not exceed the size of a grain of rice.
Use the gear shift lever to engage the gear.
Attention: Check if there are guide bushings for centering "1" and "2" between the engine case and the gearbox. Raise the gearbox and insert it into the clutch in a horizontal position. If, during installation, the gearbox drive shaft does not enter the splines of the driven clutch disc, turn the drive shaft by hand by the flange for the cardan shaft until the splines match.
In all cases, place washers under the splined heads of the bolts for fastening the gearbox to the engine.
Tightening torques for slotted head bolts:
- M8 - 25 Nm;
- M10 - 45 Nm;
- M12 - 70 Nm.
Tightening torques for hexagon head bolts:
- M8 - 25 Nm;
- M10 - 50 Nm;
- M12 - 80 Nm.
Raise the gearbox and tighten the cross member mounting bolts to 25 Nm.
Install the clutch slave cylinder.
Treat the gear selection rod axle with Kliiber Polylub GLY B01 grease and insert. Tilt the mount downwards.
Insert the gear selector rod. Put the washers on the pin and secure the gear selector rod with the locking bracket.
Connect the reverse light switch wire.
Automatic transmission
Turn the torque converter at the gearbox so that the holes in the linings are located in the center of the holes in the flywheel. Screw a special device (pin) into the lining.
When mating the engine and gearbox, three fastening pads on the torque converters coincided with three notches on the engine flywheel housing. Additional alignment is impossible and could lead to damage.
Place the automatic transmission and carefully insert the pin into the hole in the grip. After tightening the transmission mounting bolts, unscrew the pin from the lining in the forward direction.
Remove the gearbox pliers from the housing and screw in the 3 torque converter bolts through the hole in the housing "1". Tighten the bolts to 45 Nm. When replacing, use only original bolts.
Remove the dirt-protecting plastic bags, insert the oil lines into the gearbox with new sealing gaskets, and secure the oil lines in the holder.
Screw the oil line holders to the engine oil pan.
Connect the electrical plug to the gearbox and secure it.
Install and adjust cable drive gear selection.
Fill the gearbox with oil.
Install the propeller shaft, see next chapter.
Tighten the cross member fastening to the body bottom and gearbox to a torque of 50 Nm. Remove the garage jack from under the gearbox.
Screw on the heat shield.
Install the exhaust system.
Screw the stabilizer to the pressure rods with new self-locking nuts and tighten them to a torque of 60 Nm.
Install the lower engine compartment cover.
Connect the negative (-) battery cable. Set the clock, tune the radio to transmitting stations.
[The original text of the article is available on the resource «BMWMan.ru»]
This article is available at russian, bulgarian, belarusian, ukrainian, serbian, croatian, romanian, polish, slovak, hungarian
Article verified: Ilyinsky Matvey
Share information:
Previous articles
БМВ E39: Car gearbox
Next articles
Similar articles on other types of BMW cars:
Removal and installation the gearbox BMW 3 Series E21 (1975-1983)
Removal and installation of a manual gearbox BMW 3 Series E46 (1998-2006)
Rear axle gearbox removal and installation BMW 7 Series E32 (1986-1994)
Removal and installation the rear axle gearbox BMW 7 Series E38 (1994-2001)
Pistons — removal and installation BMW X3 E83 (2003-2010)
Removal and installation of gearbox S5D 280Z BMW X5 E53 (1999-2006)
Removal and installation the gearbox BMW 3 Series E21 (1975-1983)
Removal and installation of a manual gearbox BMW 3 Series E46 (1998-2006)
Rear axle gearbox removal and installation BMW 7 Series E32 (1986-1994)
Removal and installation the rear axle gearbox BMW 7 Series E38 (1994-2001)
Pistons — removal and installation BMW X3 E83 (2003-2010)
Removal and installation of gearbox S5D 280Z BMW X5 E53 (1999-2006)
Link in different formats to this page
Visitor comments
No comments yet
- General information
- Governing bodies
- Manual
- Maintenance
- Power unit
- Engine repair
- Lubrication system
- Cooling system
- Ignition system
- Supply system
- Injection system (gasoline)
- Injection system (diesel)
- Exhaust system
- Transmission
- Clutch
- Car gearbox
- Front axle
- Rear axle
- Chassis
- Steering
- Brake system
- Wheels and tires
- Body
- Interior
- Exterior
- Heating system
- Electrical equipment
- Equipment and devices
- Power devices
- Windscreen wipers
- Electrical circuits
- General information
- Manual
- Maintenance
- Power unit
- Engine repair
- Ignition system
- Engine lubrication system
- Cooling system
- Fuel system (gasoline)
- Fuel system (diesel)
- Exhaust system
- Transmission
- Clutch
- Car gearbox
- Chassis
- Front and rear suspension
- Steering
- Brake system
- Body
- Exterior
- Interior
- Electrical equipment
- Heating system
- Equipment and devices
- Power devices
- Electrical circuits
- General information
- Manual
- Maintenance
- Power unit
- Engine in a car
- Engine overhaul
- Cooling system
- Supply system
- Ignition system
- Control system
- Transmission
- Clutch
- Manual gearbox
- Automatic gearbox
- Transmission line
- Chassis
- Steering
- Front suspension
- Rear suspension
- Brake system
- Body
- Body elements
- Car care and painting
- Electrical equipment
- Heater and air conditioner
- Equipment and devices
- Starter and generator
- Electrical circuits
- General information
- Operation and maintenance
- Specifications
- Power unit
- Engine repair
- Cooling and lubrication system
- Supply system
- Ecotronic power supply system
- Fuel injection system
- Ignition system
- Transmission
- Clutch
- Gearbox BMW 242/4
- Gearbox Getrag 262/8
- Gearbox Getrag 265/6
- Automatic gearbox
- Cardan gear
- Rear axle
- Chassis
- Steering
- Front suspension
- Rear suspension
- Brake system
- Electrical equipment
- Equipment and devices
- Electrical circuits