



- Home
- BMW 5 Series
- E39
- Transmission
- Clutch
- Removal and installation / checking of the clutch
Removal and installation / checking of the clutch (BMW 5 Series E39)
Removal
Remove the gearbox.
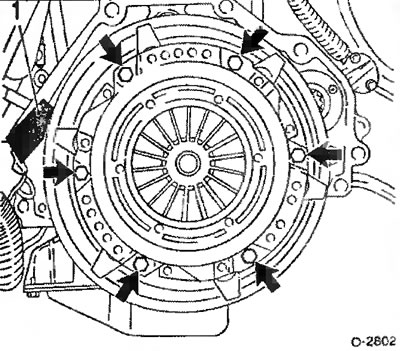
To prevent the flywheel from turning when the bolts are loosened, lock it by the toothed ring or with device "1" or with a key and pin. Loosen the clutch pressure plate mounting bolts sequentially by 1 or 1.5 turns until the pressure plate tension is relieved.
Caution: If the bolts are loosened completely at once, the diaphragm spring and guide pins between the pressure plate and the flywheel will be damaged due to distortion.
After this, unscrew the bolts completely.
Remove the pressure and driven clutch discs.
Caution: Do not drop the discs when removing them, otherwise after assembly difficulties may arise due to clutch jerking and disc separation.
Wipe the flywheel.
Examination
Check the clutch pressure plate for unevenness and cracks from burns.
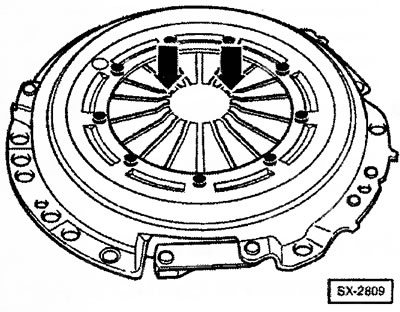
Check the diaphragm spring for damage to the "arrow".
Check the spring connections between the pressure plate and the cover for cracks, the strength of the riveted connections and the reliability of the installation. Replace the coupling with damaged or loose rivets.
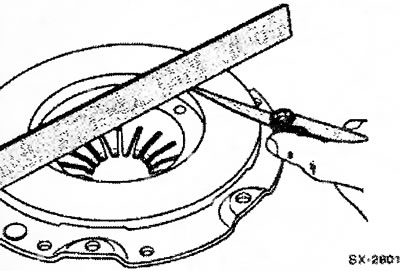
Check the contact surface of the pressure plate for cracks, burns and wear. Pressure plates with inward deflections of up to 0.3 mm can be reinstalled. The check is performed with a metal ruler and feeler gauge.
Check the engine flywheel for cracks from burns and unevenness and replace if necessary. Install new bolts with a micro-shell after each release. If the old flywheel remains on the engine, replace the mounting bolts only if oil leaks. Tighten the flywheel mounting bolts crosswise to 105 Nm.
Sand the pressure plate and flywheel with very fine sandpaper.
Replace the driven clutch disc with traces of oil and grease, as well as with mechanical damage.
Check the driven disk for sufficient lining thickness using a caliper. The minimum permissible lining thickness is 7.5 mm, otherwise replace the driven disk. The same should be done if there are cracks on the linings.
In the workshop, driven disks can be checked for runout. The maximum permissible lateral runout can be 0.5 mm.
Caution: This check is necessary when the old driven disc is to be reinstalled and the clutch has previously been disengaged incorrectly.
Clutch release bearing remove from the gearbox bearing pipe and check.
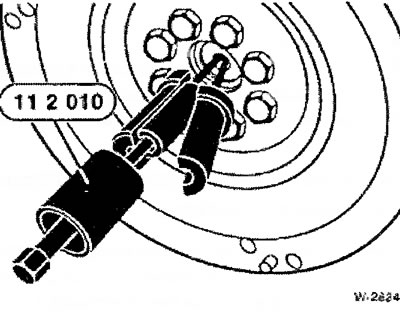
Check the radial ball bearing in the crankshaft for ease of movement. If necessary, remove the bearing using an internal puller and replace it with a new one.
Installation
Caution: Before installing a new clutch, remove all traces of anti-corrosion grease from the friction surfaces of the pressure plate and, if necessary, wipe the working surface of the flywheel clean using a solvent.
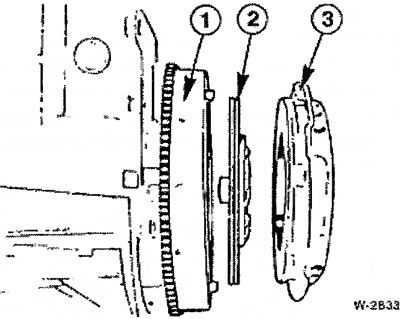
Insert driven disk "2" and pressure disk "3" into flywheel "1".
Note: The flat side of the driven disk must face the flywheel, see picture. The driven disk has the inscription Getniebeseite (gearbox side). After installing the disk, this inscription should be readable. Place the pressure disk on the corresponding guide pins.
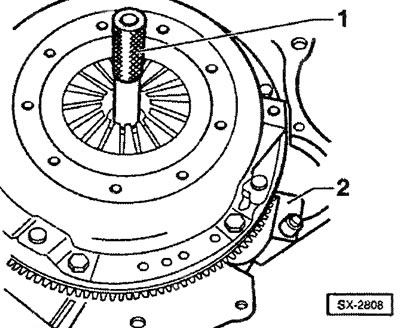
The driven disk must be centered with the appropriate pin "1" when installed (for example, HAZET 2174), or using the old gearbox drive shaft. 2 - flywheel locking device.
Tighten the pressure plate mounting bolts sequentially by 1-1.5 turns until the disk is firmly tightened. Make sure that the pressure plate enters the flywheel evenly and without touching the edges when tightening the bolts. The tightening torque depends on the accuracy class of the mounting bolts, which is stamped on their heads. Bolts of accuracy class 8.8 are tightened with a torque of 25 Nm, and bolts of accuracy class 10.9 - with a torque of 35 Nm.
Remove the centering pin.
If installed, remove the flywheel locking device.
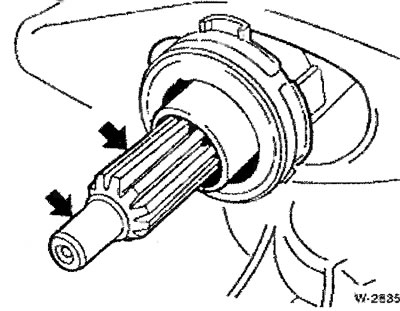
The spline grooves of the gearbox input shaft should be very thinly greased with ESSO UNIREX S2 grease.
Caution: Do not apply too much grease. The required amount of grease should not exceed the size of a grain of rice. After applying the grease, move the driven clutch disc back and forth along the drive shaft of the gearbox until the hub moves easily along the shaft. Be sure to remove excess grease, otherwise malfunctions may occur in the clutch during operation.
Install the gearbox.
(The article was copied from an online resource: «BMWMAN»)
This article is available at russian, bulgarian, belarusian, ukrainian, serbian, croatian, romanian, polish, slovak, hungarian
Article verified: Ilyinsky Matvey
Share information:
Previous articles
БМВ E39: Clutch
Next articles
Similar articles on other types of BMW cars:
Mechanical fuel pump — checking, adjustment, removal and installation BMW 3 Series E21 (1975-1983)
Removal and installation, checking of the chain tensioner BMW 3 Series E30 (1982-1994)
Removal and installation the clutch pedal BMW 7 Series E38 (1994-2001)
Fan/Fan Clutch — Removal and Installation BMW 7 Series E32 (1986-1994)
Removal and installation the clutch assembly BMW X3 E83 (2003-2010)
Removal and installation the clutch BMW X5 E53 (1999-2006)
Mechanical fuel pump — checking, adjustment, removal and installation BMW 3 Series E21 (1975-1983)
Removal and installation, checking of the chain tensioner BMW 3 Series E30 (1982-1994)
Removal and installation the clutch pedal BMW 7 Series E38 (1994-2001)
Fan/Fan Clutch — Removal and Installation BMW 7 Series E32 (1986-1994)
Removal and installation the clutch assembly BMW X3 E83 (2003-2010)
Removal and installation the clutch BMW X5 E53 (1999-2006)
Link in different formats to this page
Visitor comments
No comments yet
- General information
- Governing bodies
- Manual
- Maintenance
- Power unit
- Engine repair
- Lubrication system
- Cooling system
- Ignition system
- Supply system
- Injection system (gasoline)
- Injection system (diesel)
- Exhaust system
- Transmission
- Clutch
- Car gearbox
- Front axle
- Rear axle
- Chassis
- Steering
- Brake system
- Wheels and tires
- Body
- Interior
- Exterior
- Heating system
- Electrical equipment
- Equipment and devices
- Power devices
- Windscreen wipers
- Electrical circuits
- General information
- Manual
- Maintenance
- Power unit
- Engine repair
- Ignition system
- Engine lubrication system
- Cooling system
- Fuel system (gasoline)
- Fuel system (diesel)
- Exhaust system
- Transmission
- Clutch
- Car gearbox
- Chassis
- Front and rear suspension
- Steering
- Brake system
- Body
- Exterior
- Interior
- Electrical equipment
- Heating system
- Equipment and devices
- Power devices
- Electrical circuits
- General information
- Manual
- Maintenance
- Power unit
- Engine in a car
- Engine overhaul
- Cooling system
- Supply system
- Ignition system
- Control system
- Transmission
- Clutch
- Manual gearbox
- Automatic gearbox
- Transmission line
- Chassis
- Steering
- Front suspension
- Rear suspension
- Brake system
- Body
- Body elements
- Car care and painting
- Electrical equipment
- Heater and air conditioner
- Equipment and devices
- Starter and generator
- Electrical circuits
- General information
- Operation and maintenance
- Specifications
- Power unit
- Engine repair
- Cooling and lubrication system
- Supply system
- Ecotronic power supply system
- Fuel injection system
- Ignition system
- Transmission
- Clutch
- Gearbox BMW 242/4
- Gearbox Getrag 262/8
- Gearbox Getrag 265/6
- Automatic gearbox
- Cardan gear
- Rear axle
- Chassis
- Steering
- Front suspension
- Rear suspension
- Brake system
- Electrical equipment
- Equipment and devices
- Electrical circuits