
Table of contents: Removal ↓ Installation ↓
- Home
- BMW 5 Series
- E39
- Transmission
- Rear axle
- Replacing the corrugated cover of the rear axle propeller shaft
Replacing the corrugated cover of the rear axle propeller shaft (BMW 5 Series E39)
Removal
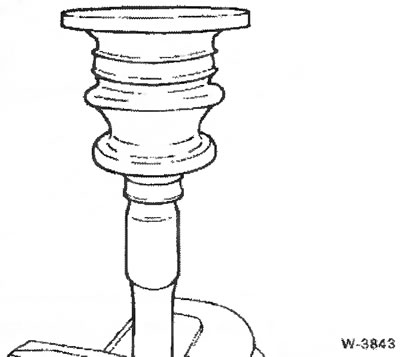
Remove the propeller shaft and clean it from dirt.
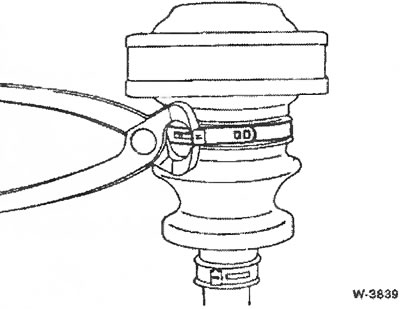
Cut off the clamps of the inner universal joint corrugated cover with side cutters.
Using a pin, press the sealing cover away from the hinge sleeve.
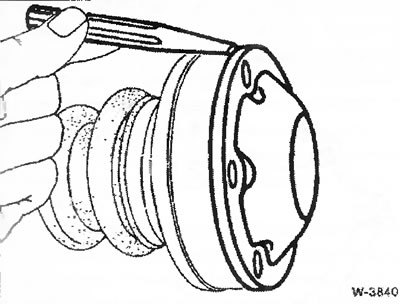
Press the corrugated cover away from the hinge sleeve and move it onto the shaft.
Wipe the grease off the cardan joint with a rag.
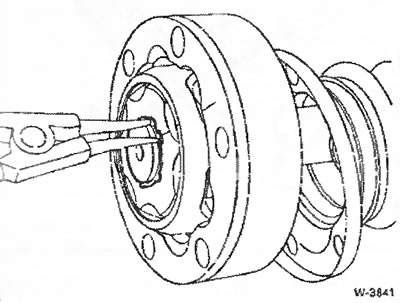
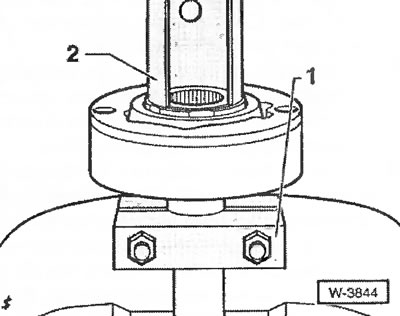
Remove the retaining ring using suitable pliers.
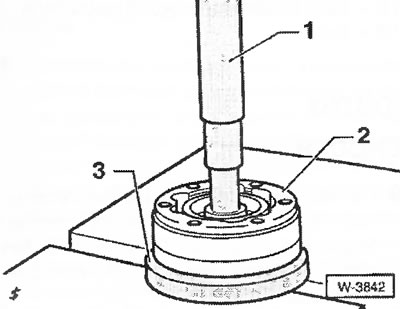
Press the cardan shaft out of the inner constant velocity joint "2" using a suitable pin "1". The spherical hub should be in contact with the support plate "3".
Check the cardan joint for dirt and damage, replace the joint if necessary. If possible, do not disassemble the cardan joint.
Clean the dirty joint, for which it is necessary to disassemble it. In this case, the relative position of the spherical hub, separator and hinge element should be marked on the end surface.
Attention: During assembly, exceptional cleanliness of parts must be ensured.
Pull through the profiled inner shaft (differential side) corrugated cover.
If necessary, use nippers to cut the clamps securing the corrugated cover at the outer hinge and remove the cover through the shaft. When removing, make sure that no dirt gets into the hinge.
Installation
To replace the bellows, use the complete repair unit. For vehicles with increased mileage, it is recommended to replace the second bellows as well.
Clean the assembled constant velocity joint thoroughly.
Put on new corrugated covers. To avoid damaging the corrugated covers when putting them on the cardan shaft, cover the sharp-edged areas with suitable bushings or cover them with adhesive tape.
Fill the joint with new grease.
Attention: In the repair unit "corrugated cover" (Faltenbalg) special lubricant is available.
Place the inner cardan joint on the shaft.
Using clamping device "1", support the cardan shaft in a vice.
Using a suitable pipe "2", place the constant velocity joint on the shaft until it stops.
Remove the clamp fixture.
Using suitable pliers, insert the new retaining ring and ensure that it is correctly positioned in the groove.
Fill the constant velocity joints and the corrugated boots at the outer and inner joints with special grease. Make sure that no dirt gets into the joints.
Amount of grease:
- inner joint 520i, 525tds - 70g; 523i, 528i, 530i, 540i - 85 g;
- outer joint 520i, 525tds - 80 g; 523i, 528i, 530i, 540i - 100 g.
Treat the contact surfaces of the sealing cover with Curil T or Stucarit Dicht-Gel 309/4 sealant and press the cover onto the hinge sleeve.
Treat the contact surfaces of the tips for the corrugated covers with Curil T or Stucarit Dicht-Gel 309/4 sealant and press onto the hinge sleeve.
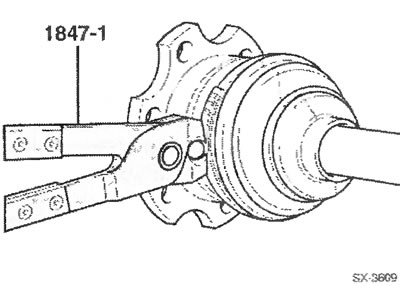
Fasten the corrugated covers to the tips with clamps using pliers, for example, HAZET 1847-1. Make sure that the lock of the large clamp is located between the two holes in the flange of the constant velocity joint.
Place the corrugated boot on the outer hinge and secure it to the large diameter.
Pull the corrugated covers through the thickenings on the shaft and secure with clamps.
Install the cardan shaft.
[The original source of the article is on the website: BMWMAN.ru]
This article is available at russian, bulgarian, belarusian, ukrainian, serbian, croatian, romanian, polish, slovak, hungarian
Article verified: Ilyinsky Matvey
Share information:
Previous articles
БМВ E39: Rear axle
Next articles
Similar articles on other types of BMW cars:
Replacing the corrugated axle shaft cover BMW 3 Series E30 (1982-1994)
Replacing the corrugated axle shaft cover BMW 3 Series E36 (1990-2000)
Replacing the CV joint of the propeller shaft BMW 7 Series E38 (1994-2001)
Changing the oil in the main gear (rear axle) BMW 7 Series E32 (1986-1994)
Pressing out and pressing in the axle shaft into the flange (the axle… BMW X3 E83 (2003-2010)
Replacing the front propeller shaft BMW X5 E53 (1999-2006)
Link in different formats to this page
Visitor comments
No comments yet
- General information
- Governing bodies
- Manual
- Maintenance
- Power unit
- Engine repair
- Lubrication system
- Cooling system
- Ignition system
- Supply system
- Injection system (gasoline)
- Injection system (diesel)
- Exhaust system
- Transmission
- Clutch
- Car gearbox
- Front axle
- Rear axle
- Chassis
- Steering
- Brake system
- Wheels and tires
- Body
- Interior
- Exterior
- Heating system
- Electrical equipment
- Equipment and devices
- Power devices
- Windscreen wipers
- Electrical circuits
- General information
- Manual
- Maintenance
- Power unit
- Engine repair
- Ignition system
- Engine lubrication system
- Cooling system
- Fuel system (gasoline)
- Fuel system (diesel)
- Exhaust system
- Transmission
- Clutch
- Car gearbox
- Chassis
- Front and rear suspension
- Steering
- Brake system
- Body
- Exterior
- Interior
- Electrical equipment
- Heating system
- Equipment and devices
- Power devices
- Electrical circuits
- General information
- Manual
- Maintenance
- Power unit
- Engine in a car
- Engine overhaul
- Cooling system
- Supply system
- Ignition system
- Control system
- Transmission
- Clutch
- Manual gearbox
- Automatic gearbox
- Transmission line
- Chassis
- Steering
- Front suspension
- Rear suspension
- Brake system
- Body
- Body elements
- Car care and painting
- Electrical equipment
- Heater and air conditioner
- Equipment and devices
- Starter and generator
- Electrical circuits
- General information
- Operation and maintenance
- Specifications
- Power unit
- Engine repair
- Cooling and lubrication system
- Supply system
- Ecotronic power supply system
- Fuel injection system
- Ignition system
- Transmission
- Clutch
- Gearbox BMW 242/4
- Gearbox Getrag 262/8
- Gearbox Getrag 265/6
- Automatic gearbox
- Cardan gear
- Rear axle
- Chassis
- Steering
- Front suspension
- Rear suspension
- Brake system
- Electrical equipment
- Equipment and devices
- Electrical circuits