
Table of contents: Removal ↓ Installation ↓
- Home
- BMW 5 Series
- E39
- Transmission
- Front axle
- Removal and installation the transverse arm
Removal and installation the transverse arm (BMW 5 Series E39)
Note: After installation, it is necessary to measure the parameters of the front axle.
Removal
Hang the engine and unscrew the fastenings of its supports.
Mark the position of the front wheels relative to the hubs with paint. This will allow the balanced wheel to be installed in its original position. When unscrewing the wheel bolts, the car should stand on its wheels. Raise the car from the front and remove the front wheels.
Remove the lower engine compartment cover.
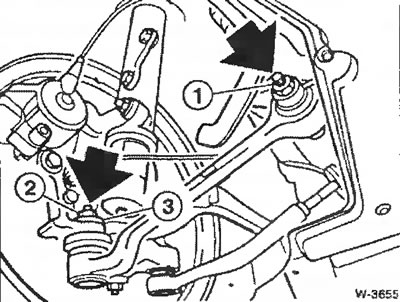
Loosen the nuts securing the "arrow" and remove the transverse arm from the front axle beam.
Remove the control arm ball joint from the pivot bearing using a standard puller.
Installation
Before installing the transverse arm, clean and degrease the conical journal of the ball joint and the receiving hole in the pivot support.
Insert the ball joint, install washer "3", screw on a new self-locking nut "2" and tighten it to a torque of 80 Nm.
Screw the transverse arm to the front axle beam, do not tighten fastening "1".
Tighten the front wheels. Do not lubricate the wheel bolts. Position the wheels so that the marks made before removal match. Lower the car and tighten the wheel bolts crosswise to 100 Nm.
Place the vehicle in its normal position. To do this, the following prerequisites must be met:
- the car is on wheels;
- the front seats are in the middle position;
- each front seat has a load capacity of 68 kg;
- in the center of the luggage compartment there is a load weighing 21 kg;
- the fuel tank is filled to capacity with fuel.
Tighten the transverse levers to the front axle beam to the following torques: for a 6-cylinder engine - 81 Nm; for the 8-cylinder engine - 77.5 Nm.
Install the lower engine compartment cover.
This article is available at russian, bulgarian, belarusian, ukrainian, serbian, croatian, romanian, polish, slovak, hungarian
Article verified: Ilyinsky Matvey
Share information:
Previous articles
БМВ E39: Front axle
Next articles
Similar articles on other types of BMW cars:
Removal and installation the transverse suspension arm BMW 3 Series E21 (1975-1983)
Removal and installation the transverse arm BMW 3 Series E36 (1990-2000)
Cylinder Head Cover — Removal and Installation BMW 7 Series E32 (1986-1994)
Pistons — removal and installation BMW X3 E83 (2003-2010)
Removal and installation the engine BMW X5 E53 (1999-2006)
Link in different formats to this page
Visitor comments
No comments yet
- General information
- Governing bodies
- Manual
- Maintenance
- Power unit
- Engine repair
- Lubrication system
- Cooling system
- Ignition system
- Supply system
- Injection system (gasoline)
- Injection system (diesel)
- Exhaust system
- Transmission
- Clutch
- Car gearbox
- Front axle
- Rear axle
- Chassis
- Steering
- Brake system
- Wheels and tires
- Body
- Interior
- Exterior
- Heating system
- Electrical equipment
- Equipment and devices
- Power devices
- Windscreen wipers
- Electrical circuits
- General information
- Manual
- Maintenance
- Power unit
- Engine repair
- Ignition system
- Engine lubrication system
- Cooling system
- Fuel system (gasoline)
- Fuel system (diesel)
- Exhaust system
- Transmission
- Clutch
- Car gearbox
- Chassis
- Front and rear suspension
- Steering
- Brake system
- Body
- Exterior
- Interior
- Electrical equipment
- Heating system
- Equipment and devices
- Power devices
- Electrical circuits
- General information
- Manual
- Maintenance
- Power unit
- Engine in a car
- Engine overhaul
- Cooling system
- Supply system
- Ignition system
- Control system
- Transmission
- Clutch
- Manual gearbox
- Automatic gearbox
- Transmission line
- Chassis
- Steering
- Front suspension
- Rear suspension
- Brake system
- Body
- Body elements
- Car care and painting
- Electrical equipment
- Heater and air conditioner
- Equipment and devices
- Starter and generator
- Electrical circuits
- General information
- Operation and maintenance
- Specifications
- Power unit
- Engine repair
- Cooling and lubrication system
- Supply system
- Ecotronic power supply system
- Fuel injection system
- Ignition system
- Transmission
- Clutch
- Gearbox BMW 242/4
- Gearbox Getrag 262/8
- Gearbox Getrag 265/6
- Automatic gearbox
- Cardan gear
- Rear axle
- Chassis
- Steering
- Front suspension
- Rear suspension
- Brake system
- Electrical equipment
- Equipment and devices
- Electrical circuits