
- Home
- BMW 5 Series
- E39
- Power unit
- Lubrication system
- Removal and installation the oil pan
Removal and installation the oil pan (BMW 5 Series E39)
Engine oil pan for 520i, 523i, 528i models
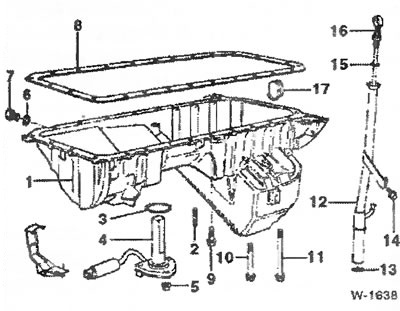
1 - oil pan
2 - hairpin
3 - sealing ring
4 - oil level sensor
5 - hex nut
6 - sealing ring, size A12x15.5-AL
7 - drain plug
8 - sealing gasket
9-11 - Hexagon head bolt
12 - guide tube
13 - sealing ring
14 - Hexagon head bolt
15 - sealing ring
16 - oil level indicator
17 - lid
Removal
Caution: Due to lack of space to remove the oil pan, it is necessary to release both engine mounts and lower the front axle beam.
Disconnect the negative (-) battery cable. The battery is located in the luggage compartment behind the right side trim.
Caution: This will erase the contents of memory devices, such as the engine fault code memory. Follow the instructions in Chapter "Removal and installation the battery".
Disconnect the air filter housing with the air intake hose from the throttle valve pipe and pull out of the engine compartment.
Raise the car, remove the bottom engine compartment cover.
Drain the engine oil, see section "Maintenance work".

Loosen the clamp and remove the oil return hose from the oil separator at the oil level indicator guide tube.
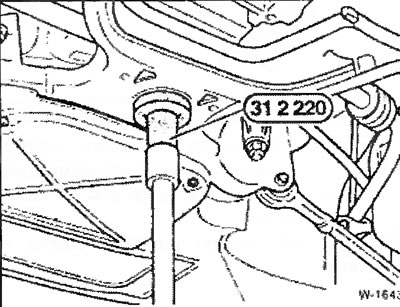
Unscrew the bracket fastening of the oil level indicator guide tube, for which loosen bolt "14" (see figure W-1638). Pull the guide tube out of the oil pan with an upward movement, paying attention to the position of the sealing ring.
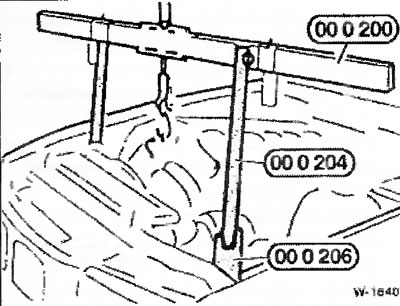
Attach the engine to a lifting device and lift it. If there is no lifting device, pass a suitable cable through the engine eyes, slide a reliable pipe under the cable and support it on suitable trestles or in the pressed-in belts in the wings.
Caution. Do not rest the pipe on the body fenders. Slowly lift the engine upwards, making sure that none of the wires or hoses are stretched or compressed. The BMW lifting device shown in the figure is installed on the left and right sides of the engine subframe.
Using a lifting device, slowly raise the engine approximately 5 mm.
Disconnect the steering shaft from the steering gear. To do this, loosen the clamp and remove the universal joint from the steering gear.
Loosen the power steering pump mount and hang the pump with the attached pipes on the engine using wire.
Caution: Do not disconnect the pipes from the pump, otherwise the oil will leak out. If the hydraulic system is opened, it is necessary to ensure exceptional cleanliness, since the ingress of contaminants into the system causes malfunctions and damage.
Loosen the fastening on both engine mounts on the left and right at the top by approximately 4 turns.
From the bottom of the car, unscrew the nuts securing both engine mounts.
If equipped, disconnect the oil lines from the bracket on the oil pan.
Disconnect the engine oil level sensor plug connector at the oil pan.
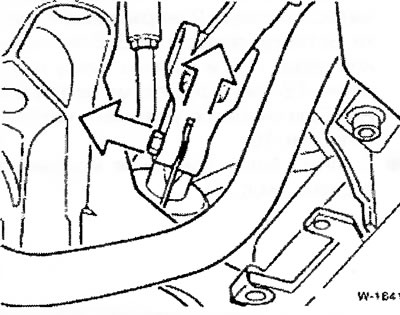
Using a garage jack and a suitable adapter, support the front axle beam. The illustration shows an adapter from BMW.
Unscrew the fastening front axle beams and lower it as low as possible.
Note: Do not loosen the fastening to the steering gear beam and the suspension arms.
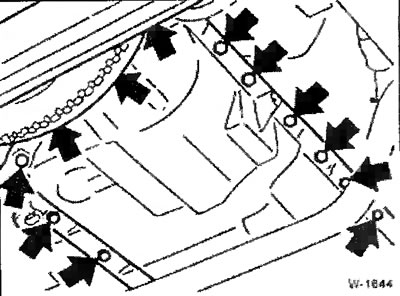
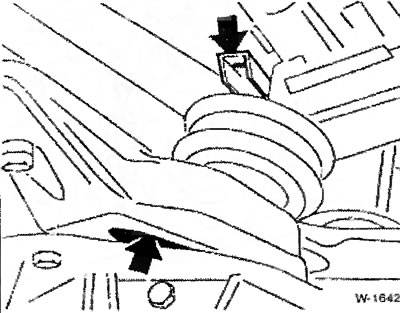
Loosen the oil pan fastening at the front and rear (Figure).
Lower the oil pan and pull it out with a backward movement.
Note: If the oil pan cannot be pulled out, unscrew the pressure rod mount on the left and right of the stabilizer and lower the front axle beam even lower.
Installation
Clean the contact surfaces of the oil pan and engine block.
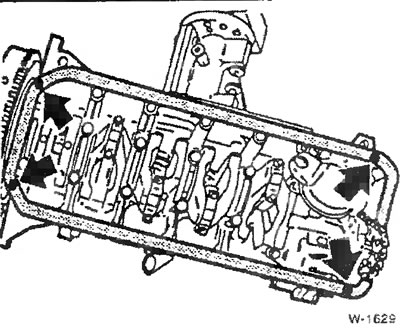
Seal the transitions to the distributor sprocket niche cover and the chain partition with Drei Bond 1209, a long-lasting elastic sealant. The sealant layer should be approximately 3 mm wide and approximately 2 mm high.
Lubricate the new oil pan sealing gasket with some grease, then check that the gasket is installed correctly.
Caution: Always install a new gasket.
Place the oil pan in place.
Screw in the oil pan mounting bolts, but do not tighten them. First, lightly tighten the oil pan mounting bolts to the gearbox, then the engine mounting bolts. After that, tighten all the bolts to 10 Nm, i.e. quite lightly. If you tighten the mounting bolts too much, the sealing gasket will be crushed and will not provide a seal.
If present, route oil lines through holders on oil pan.
Insert the oil level indicator guide tube with the sealing ring and screw it onto the bracket. Always replace a damaged sealing ring.
Secure the oil return hose from the oil separator to the oil level indicator guide tube with a clamp.
Connect and secure the plug for the oil level sensor.
Screw the stabilizer bars.
Raise and tighten the front axle beam.
Screw the steering shaft to the steering gear, tighten the terminal clamp bolt to a torque of 20 Nm.
Lower the engine and remove the engine lifting device. Tighten the fasteners of both engine mounts to 45 Nm.
Note: the fastenings of all engine supports and brackets are tightened to the following torques: for M8 threads - 25 Nm, for M10 threads - 45 Nm.
Install the power steering pump.
Fill the engine oil. There are 2 marks on the oil level indicator, between which the oil level should be located. The difference in the amount of oil between the min and max marks is 1 liter.
Lower the car.
Install air filter.
Connect the negative (-) battery cable. Set the clock, tune the radio to transmitting stations.
After the test drive, check the tightness of the oil pan and carefully tighten all bolts if necessary.
Install the lower engine compartment cover.
The original text of the article is available on the resource: «BMWMAN»
This article is available at russian, bulgarian, belarusian, ukrainian, serbian, croatian, romanian, polish, slovak, hungarian
Article verified: Ilyinsky Matvey
Share information:
Previous articles
БМВ E39: Lubrication system
Next articles
Similar articles on other types of BMW cars:
Removal and installation the contact ignition distributor BMW 3 Series E21 (1975-1983)
Cylinder Head Cover — Removal and Installation BMW 7 Series E32 (1986-1994)
Pistons — removal and installation BMW X3 E83 (2003-2010)
Removal and installation the engine BMW X5 E53 (1999-2006)
Removal and installation the contact ignition distributor BMW 3 Series E21 (1975-1983)
Cylinder Head Cover — Removal and Installation BMW 7 Series E32 (1986-1994)
Pistons — removal and installation BMW X3 E83 (2003-2010)
Removal and installation the engine BMW X5 E53 (1999-2006)
Link in different formats to this page
Visitor comments
No comments yet
- General information
- Governing bodies
- Manual
- Maintenance
- Power unit
- Engine repair
- Lubrication system
- Cooling system
- Ignition system
- Supply system
- Injection system (gasoline)
- Injection system (diesel)
- Exhaust system
- Transmission
- Clutch
- Car gearbox
- Front axle
- Rear axle
- Chassis
- Steering
- Brake system
- Wheels and tires
- Body
- Interior
- Exterior
- Heating system
- Electrical equipment
- Equipment and devices
- Power devices
- Windscreen wipers
- Electrical circuits
- General information
- Manual
- Maintenance
- Power unit
- Engine repair
- Ignition system
- Engine lubrication system
- Cooling system
- Fuel system (gasoline)
- Fuel system (diesel)
- Exhaust system
- Transmission
- Clutch
- Car gearbox
- Chassis
- Front and rear suspension
- Steering
- Brake system
- Body
- Exterior
- Interior
- Electrical equipment
- Heating system
- Equipment and devices
- Power devices
- Electrical circuits
- General information
- Manual
- Maintenance
- Power unit
- Engine in a car
- Engine overhaul
- Cooling system
- Supply system
- Ignition system
- Control system
- Transmission
- Clutch
- Manual gearbox
- Automatic gearbox
- Transmission line
- Chassis
- Steering
- Front suspension
- Rear suspension
- Brake system
- Body
- Body elements
- Car care and painting
- Electrical equipment
- Heater and air conditioner
- Equipment and devices
- Starter and generator
- Electrical circuits
- General information
- Operation and maintenance
- Specifications
- Power unit
- Engine repair
- Cooling and lubrication system
- Supply system
- Ecotronic power supply system
- Fuel injection system
- Ignition system
- Transmission
- Clutch
- Gearbox BMW 242/4
- Gearbox Getrag 262/8
- Gearbox Getrag 265/6
- Automatic gearbox
- Cardan gear
- Rear axle
- Chassis
- Steering
- Front suspension
- Rear suspension
- Brake system
- Electrical equipment
- Equipment and devices
- Electrical circuits