
Table of contents: Removal ↓ Installation ↓
- Home
- BMW 5 Series
- E34
- Body
- Interior
- Removal and installation the center console and shelf under the dashboard
Removal and installation the center console and shelf under the dashboard (BMW 5 Series E34)
Removal
Disconnect the ground wire from the battery.
Remove the handbrake lining and the shelf in front of the handbrake lever.
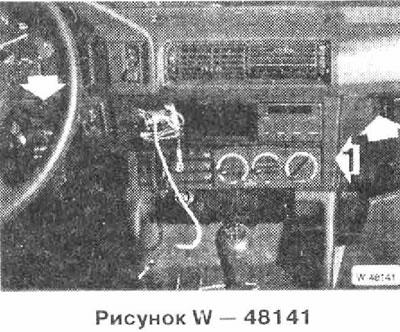
Remove the radio.
Remove the heater control panel.
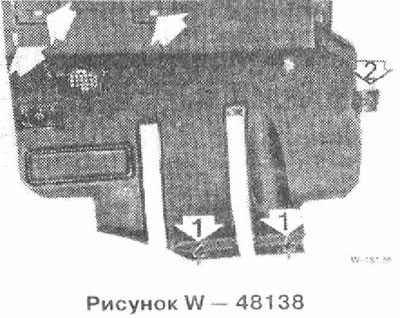
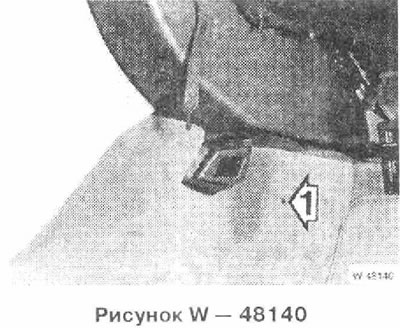
Remove the left lower trim by unscrewing the "arrow" screws. Then turn the locks 1 by 90° and thereby open them. Release the hook 2 from the middle console.
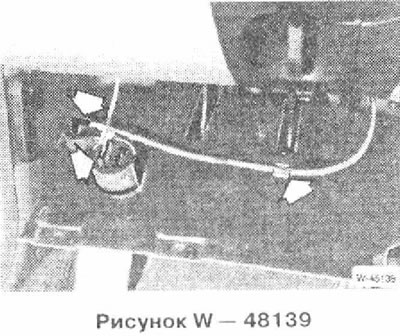
Fold the left lower cover down and remove the wire from the back. Remove the cover.
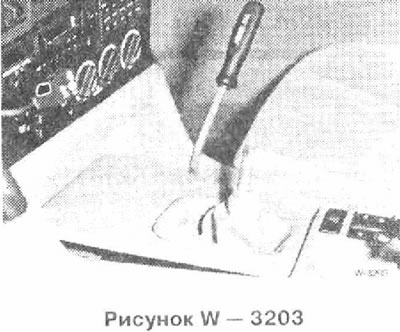
For manual transmission: Remove the gear shift knob.
For automatic transmission: Loosen the bolt on the front side of the shift lever and remove the lever.
Remove the corrugated cover, pull out the gearshift lever cover.
Remove the ashtray.
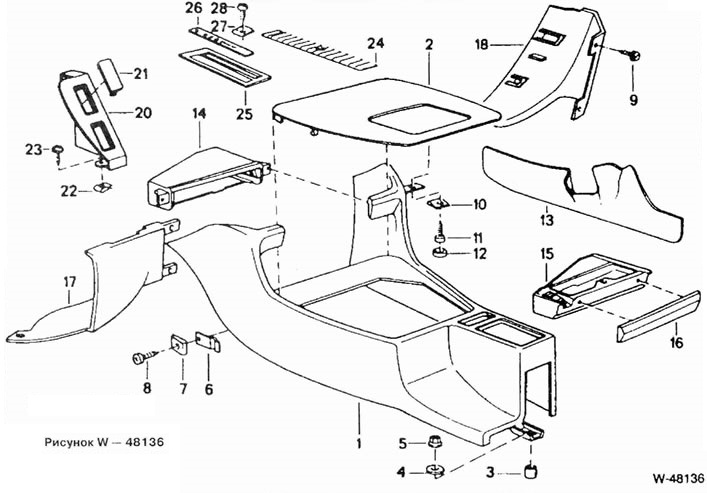
Figure W - 48136. Middle console
1 Console
2 Overlay
3 Spacer
4 Gasket
5 Nut
6 Fastening (left and right)
7 Nut
8 Self-tapping screw
9 Bolt
10 Nut
11 Self-tapping screw
12 Cap
13 Sidewall (left and right)
14 Ashtray frame
15 Ashtray
16 Ashtray cover
17 Lower left trim
18 Lower right trim
20 Overlay (left and right)
21 Lid
22 Nut
23 Self-tapping screw
Only with automatic transmission:
24 Lining
25 Shift knob cover
26 Gear indicator cover
27 Nut
Grasp the console at the bottom at the rear and press the window and hazard warning lights switches.
Remove the switches and disconnect the connectors from the back.
Unscrew the screws on the left and right and remove the covers.
Loosen nuts 5 securing the rear side of the console to the floor (Figure W - 48136).
Unscrew the two "arrow" screws and pull frame 1 forward.
Remove the center console.
Installation
Installation is carried out in reverse order.
Place the leatherette cover on the shift lever and press the board into the console.
Put the shift lever handle on and it should snap into place.
On vehicles with automatic transmission: Insert the shift lever cover and secure the shift lever knob with the screw.
Insert the electric window and hazard warning lights switches after connecting the wires.
Install the heater control panel.
Install a radio receiver.
Install the handbrake lever cover.
Connect the ground wire to the battery.
Check the operation of the switches, heater controls, and the free movement of the gear shift lever in the center console.
This article is available at russian, bulgarian, belarusian, ukrainian, serbian, croatian, romanian, polish, slovak, hungarian
Article verified: Polikarpov Saveliy
Share information:
Previous articles
БМВ E34: Interior
Next articles
Similar articles on other types of BMW cars:
Removal and installation the center console and shelf under the… BMW 3 Series E30 (1982-1994)
Removal and installation the center console BMW 3 Series E36 (1990-2000)
Removal and installation the shelf behind the rear seat and the rear… BMW 7 Series E38 (1994-2001)
Cylinder Head Cover — Removal and Installation BMW 7 Series E32 (1986-1994)
Pistons — removal and installation BMW X3 E83 (2003-2010)
Removal and installation the engine BMW X5 E53 (1999-2006)
Link in different formats to this page
Visitor comments
No comments yet
- General information
- Governing bodies
- Manual
- Maintenance
- Power unit
- Engine repair
- Lubrication system
- Cooling system
- Ignition system
- Supply system
- Injection system (gasoline)
- Injection system (diesel)
- Exhaust system
- Transmission
- Clutch
- Car gearbox
- Front axle
- Rear axle
- Chassis
- Steering
- Brake system
- Wheels and tires
- Body
- Interior
- Exterior
- Heating system
- Electrical equipment
- Equipment and devices
- Power devices
- Windscreen wipers
- Electrical circuits
- General information
- Manual
- Maintenance
- Power unit
- Engine repair
- Ignition system
- Engine lubrication system
- Cooling system
- Fuel system (gasoline)
- Fuel system (diesel)
- Exhaust system
- Transmission
- Clutch
- Car gearbox
- Chassis
- Front and rear suspension
- Steering
- Brake system
- Body
- Exterior
- Interior
- Electrical equipment
- Heating system
- Equipment and devices
- Power devices
- Electrical circuits
- General information
- Manual
- Maintenance
- Power unit
- Engine in a car
- Engine overhaul
- Cooling system
- Supply system
- Ignition system
- Control system
- Transmission
- Clutch
- Manual gearbox
- Automatic gearbox
- Transmission line
- Chassis
- Steering
- Front suspension
- Rear suspension
- Brake system
- Body
- Body elements
- Car care and painting
- Electrical equipment
- Heater and air conditioner
- Equipment and devices
- Starter and generator
- Electrical circuits
- General information
- Operation and maintenance
- Specifications
- Power unit
- Engine repair
- Cooling and lubrication system
- Supply system
- Ecotronic power supply system
- Fuel injection system
- Ignition system
- Transmission
- Clutch
- Gearbox BMW 242/4
- Gearbox Getrag 262/8
- Gearbox Getrag 265/6
- Automatic gearbox
- Cardan gear
- Rear axle
- Chassis
- Steering
- Front suspension
- Rear suspension
- Brake system
- Electrical equipment
- Equipment and devices
- Electrical circuits