
- Home
- BMW 5 Series
- E39
- Power unit
- Supply system
- Removal and installation the fuel level sensor / fuel pump
Removal and installation the fuel level sensor / fuel pump (BMW 5 Series E39)
In BMW 5-series cars, there is a fuel level sensor in both sections of the tank. To check the sensors, they must be removed. The sensor of the right section of the tank, when viewed in the direction of travel of the car, is combined with the fuel pump (fuel pump inside the tank). Therefore, to dismantle the pump, the right sensor must be removed.
Ensure perfect ventilation of the work area. Fuel vapors are toxic, no open flames, no smoking, fire hazard! Have a fire extinguisher ready.
Disconnect the negative (-) battery cable. The battery is located in the luggage compartment behind the right side trim.
Remove the rear seat.
Fold back the rubber insert on the left or right under the rear seat. Cut the insulating mat along the perforation line with a sharp knife and fold it back.
Unscrew the lid and remove it together with the sealing ring.
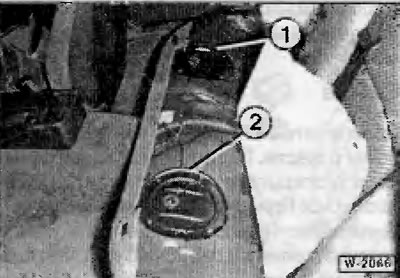
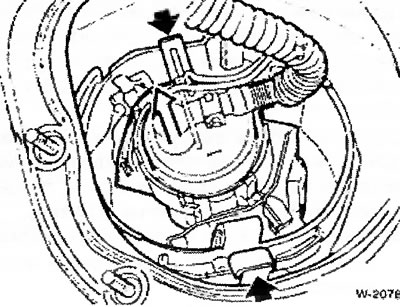
Unscrew cover "1".
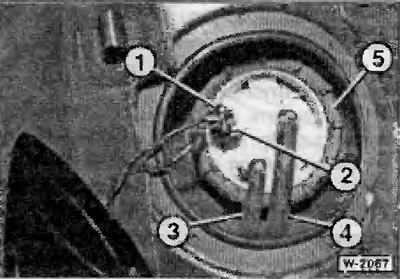
1 - fuel pump plug connector;
2 - fuel level sensor plug connector;
3 - fuel supply hose to the fuel pump;
4 - hose to the autonomous heating system (if there is one).
Disconnect the plugs of connectors "1" and "2". To disconnect, squeeze the retaining tabs.
Mark fuel hoses "3" and "4" with tags and disconnect from the fuel level sensor, after first releasing the worm or clamp clamps.
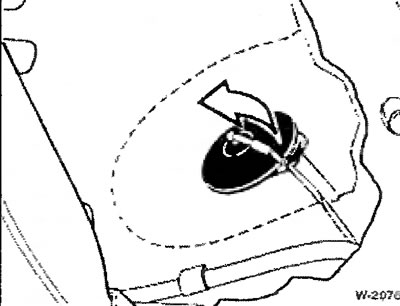
Carefully loosen the union nut "5" using the special tool from BMW 161020. If you do not have a special tool, you can use a strong wooden rod.
Pull the fuel level sensor up, tilt it to the side and remove it. Before removing it, put a rag down and collect the leaking fuel.
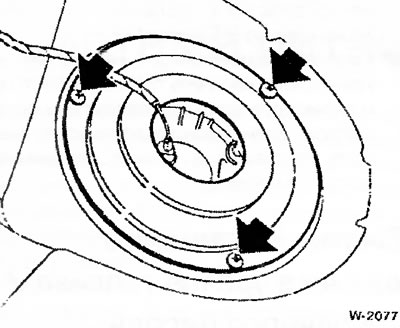
Remove the fuel pump bracket (black case 1). Remove the fuel pump from the glass (white case) with dovetail guide.
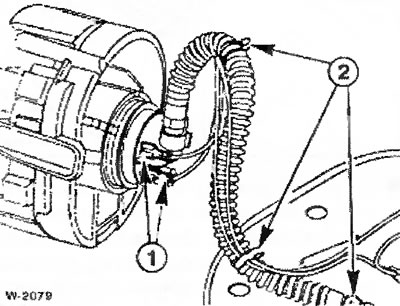
Disconnect both connectors "1" from the fuel pump.
Loosen the clamps "2". Loosen the hose clamp with the protective spiral braid and carefully remove it from the fuel pump.
Unscrew cover "2", see figure W-2066.
Disconnect the plug from the fuel level sensor. To remove, squeeze the retaining tabs.
Disconnect the fuel hose from the fuel level sensor, having first loosened the worm or clamp clamp.
Carefully loosen the union nut using the special tool BMW 161020. If you do not have a special tool, you can use a strong wooden rod.
Pull the fuel level sensor up a little. Press the two retaining tabs of the fuel pump pipe from the bottom and remove the pipe. Remove the fuel level sensor. Before removing, put a rag down and collect the leaking fuel.
Left fuel level sensor: insert the sensor and hold it above the fuel tank at a height of approximately 5 cm. Secure the fuel pump pipe.
Attach the fuel pump to the fuel level sensor and connect the connectors.
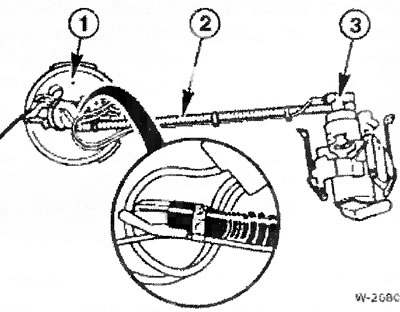
Before installation, the hose is equipped with a protective spiral braid (spare part black with white marks) and straighten the wire "2" between the fuel level pilot "1" and the fuel pump "3" to avoid stress.
Turn the fuel level sensor to the correct position, so that the protrusion on the top of the sensor fits into the recess on the fuel tank. The sensor should be positioned vertically in the fuel tank, with its lower part fitting into the guide located on the bottom of the tank.
Attach the union nut and tighten it to 35 Nm. The nut should be fixed with a clearly audible and perceptible click relative to the protrusion on the tank.
Install the fuel hoses according to the marks and tighten with new clamps.
Insert and secure the electrical plugs.
Place and secure the lid, paying attention to the correct position of the sealing gasket.
Install the rear seat.
Connect the negative (-) battery cable. Set the clock and tune the radio to transmitting stations.
Check the operation of the fuel level indicator on the instrument panel.
(The original article is located on: «BMWMan.ru»)
Removal
Ensure perfect ventilation of the work area. Fuel vapors are toxic, no open flames, no smoking, fire hazard! Have a fire extinguisher ready.
Caution: When removing the fuel level sensor, the fuel tank must be empty. Therefore, the tank contents must either be used up during a trip or sucked out with a suitable pump into a suitable large container. Fuel vapors are toxic, do not inhale. If possible, carry out work outdoors or ensure good ventilation.
Disconnect the negative (-) battery cable. The battery is located in the luggage compartment behind the right side trim.
Caution: This will erase the contents of memory devices, such as the engine fault code memory. Follow the instructions in Chapter "Removal and installation the battery".
Remove the rear seat.
Fold back the rubber insert on the left or right under the rear seat. Cut the insulating mat along the perforation line with a sharp knife and fold it back.
Unscrew the lid and remove it together with the sealing ring.
Removal the right fuel level sensor together with the fuel pump
Unscrew cover "1".
1 - fuel pump plug connector;
2 - fuel level sensor plug connector;
3 - fuel supply hose to the fuel pump;
4 - hose to the autonomous heating system (if there is one).
Disconnect the plugs of connectors "1" and "2". To disconnect, squeeze the retaining tabs.
Mark fuel hoses "3" and "4" with tags and disconnect from the fuel level sensor, after first releasing the worm or clamp clamps.
Caution: The fuel system is under pressure, so remove the fuel hose slowly and, if possible, collect any splashed fuel with a rag.
Carefully loosen the union nut "5" using the special tool from BMW 161020. If you do not have a special tool, you can use a strong wooden rod.
Caution: No sparks should occur when releasing.
Pull the fuel level sensor up, tilt it to the side and remove it. Before removing it, put a rag down and collect the leaking fuel.
Remove the fuel pump bracket (black case 1). Remove the fuel pump from the glass (white case) with dovetail guide.
Disconnect both connectors "1" from the fuel pump.
Loosen the clamps "2". Loosen the hose clamp with the protective spiral braid and carefully remove it from the fuel pump.
Note: The tie-down clamps are positioned at the white marks, please pay attention during subsequent installation.
Removal the left fuel level sensor
Unscrew cover "2", see figure W-2066.
Disconnect the plug from the fuel level sensor. To remove, squeeze the retaining tabs.
Disconnect the fuel hose from the fuel level sensor, having first loosened the worm or clamp clamp.
Caution: The fuel supply system is under pressure, so remove the fuel hose slowly and, if possible, collect any splashed fuel with a rag.
Carefully loosen the union nut using the special tool BMW 161020. If you do not have a special tool, you can use a strong wooden rod.
Caution: No sparks should occur when releasing.
Pull the fuel level sensor up a little. Press the two retaining tabs of the fuel pump pipe from the bottom and remove the pipe. Remove the fuel level sensor. Before removing, put a rag down and collect the leaking fuel.
Installation
Caution: The fuel level pilot sealing rings must be replaced.
Left fuel level sensor: insert the sensor and hold it above the fuel tank at a height of approximately 5 cm. Secure the fuel pump pipe.
Right fuel level sensor
Attach the fuel pump to the fuel level sensor and connect the connectors.
Before installation, the hose is equipped with a protective spiral braid (spare part black with white marks) and straighten the wire "2" between the fuel level pilot "1" and the fuel pump "3" to avoid stress.
Turn the fuel level sensor to the correct position, so that the protrusion on the top of the sensor fits into the recess on the fuel tank. The sensor should be positioned vertically in the fuel tank, with its lower part fitting into the guide located on the bottom of the tank.
Attach the union nut and tighten it to 35 Nm. The nut should be fixed with a clearly audible and perceptible click relative to the protrusion on the tank.
Install the fuel hoses according to the marks and tighten with new clamps.
Insert and secure the electrical plugs.
Place and secure the lid, paying attention to the correct position of the sealing gasket.
Install the rear seat.
Connect the negative (-) battery cable. Set the clock and tune the radio to transmitting stations.
Check the operation of the fuel level indicator on the instrument panel.
(The original article is located on: «BMWMan.ru»)
This article is available at russian, bulgarian, belarusian, ukrainian, serbian, croatian, romanian, polish, slovak, hungarian
Article verified: Ilyinsky Matvey
Share information:
Previous articles
БМВ E39: Supply system
Next articles
Similar articles on other types of BMW cars:
Removal and installation the fuel level sensor / fuel pump BMW 3 Series E46 (1998-2006)
Removal and installation, checking of fuel level sensor BMW 3 Series E30 (1982-1994)
Fuel/Fuel Pump Sensor — Removal and Installation BMW 7 Series E32 (1986-1994)
Removal and installation the fuel pump BMW 7 Series E38 (1994-2001)
Removal and installation the fuel filler cap BMW X3 E83 (2003-2010)
Fuel level indicator sensor BMW X5 E53 (1999-2006)
Link in different formats to this page
Visitor comments
No comments yet
- General information
- Governing bodies
- Manual
- Maintenance
- Power unit
- Engine repair
- Lubrication system
- Cooling system
- Ignition system
- Supply system
- Injection system (gasoline)
- Injection system (diesel)
- Exhaust system
- Transmission
- Clutch
- Car gearbox
- Front axle
- Rear axle
- Chassis
- Steering
- Brake system
- Wheels and tires
- Body
- Interior
- Exterior
- Heating system
- Electrical equipment
- Equipment and devices
- Power devices
- Windscreen wipers
- Electrical circuits
- General information
- Manual
- Maintenance
- Power unit
- Engine repair
- Ignition system
- Engine lubrication system
- Cooling system
- Fuel system (gasoline)
- Fuel system (diesel)
- Exhaust system
- Transmission
- Clutch
- Car gearbox
- Chassis
- Front and rear suspension
- Steering
- Brake system
- Body
- Exterior
- Interior
- Electrical equipment
- Heating system
- Equipment and devices
- Power devices
- Electrical circuits
- General information
- Manual
- Maintenance
- Power unit
- Engine in a car
- Engine overhaul
- Cooling system
- Supply system
- Ignition system
- Control system
- Transmission
- Clutch
- Manual gearbox
- Automatic gearbox
- Transmission line
- Chassis
- Steering
- Front suspension
- Rear suspension
- Brake system
- Body
- Body elements
- Car care and painting
- Electrical equipment
- Heater and air conditioner
- Equipment and devices
- Starter and generator
- Electrical circuits
- General information
- Operation and maintenance
- Specifications
- Power unit
- Engine repair
- Cooling and lubrication system
- Supply system
- Ecotronic power supply system
- Fuel injection system
- Ignition system
- Transmission
- Clutch
- Gearbox BMW 242/4
- Gearbox Getrag 262/8
- Gearbox Getrag 265/6
- Automatic gearbox
- Cardan gear
- Rear axle
- Chassis
- Steering
- Front suspension
- Rear suspension
- Brake system
- Electrical equipment
- Equipment and devices
- Electrical circuits